Section breaks, headers, footers, and page numbering
These instructions will help you learn to add headers, footers and page numbers to your documents. You will learn to select a different header and footer for the first page of the document. You will also learn to create different headers and footers within the same document using section breaks.
Note: These instructions are an excerpt of Luther Maddy’s Word workbook. This full text is available in printed or eBook format from Amazon.com
Different headers, footers, and page numbering in the same document
A header is text that will appear at the top of several pages.
A footer is text that appears at the bttom of several pages.
Centering text vertically on the page
When you use headers and footers, you are usually creating a document that exceeds two pages. A good example of a document that would use headers and footers would be a large document that contains user documentation or a long report.
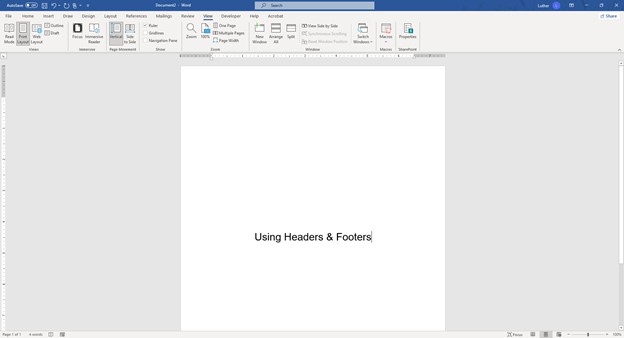
In this exercise you will create a title page. Title pages often have their text centered vertically and horizontally on the page. You will do that for this title page.
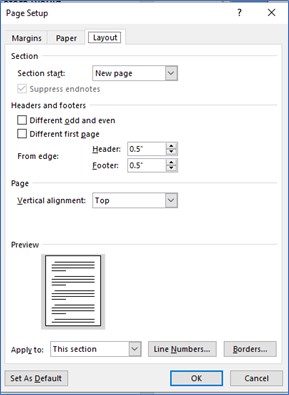
1. Create a new blank document if needed. Then, launch the Page Setup dialog box in the Page Layout Tab.
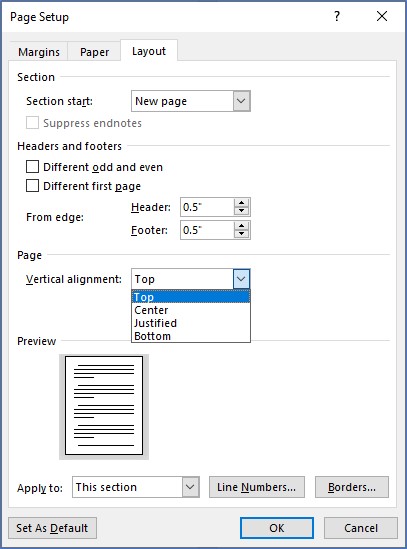
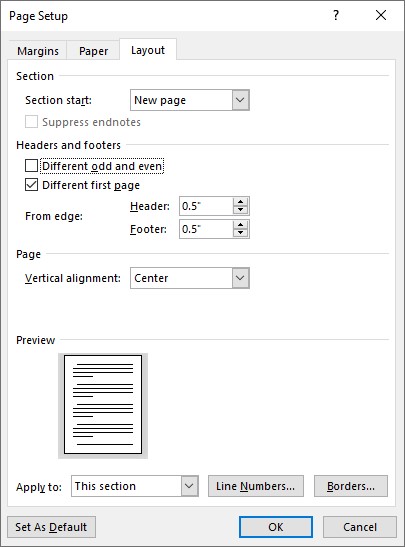
2. In the Page Setup dialog box, click the Layout Tab.
3. Here, click the Vertical Alignment drop down list button and choose Center. Click OK when done.
4. Change the font size to 24 points and change the horizontal alignment to Center, type: Using Headers & Footers and then press (Enter).
Working with Section Breaks
If you create a normal page break with (Control+Enter) or fill up the page with text, the next page will have the same formatting as the previous page. Since you do not want the second page of this document to have the text centered vertically, you will need to change this formatting option. To do this, you will need to insert a Next Page section break.
To change Page formatting options within the same document you must create another section in the document. Word can change formatting section by section. After creating a section break, you can then change the formatting of the new section.
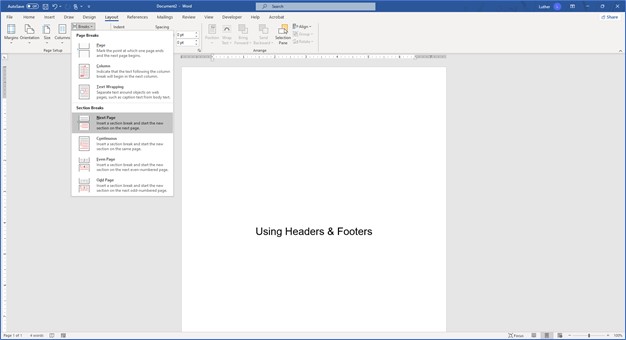
1. Click the drop-down list for the Breaks tool in the Page Layout tab.
2. In the Breaks submenu, click Next Page.
Viewing Document Sections
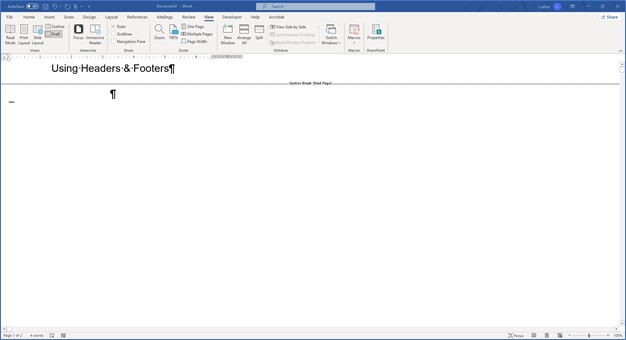
You have now separated this document into two sections. You can verify this in a couple ways. You can modify the Status Bar to show you document sections, and/or you can view your document in Draft View. You will now try both of these methods.
1. Display the View tab and choose Draft in the View section.
You should see that the section break is clearly displayed on the screen.
2. Click the Print Layout tool to turn to that view.
You will now change the status bar display to show you document sections.
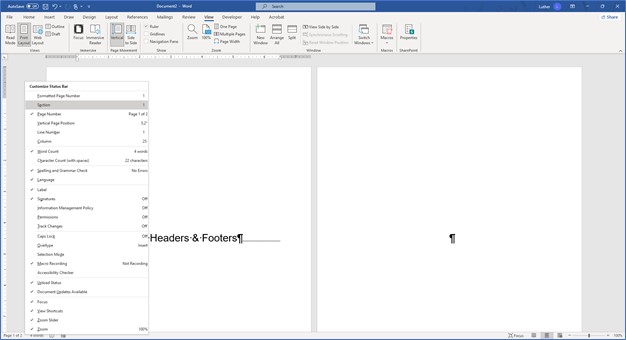
3. Right+click on the Status Bar and turn on the Section option.
4. Click in the document to close the Status Bar menu.
You should notice that Word has added a section indicator to your document. If you move from page 1 to page 2 you should notice that section number changes from 1 to 2.
Even though you have created a new section, the second page of this document still has the same formatting options as the page before it. It will center the text vertically on the page. You will now change these options back to the default values because you do not want them used on this page.
5. Ensure you are on page 2, then display the Page Setup dialog box again.
6. Choose the Layout tab and then change the Vertical alignment back to Top.
7. Click OK to close the Page Setup dialog box.
8. Now on the new page (page 2) you just created, change the Font size back to 12 and the Horizontal alignment back to Left.
9. On page two type:
Headers and footers are useful when you want the same text to show up on several pages.
Adding Headers and Footers
When you add a header or a footer, it will show up on every page in the document. Of course, you can change this. You add headers and footers by choosing the insert tab and selecting a header or footer in the Header and Footer box.
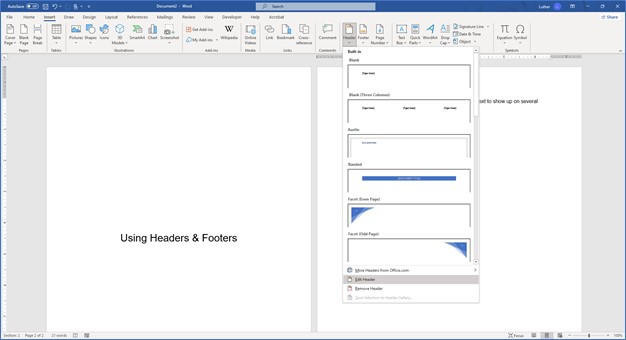
1. Display the Insert tab on the ribbon and select Header.
You should now several predefined header option. You will create your own header style for this exercise.
2. Choose Edit Header in the Header submenu.
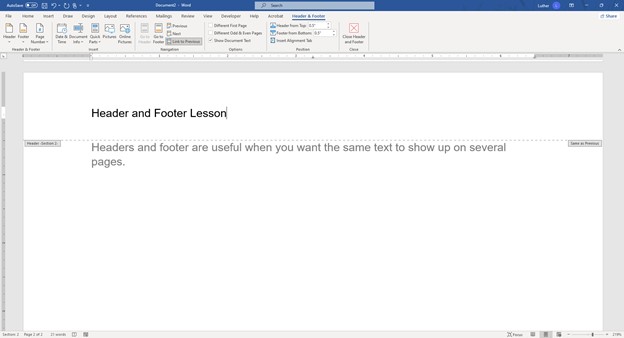
3. In the Header section of this document, type:
Header and Footer Lesson.
4. In the Navigation section of the Header & Footer tab on the ribbon, click Go To Footer.
You are now in the footer of this document. Here you can enter text or insert codes for page numbers and other information. You will now use some of these options for the footer.
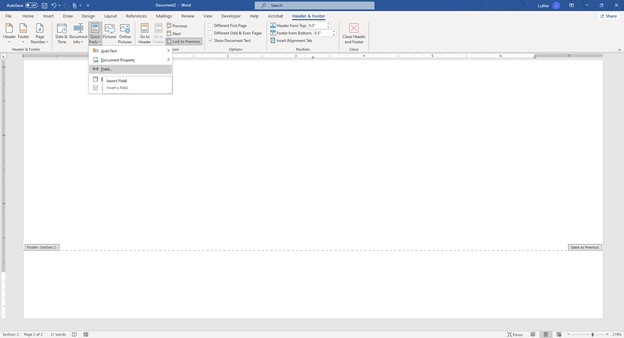
5. In the Insert section of the Header & Footer tools ribbon click the Quick Parts tool and choose Field...
6. From the list of fields, scroll down to and select Filename.
7. Ensure the Add path to filename option is selected and click OK.
Word will now insert the Filename and path for this document. Word inserts this as a code. Therefore, if the filename changes, Word will update the display in the footer. Because you have not yet saved this document, you will just see Document # in the footer.
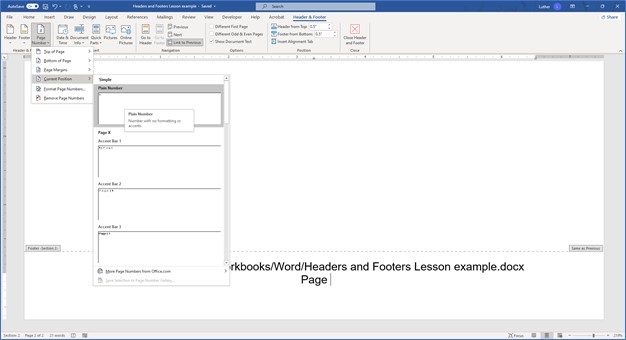
8. After inserting the Filename and path, press (Enter) and then press (Tab) to move to the center section of the footer. Here, type Page and then press (Space).
You pressed (Enter) to place the page number on a line below the path and filename. You did this in case the path and filename extends past the middle of the page.
9. Next, locate and click the Page number tool in the Header and Footer section. From the submenu, choose Current Position and then Plain Number.
Inserting page numbers
Word will update the page number on each page of this document. You can insert page numbers without creating a header or footer first by using the Page Number button in the Insert tab on the ribbon. When you insert a page number, normally you would place them in a header or footer, but you can also have the current page number appear anywhere on the page.
10. Press (Tab) again to move to the right sections and then click the Date & Time tool in the Insert section of the Header & Footer tab.
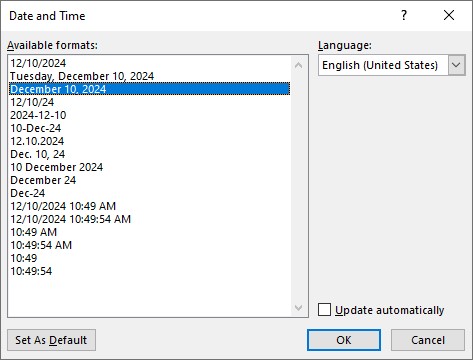
You should now see the Date and Time dialog box.
Like the page numbers and the Filename, Word will automatically change the date if you click the Update automatically check box. If you want a date that does not change every time you open or print the file, don’t select this option.
11. Choose the third option from the top in the Date and Time dialog box and click OK.
Word has now placed the current date in the right of the footer. It will not change unless you change it because you did not select the Update automatically option.
12. Click the Close Header and Footer tool to complete the header and footer entry.
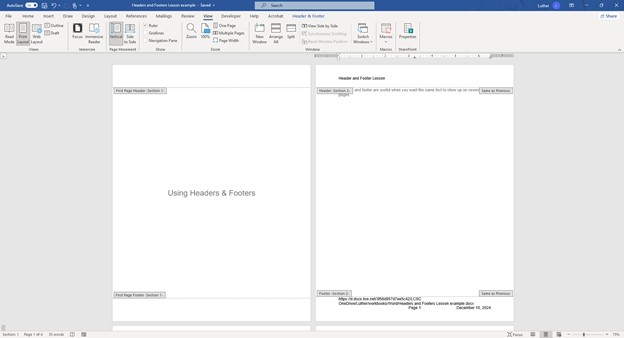
13. Examine the Header and Footer on page 2 using the Print Preview. After viewing, click Close Print Preview.
You will not see the path of the document until you save it.
14. Move to the top of the document with (Control+Home), then scroll up to the very top of page 1 of this document. You will have to use the vertical scroll bar to reach the very top.
You should now see the header at the top of the first page.
Selecting a Different First page Header and Footer
You should notice that the first page has the same header as page 2. If you scroll down to the bottom of page 1 you will see that it also has the same footer. This is because Word, by default, adds the same header and footer to the entire document. If this is not what you want, you will have to inform Word of your wishes. In this portion of the lesson you will eliminate the header and footer from the first page of this document.
1. Make sure the insertion point is on page 1. Then, open Page Setup dialog box from the Page Layout tab, and click the Layout tab.
2. In the Layout section click the Different first page check box in the Headers and Footers section. Click OK when done.
Now, if you scroll to the very top of page 1, you will notice that it no longer displays a header. The footer is also gone. You have not really eliminated the header or footer, you have simply told Word to display a different header and footer. And, since you have not placed any text in the header or footer for the first page, it appears blank, or empty.
3. Move to the end of the document and create a normal page break with (Control+Enter).
4. On the new page type:
The header on this page is the same.
The header and footer on this page is the same as the previous page. As it is now, this same header and footer will continue until the end of the document.
Changing the page number value
You will now tell Word to number page 2 as if it were Page number 1. This is typical of long documents, as the document should not really count the title page as page 1 for numbering and table of contents purposes.
1. Move to the top of page 2 with (Control+PageUp).
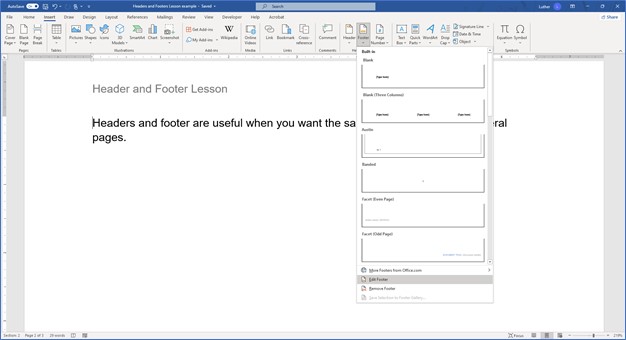
2. Display the Insert tab and click the Footer Tool, then select Edit Footer to display the footer.
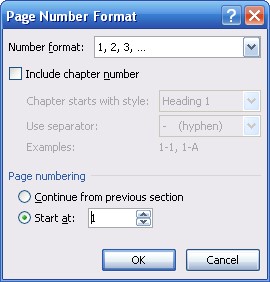
3. Remaining in the Footer, click the Page Numbers tool in the Header & Footer section, then choose Format Page Numbers.
4. In the Page Number Format dialog box, select the Start at: option and change the value to 1.
5. Click OK to leave the Page Number Format dialog box.
Word will now sequentially number the pages counting what used to be page 2 as page number 1.
6. Click the Close Header & Footer tool.
Creating different headers and footers
You have now come to the place in this document where you want another header. You want to keep the header as it is for these two pages, but you want subsequent pages to appear with a different header.
To do this you will need to create another section in this document. Then you will change the header for this section.
1. Move to the end of the document with (Control+End).
2. Create another Next Page Section break. (Breaks on the Page Layout tab).
You have now created a third section in this document. You can verify this by examining the status bar. This section can have different formatting options than the previous two sections. You will change the Header in this section.
3. On this new page, display the Insert tab and choose Header and then Edit Header.
4. Locate and click the Link to Previous tool in the Navigation section of the Header & Footer tools.
Turning off the Link to Previous option allows you to create a different header. If you did not turn this option off and changed the header, that change would show up on the previous section too.
5. Now, erase the current header and type:
Different header in this section
6. Click the Close Header & Footer tool.
7. Now, on the last page of the document, type:
Another document section, a different header.
Page numbering continuing from previous section
You have now created a document with three different headers. One for the first page and two for two different document sections. The text in the footer will be the same for both of these sections because you did not change it.
However, if you examine the footer on the last page, it will display page number 1 instead of 3. This is because Word, by default, restarts page numbering at the beginning of each new section. To continue with the current page numbering sequence, you will once again need to change the page number value.
1. Choose Footer and then Edit Footer from the Insert tab.
2. Click the Page Numbers and then Format Page numbers.
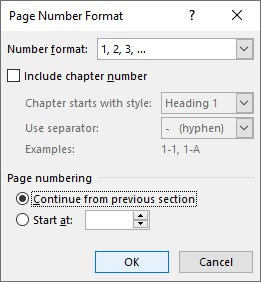
3. In the Page Number Format dialog box turn on the Continue from Previous section option and click OK.
This page should now display 3 instead of 1.
4. Close the Header Footer edit. Save this document as Header exercise and then close it.
5. After closing this document, open it again.
6. Using Print Preview, examine the footer that begins on the second page.
The footer should now display the updated filename and path.
7. Scroll through the various pages of this document and examine the headers and footers. When done, close Print Preview and the document.
Sponsored Ads
2067
