Mail Merge
Note: These instructions are (C) 2024 Luther M. Maddy III and are an excerpt of Luther Maddy’s Microsoft Word the Basics. This full text is available in printed or eBook format from Amazon.com
Creating Main Documents and Data Files
The process of merging combines: a Data Source File and a Main Document. The Data Source contains information such as names and addresses. The Main Document contains everything in the document except data like the name and address of the recipient.
The result of a merge is usually several documents with different names, addresses or other information. Form letters are a good example of merged documents. In this exercise you will create both a data file and a form file and them merge the to create form letters.
Video-Mail Merge in Microsoft Word
Video-custom emails with Mail Merge
1. Click the Mailing tab in the MS Word ribbon.
Mail Merge - sample data file
Mail Merge - sample letter
Printable Instructions - Mail Merge
2. Next, click the Start Mail Merge tool and select Letters from the drop down list.
The next step is to inform Word what to use as the data for the letters you are creating. In this exercise you will create a new data source. You could use an existing data file created in Word, Excel or Access by choosing the Use an existing list option. In this example, we will create a data file in Microsoft Word.
3. Now, click the Select Recipients and choose Type New List… from the drop down menu.
Creating a data source
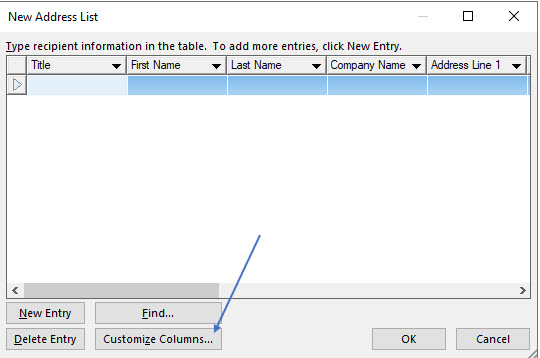
You will now see the New Address List dialog box. Here you can simply start filling in names and addresses. Or, you can modify the field list if you want to add or delete fields. The fields are the most basic element in a data source and are what you will put
into the "blanks" in your form letters. When structuring your own data files, fields should contain one piece of information only. In other words, separate the first and last names as well as the City, State and Zip into separate fields. Doing so will allow you to easily select which data records will receive letters.
Customizing the field list
Word gives you a suggested field list. You can remove the fields you do not wish to use. You can also add your own fields. To remove or add fields, you will click the Customize Columns button. Word will then take you to the Customize Address List dialog box where you can modify fields.
1. In the New Address List dialog box click Customize Columns.
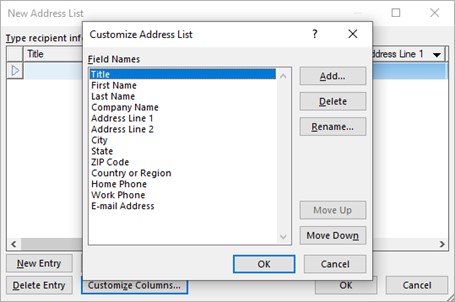
You will now see the Customize Address List dialog box. Here you can add, delete or rearrange fields.
2. In the Customize Address List, click on Title and then click Delete.
You will now be asked if you are sure you want to delete this field. If you answer Yes, your data source will not contain this field.
3. Answer Yes to remove the Title field.
Removing a field after you have already entered data could result in lost data, as this message is warning you.
4. Also remove the Company Name, Country or Region field from the field list.
When creating your own data files remember that you don't have to use every field in every form letter. You are leaving the email address so we can use MS Word’s merge feature to send out emails to customers.
Try to structure your data files so you can use them over and over with many different letters, envelopes or labels.
Adding Fields:
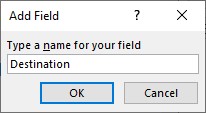
You can add your own fields to the data file. To add a field, click the Add button in the Customize Address List dialog box and then type the field name and click OK.
1. In the Customize Address List dialog box, click the Add button.
2. Type Destination in the Field name text box in the Add Field dialog box, and then click OK.
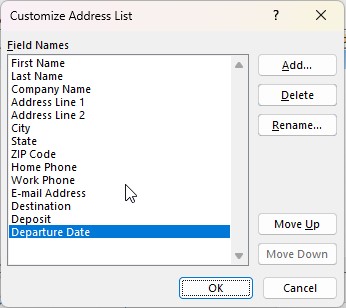
You should now see that field name added to the list of fields.
3. Add two more fields named: Deposit and Departure Date.
Word will allow field names to contain spaces. You may easily reorder the field names by using the Move Up and Move Down buttons.
4. Click OK after adding the new field names.
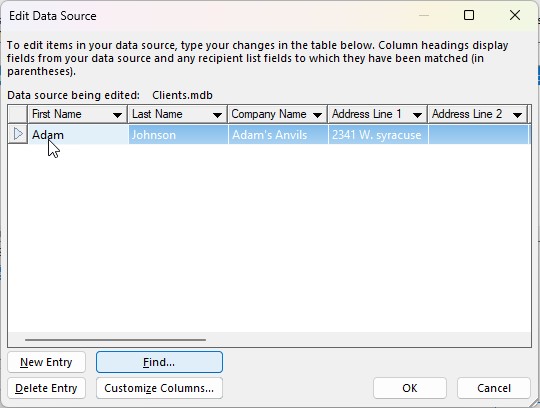
Now that you have determined and created the structure of your data source, the next step will be to fill in the information. Your data source can be dynamic, in that you will be able to add, delete and edit records in it in the future. You can do this by opening the data file in Word.
5. Click in the first name column and then add the following Record in the first row. Use Tab to move from field to field.
Adam Johnson
Adam’s Anvils
2341 W. Syracuse
Phoenix, AZ 94332 email: AdamJ99@gmail.com
Use Bangkok as the Destination, $200 as the Deposit Amount and 6/1/28 as the departure date.
After entering a record, pressing the Tab key will take you to the next new, blank row. We are skipping phone numbers just to speed up the data entry process in this example.
6. Click the New Entry button and enter four more records with the data as follows:
Be sure to separate the information into the proper fields.
7. After entering the last record, click OK.
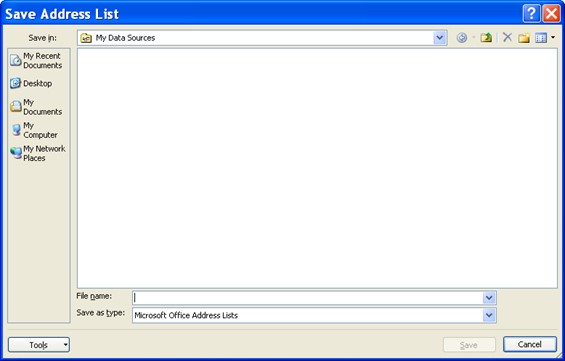
You will now see the Save Address List dialog box. Here you can name your data source.
8. Save the data file as Clients when prompted to save the file.
At this point you are naming the data file. Your data source files are actually saved as Access files with an (*.mdb) file extension. You will be able to use this data file with other form documents if you wish. You will also need to save this file again after entering data records.
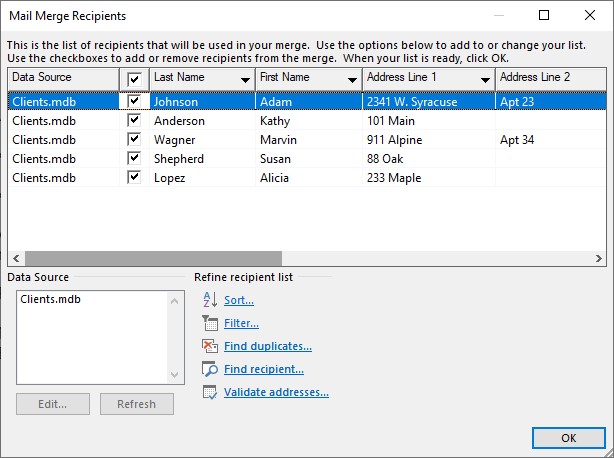
9. To make sure you have correctly entered all the records click the Edit Recipients List on the ribbon.
You will now see the Mail Merge Recipients dialog box. The image shows the list expanded to show all the fields. Here you can easily choose which records will receive the letter with the checkbox to the left of each record.
10. Click OK to close the Mail Merge recipients list.
Creating the Main Document (the Form letter)
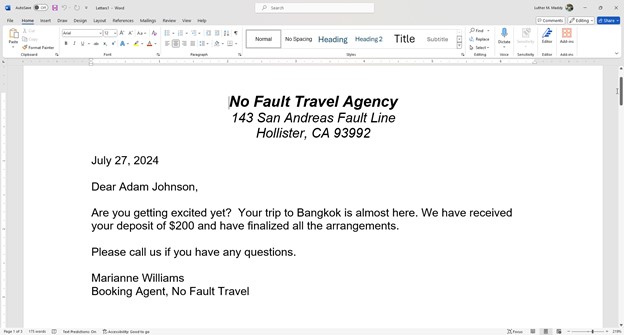
Now you will create the form letter. When you come to a location in the document where you need information from the data file, you will simply insert a merge field code. This code will cause Word to fill-in the blank with the information from that field in the data file. Each record in the data file, unless you specify otherwise, will have its own filled-in form letter.
1. Center and type the following:
No Fault Travel Agency
143 San Andreas Fault Line
Hollister, CA 93992
2. Press (Enter) twice after typing the zip code. Then change the Alignment back to Left.
Using the Date Code
This is where you would like the current date to appear on the letter. However, if you type the date it will remain the same and this main document will only be good for that date. Instead, you would like a date that updates each time you perform a merge. To do this, you will use a Field code to insert the date.
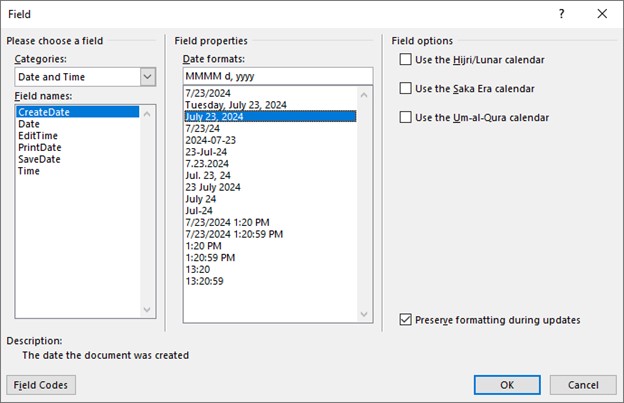
4. Click the Insert Tab and then click Quick Parts and choose Field.
You should now see the Field dialog box. Here you will select a specific category to narrow down the list.
5. Choose Date and Time in the Categories list.
6. In the Field names column, select CreateDate, if necessary, and then choose the third date format from the top and click OK.
You should now see the current date in the main document. Because you used the field code, each time you create form letters with this main document, this date will update.
7. Press (Enter) twice to move down the page.
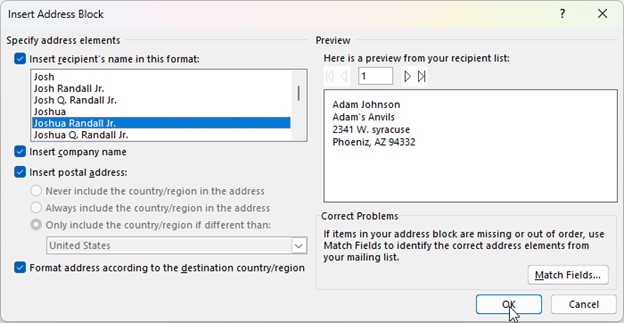
At this place in the letter, you will place the name and address of the letter's recipient. This information will come from the data file. To do this you will need to insert field codes representing the fields from the data file you just created. Using the Mail Merge Wizard will make this very easy.
8. Click the Mailings tab again and then click the Address Block tool.
The Insert Address Block dialog box displays several addressing options. It also shows a preview of the option you have selected.
9. Choose the fifth variation in the Insert Address Block dialog box and click OK.
You should now notice that Word inserted a merge code referring to the address block, formatted as you specified. When you merge, each record's complete name and address will appear at this location in the letter.
10. Press (Enter) twice to move down the page.
You are now ready for the salutation, or greeting line, in this letter.
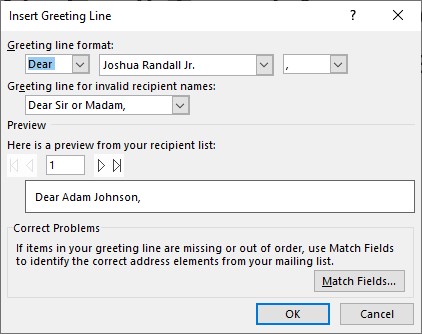
11. Click the Greeting line tool in the Write & Insert Fields group.
The Greeting Line dialog box allows you to specify exactly how you would like the greeting to appear and what fields from the data source you want to display.
12. Click OK in the Greeting Line dialog box to accept the defaults.
13. Press (Enter) twice to move down the page.
14. Begin the body of the letter by typing: Are you getting excited yet? Your trip to and then press (Space).
You have now come to a spot in the letter where you want to insert some information from the data source for each record. To do this you will have to insert an individual field.
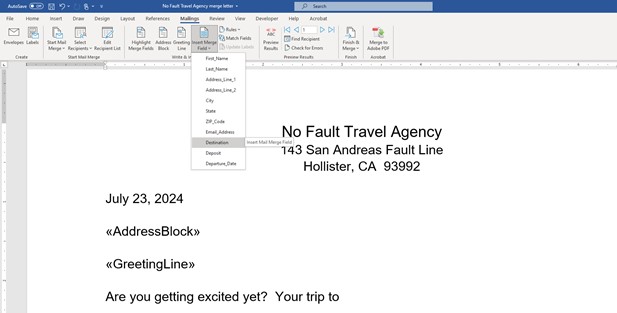
15. Click the Insert Merge Field tool on the ribbon in the Mailings tab.
You should now see a complete list of individual fields in the data source. Here you can choose the field, or fields, you need in any place in the letter.
16. From the list of merge fields, select Destination.
17. Press (Space) and then type is almost here and then end the sentence with a period (.) and a space.
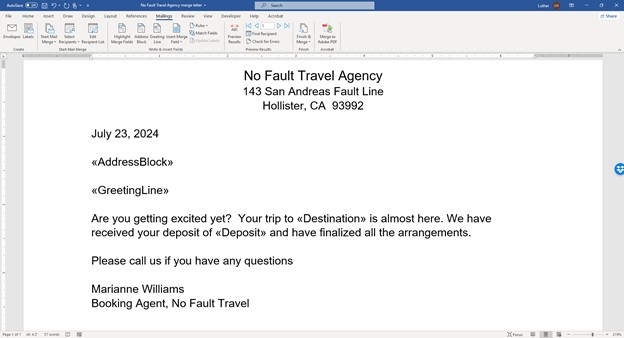
18. Create the rest of the letter as shown below. Insert a Merge field code for Deposit as indicated in the letter.
19. When done, save this as Booking Letter and close it.
Performing the Merge
After creating both a main document and a data source, you can now combine the two. By default, Word will create one form letter for each record in the data file. Since this is not always appropriate, you will learn in this lesson how to select certain records to be included in the merge.
The first step in performing the merge is to open the main document (form letter). You established a link between the main document and data source when you created the main document. Therefore, you won't need to specify the name of the data file to complete the merge.
1. Open Booking Letter and answer Yes when asked if you also want to open the database.
Word will now inform you that this document is linked to a database, the merge data file. Answer Yes to link the letter with the merge data file you created earlier.
2. If needed, click the Mailings tab on the ribbon.
The Mailings tab has some very useful tools. On this ribbon are options to select which records in the data source you want to include in the merge, and buttons to perform the merge to a new document, printer, fax or email.
Filtering Records
In this example, you do not want all records to get this letter. Sending this letter to someone who had not made a deposit would not be a good idea. You will use the filter option to choose only those records who have made a deposit.
3. In the Mailings tab, click the Edit Recipients List tool.
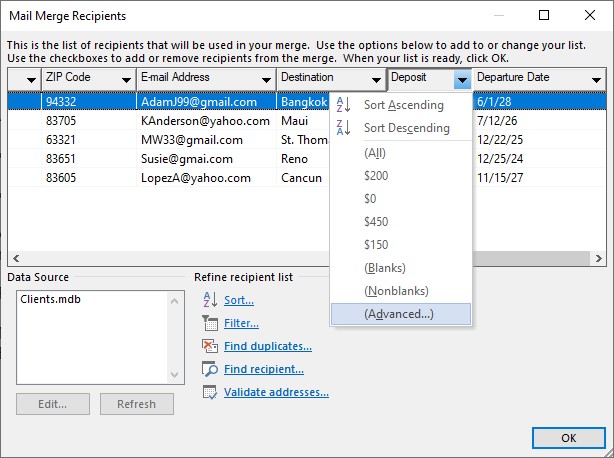
You should now see the Mail Merge Recipients dialog box. Here you can select records individually with the check box beside each record. Or, as in the case for this letter, you can specify a certain condition to select records to include in the merge. You can do this by choosing the filter option. You access the filter option by clicking the drop-down list button to the right of each column’s heading.
4. Scroll right until you locate the Deposit field column. Then, click the drop-down list arrow to the left of this field to display the filter options.
5. From the filter options for the Deposit field, click Advanced.
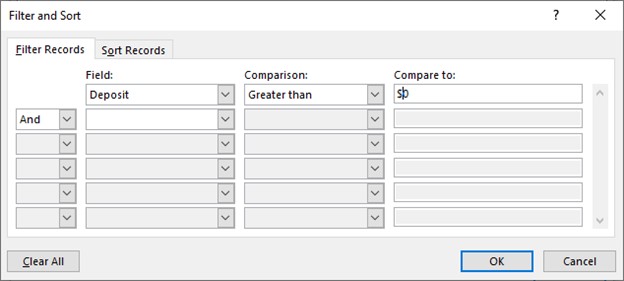
6. Ensure the Filter Records tab is selected. Then, click the Field drop-down list arrow and choose Deposit.
7. Choose Greater than as the Comparison and type $0 in the Compare to text box. Click OK when done.
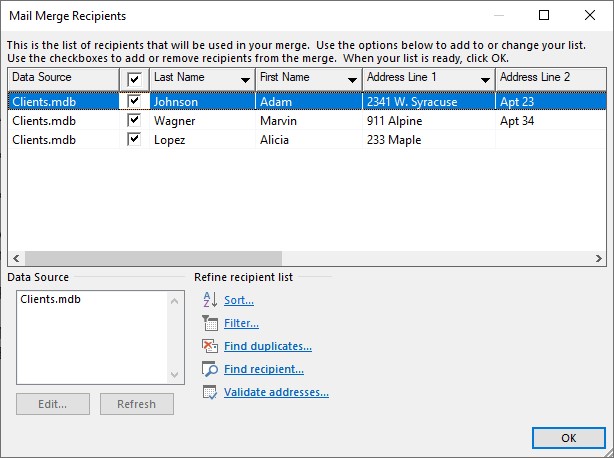
You have now told Word to exclude all the records in the data file that have not made a deposit. Word will only create letters for the records in the Client data file with a deposit. The Mail Merge Recipients dialog box displays the records that will be included in the merge.
8. Click OK to close the Mail Merge Recipients dialog box.
You are now ready to perform the merge.
9. Display the drop down list for the Finish & Merge tool and choose Edit Individual Documents.
When you merge, Word will create a new document that contains one page for each letter. One advantage of merging to a new document instead of clicking the Merge to Printer option is so that you can edit the individual merged documents if you want to.
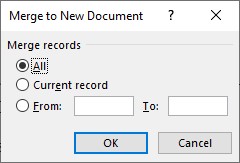
You will now see the Merge to New Document dialog box. Here, Word is asking one more time which records you would like to include in the merge. Since you already filtered the records, you will not make any changes here.
10. In the Merge to New Document dialog box, ensure All is selected and then click OK.
You should now see a new document consisting of three pages. Each page is a completed letter for each client who has made a deposit.
11. View the resulting merge documents, then close without saving.
Saving your changes will cause Word to save the filter you applied to the data file permanently. This means that the next time you display the list; you would only see those records with a deposit amount. To see all records again you would have to change the filtering on the data source.


