Creating and Formatting Tables
Word has many features that enable you to do a wide range of things to any document. This lesson will cover creating formatting tables inside of Word.
Note: These instructions are an excerpt of Luther Maddy’s Word workbook. This full text is available in printed or eBook format from Amazon.com
Creating and Formatting Tables
Word tables are very versatile. You can use them to draw attention to a portion of your document. Or, you can use tables as an easy way to put information in columns. You can even use tables to perform basic math operations. In this exercise you will create and then format a table. You will also create cells that compute values.
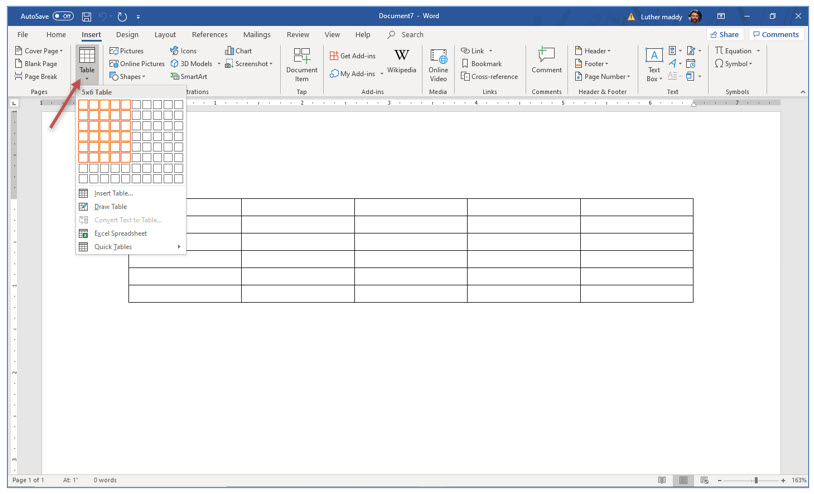
1. In a New Document, click the Table tool on the Insert tab. Then, click and drag down and right to create a table of 5 columns and 6 rows.
Merging cells
When you create a table, every cell (the intersection of a row and column) is of equal size. You will now merge all the cells in row one to create one large cell for the table’s title.
1. Select all the cells in row 1 of the table you just created.
You can select all these cells by clicking and dragging across them or by clicking in the selection area (left margin) just to the left of the first column.
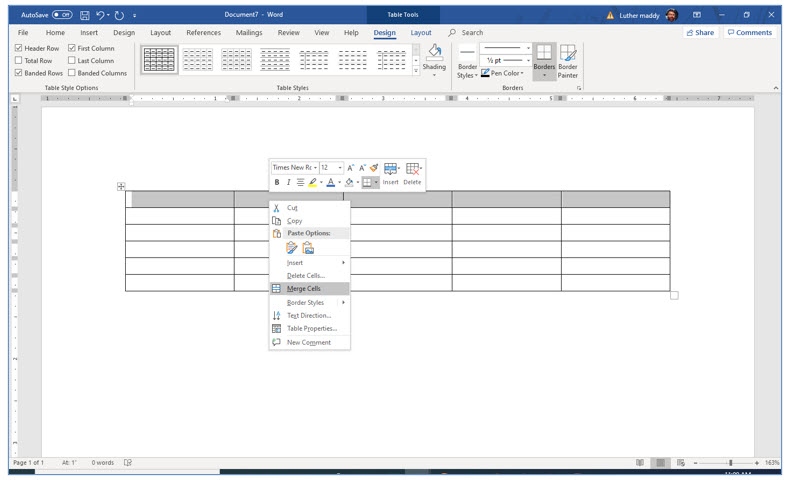
2. After selecting these cells, right-click in the selected cells. From the shortcut menu, choose Merge Cells.
The separation lines between the cells in the first row should disappear. All the cells in row one have merged into one, larger cell.
3. In the first cell in this table, click the Center tool on the Home tab and type:
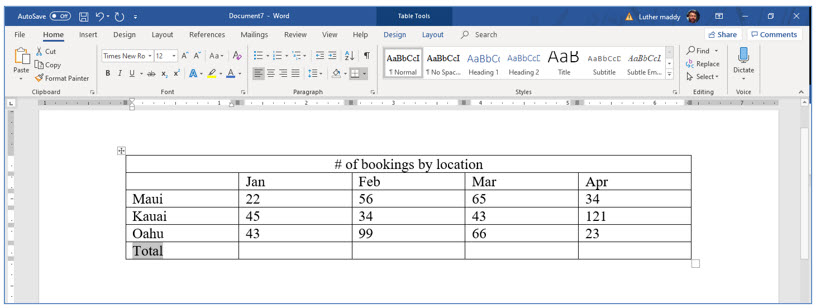
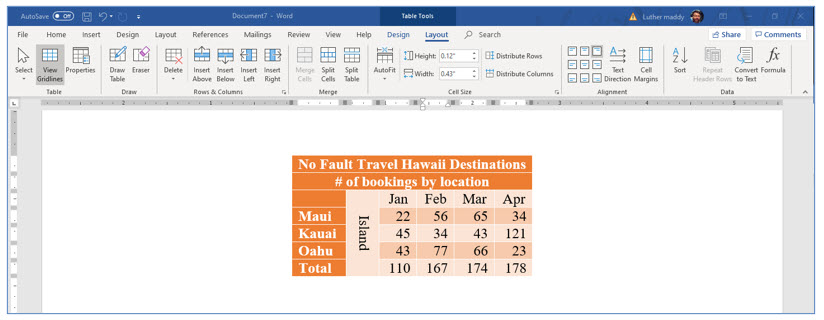
# of bookings by location
4. Press (Tab) to move into the next table cell.
The Tab key moves one cell forward each time you press it. Shift+Tab will move one cell backward. Pressing (Enter) in a cell causes it to grow larger horizontally. Should that occur, you can use the Undo command.
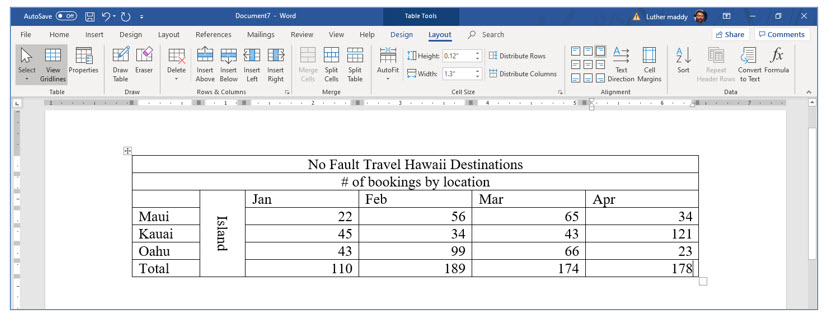
5. Fill in the table as shown in the figure above. Use (Tab) to move forward and (Shift+Tab) to move back cell by cell.
Inserting rows in a table
You can easily insert new rows in a table. If you need a new row at the end of the table, just press (Tab) in the last cell of the table. Word will then create a new row. If you need to insert rows elsewhere in the table you will use the Insert Row command.
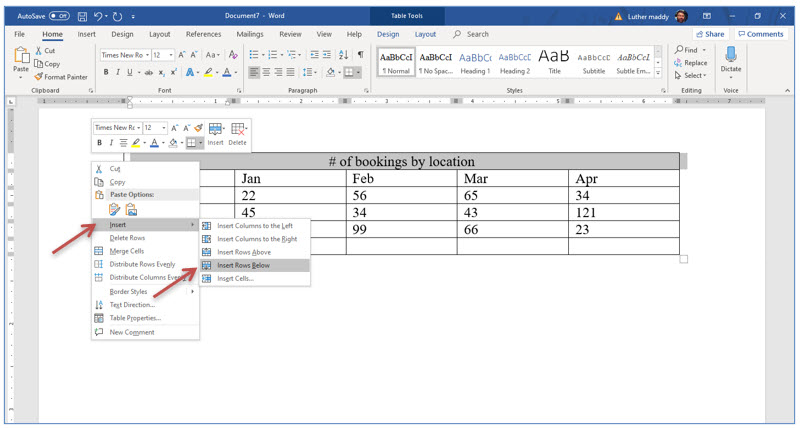
1. Move into the selection area just to the left of the first row (outside the table) and right-click. From the shortcut menu, choose Insert and then Insert Rows Above.
Word has now inserted a new row above the first row. Here you will enter an additional title. When you insert a row, Word will automatically copy the formatting from the row you right-clicked on. You should notice the newly inserted row has already been merged into one large cell.
2. Move into the new row at the top of the table and type:
No Fault Travel Hawaii Destinations
Splitting Table Cells
If you need to, you can spilt a cell or cells into more than one cell. You can do this by choosing the Spilt Cell command from the Table menu. You can also do it with the Draw Table tool. In this portion of the exercise, you will use the Draw Table tool.
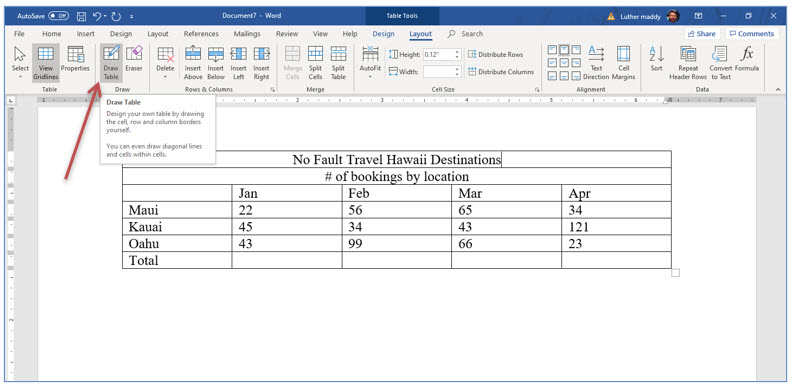
1. With the insertion point somewhere in the table, click the Layout tab in the Table Tools section. Then, click the Draw Table tool.
The draw table tool provides a very quick way to split several cells as you are about to do. To do this you simply click and drag where you want to new cells to appear after selecting the Draw Table tool.
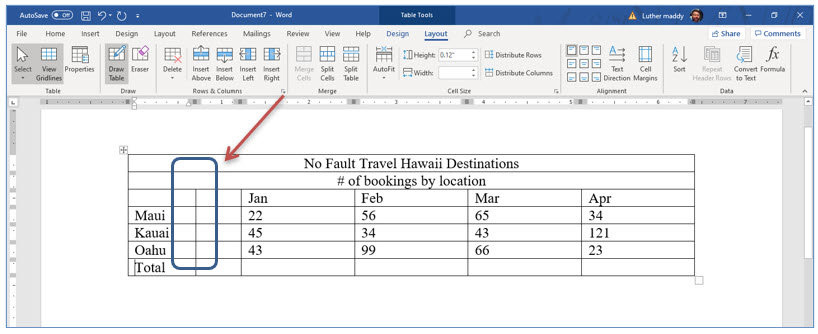
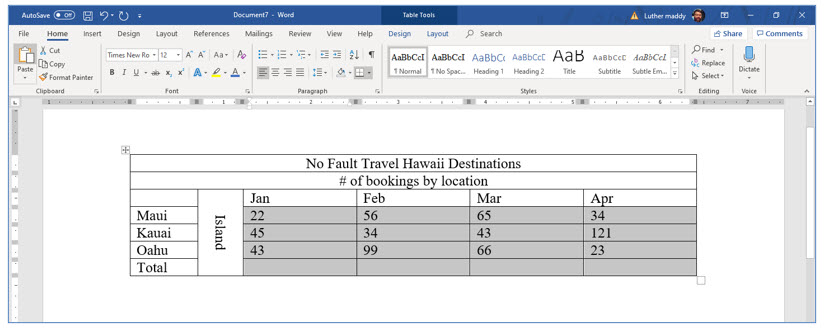
2. Use the Draw Table tool and draw a line to the right of the destinations, beginning in the cell above Maui as shown in the figure below.
3. Turn off the Draw Table mode by clicking the Draw Table tool again.
If you don’t turn off the draw table tool, Word will attempt to create table cells wherever you click. You will now merge the new cells you created into one, larger cell.
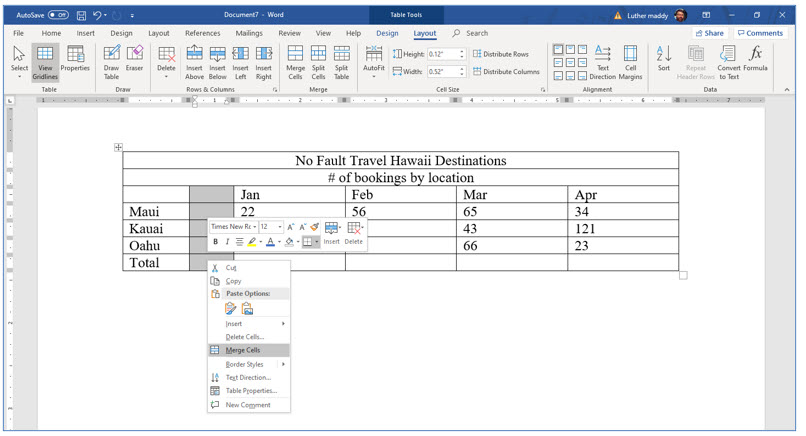
4. Select all the cells in the new column you just created.
5. Right-click in the selected cells and chose Merge Cells from the shortcut menu.
6. In this newly merged cell type: Island
Changing Text Direction
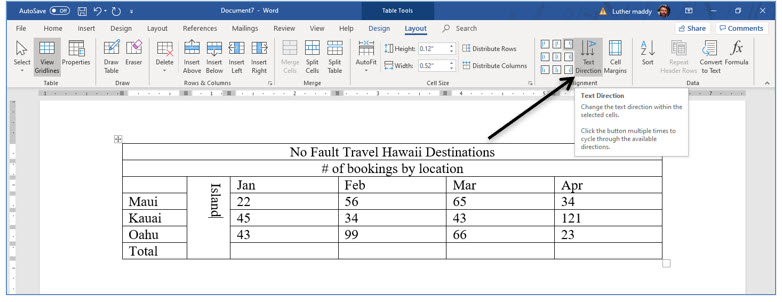
The text may not fit well in this cell. You could increase the size of this column to make the text fit. However, you will instead rotate the text to make it fit in the cell. You can change the text direction in a cell easily using the Text Direction tool on the Layout tab.
1. Staying in the cell where you just typed Island, display the Layout tab and then click the Change Text direction tool.
The text in this cell now goes down instead of across in the cell.
2. Now, click the Center tool on the Home tab.
The text is now centered vertically in the cell.
Table Cell Alignment
If you examine the cell that contains the word Island, you should notice the text is not perfectly aligned in the cell. You have centered the text horizontally, which appears to be centered vertically because of the change in the text direction. Now, you will change the vertical alignment of this cell. And, because of the change in text direction, the change will appear as a horizontal change rather than vertical. However, this should all make sense after you complete the command.
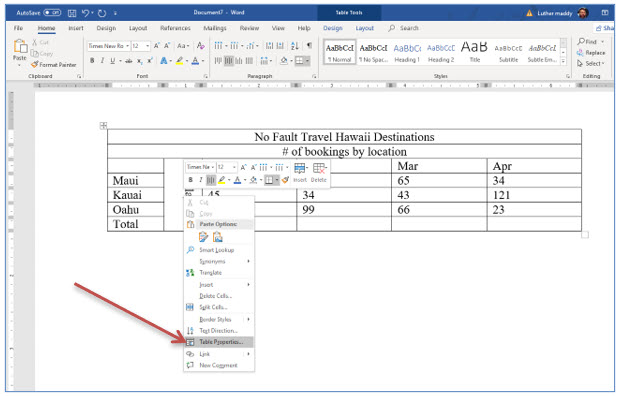
1. Right-click in the cell containing the word Island and choose Table Properties from the shortcut menu.
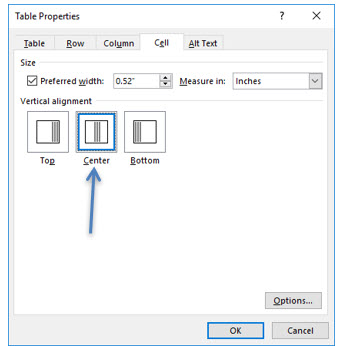
You should now see the table properties dialog box. Here you can change many attributes of the table, rows, columns or individual cells. For now, we’ll use this to change the vertical alignment of this cell.
2. In the Table Properties dialog box, click Cell to display Cell properties. Then, click Center in the Vertical alignment section and click OK.
You should now notice that the text in this cell is centered both horizontally and vertically.
Formatting the Table
You can easily add formatting options to tables. In this portion of the exercise you will change cell alignment, shade rows and rotate text.
1. Select all the cells that have numbers in them. Select the row that will have totals too as shown.
2. With these cells selected, change the alignment to Right, with (Control+R).
Of course, you could use another way to change the alignment, such as the Ribbon, and achieve the same results.
Table Formulas
You can create basic formulas in table cells. In this lesson you will create a formula that computes the total of trips booked for each month. To do this you will use the Formula option in the Table Layout tab.
1. Display the Layout tab of the Table Tools, then move into the cell that will display January’s total.
2. Click the Formula tool on the Layout tab.
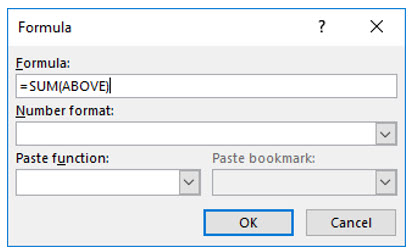
You should now see the Formula dialog box. Here you can enter a formula to do basic math within a table cell.
3. Make sure the formula reads =Sum(Above) in the formula text box and click OK.
This formula tells Word to add up all the numbers above it, which in this case is exactly what you want this formula to do. There are other functions in Word, and you can create formulas that are fairly complex. We will save this for another course. If you have many formulas to compute, you may want to consider creating them in Excel and then copying the table into Word.
4. Move to the bottom of the next column and click the Formula and then OK to enter the same formula there too.
5. Repeat this process for the remaining totals.
You should now see computed totals for every month.
Updating table formulas
If you have used a spreadsheet like Excel, you may be used to having computed values change automatically. This is not the case in Word. Formulas in tables do not update when values change. If you make changes in values used in a formula in a Word table, you have to manually inform Word to recalculate the value.
In this portion of this lesson you will change a value and then update the formula to reflect the changed value.
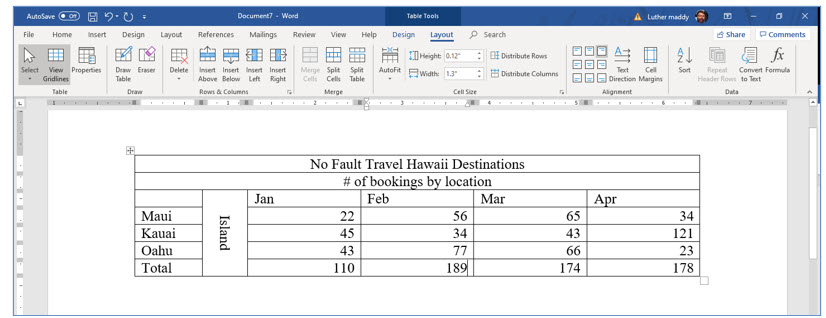
1. Change the value for February trips to Oahu from 99 to 77.
You should notice the Word did not update the computed value. And, because of this, it reflects a value that is now incorrect. You will now inform Word to recompute or update this value.
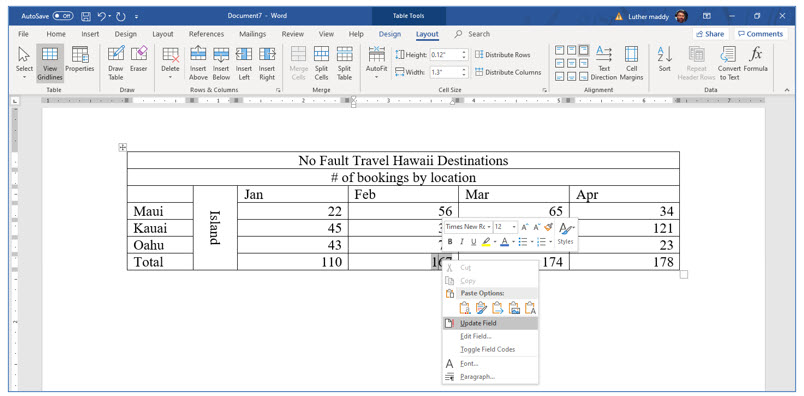
2. Right+click in the cell that contains the total for February and choose Update Field from the shortcut menu.
You should notice that Word updated the value and it is now correct. There is no need to do this for the other totals, unless you change a value that total uses in its computation.
Now you will explore so options for improving the appearance of this table.
Using the Table Styles
Word provides many preformatted Table styles to choose from. You can always manually change the borders and shading if you like, but using a preformatted style can be much faster.
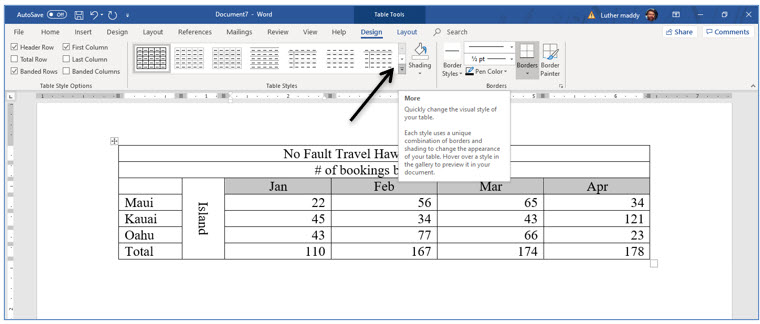
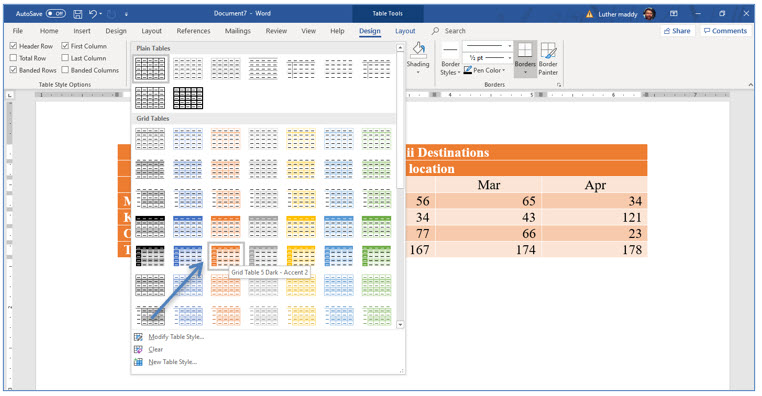
1. Center the month names using the Center tool on the Home tab then, display the Design tab and click the More down arrow in the Table styles section.
2. From the list of Table Styles, scroll down to and select Grid Table 5 Dark Accent 2.
The exact table style you apply here will not matter that much. Go ahead and experiment if you like. If you apply a table style and later change your mind, you can apply any other style from this list. When you do, the existing style is completely erased and the new style takes over.
Changing Column Widths
If you examine this table closely you may notice that the columns do not need to be as wide as they are. In fact, making the width of the columns with the numbers smaller would probably enhance the appearance of this table. There are, of course, several ways to change the width of a column within a table, but for this exercise we’ll have you use the Auto Fit method.
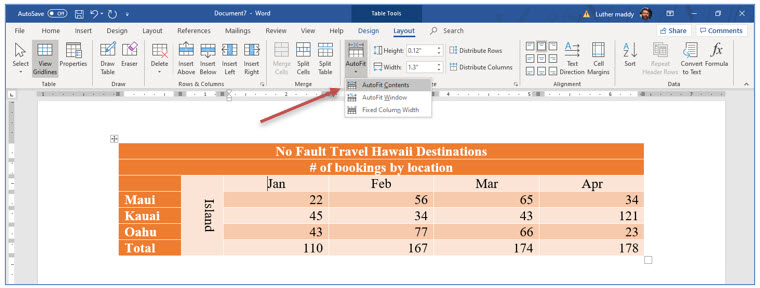
1. In the Layout tab click the Autofit tool and choose AutoFit Contents.
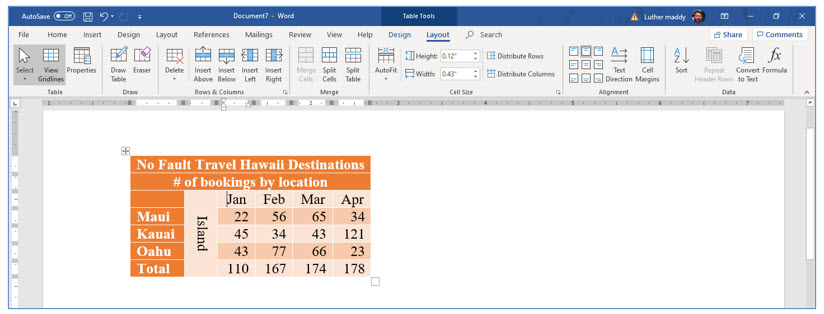
You should notice that the table is much smaller as Word adjusted each column to fit the width of the text within it.
Now you’ll center the table on the page by using the Table Properties dialog box.
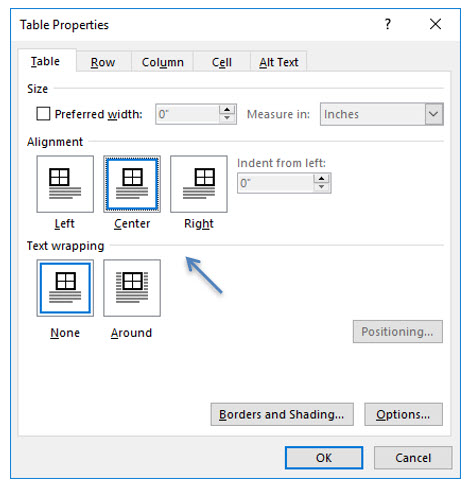
2. Right-click in the table and choose Table Properties from the shortcut menu.
3. Click the Table tab to ensure the Table properties are showing then click the Center tool in the Alignment Section.
You are telling Word that you want the table to be in the center of the page rather than aligned with the left margin.
4. Click OK when done.
The table should be horizontally centered on the page.
5. Save this as Hawaii Destinations and close it.
Sponsored Ads
2043
