Find, Replace and Thesaurus
Word has many features that enable you to do a wide range of things to any document. This lesson will cover using the Find and Replace tool as well as using MSWord's built in thesaurus.
Note: These instructions are an excerpt of Luther Maddy’s Word workbook. This full text is available in printed or eBook format from Amazon.com
Find and Replace
Finding Text
The Find command does what the term implies. It finds text. You can use it as a "go to" command to find a particular heading or phrase quickly in your document.
Replacing Text
The Replace command finds text and lets you change it to something else. This command is useful when you have, for example, consistently misspelled a name throughout the document.
The Replace command provides you the option of replacing every occurrence of the text automatically or choosing which occurrences you want to change and which you do not.
In this exercise you will use the replace command to change the travel agency's name from No Fault Travel to Faultless Travel.
1. Open the file named Johnson Travel Confirmation letter.
The first page of this document is now the envelope you created in the last lesson. You will now move down to the second page, the beginning of the letter itself to being the Find operation.
2. Move to the top of page 2 (the letter) by pressing (Control+Page Down).
You may recall when you open a document in Word, it always places the insertion point at the beginning of the document. If this shortcut does not take you to the second page, just move there yourself. You will rest this command shortly.
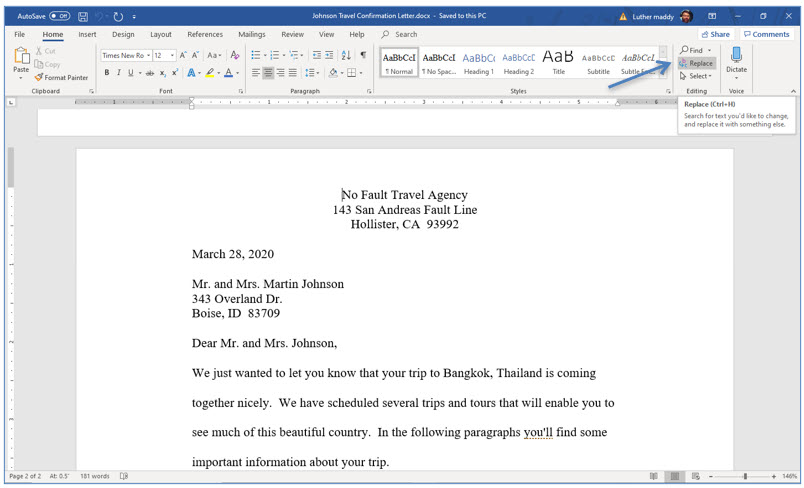
3. Click the Home tab and then click the Replace tool (far right) on the Ribbon.
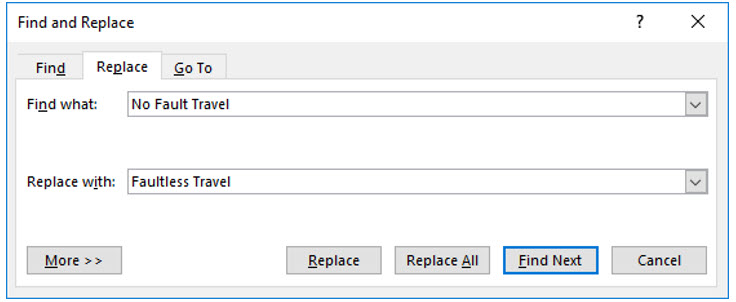
4. In the Find what section of this dialog box type No Fault Travel and press (Tab).
5. In the Replace with section of this dialog box, type Faultless Travel.
After specifying the text to find and the replacement text, you then must decide to replace all occurrences, or just the ones you choose. Clicking Replace All will replace every occurrence of No Fault with Faultless.
If you are unsure you want to change every single occurrence, then you would click Find Next. After finding the next occurrence of No Fault Travel in the document you could then choose to replace that one instance by clicking the Replace button. If you do not want to replace that specific occurrence, you would click Find Next to find the next time that text appears in the document.
6. Click Replace All.
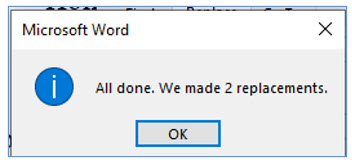
7. Click OK when Word informs you how many replacements it made. After this, close the Find and Replace dialog box.
You have now effectively changed the name of this company with one command. Scroll through the document to verify that all occurrences of this text have changed.
Using the Thesaurus
The Thesaurus allows you to find synonyms for words appearing in your document. To use the Thesaurus, move the insertion point into the word for which you want to find a synonym. Then, display the Review tab and choose Thesaurus in the Proofing group. You can also quickly display synonyms by right clicking the word.
The Thesaurus will then display synonyms for that word. You then have the option of replacing that word with one of the listed synonyms, or you can lookup synonyms for any of the suggestions.
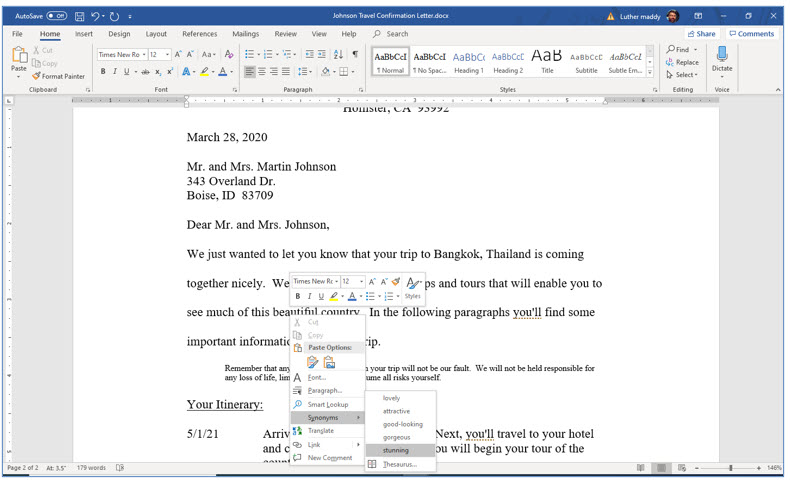
8. Move the insertion point into the word beautiful near the end of the first paragraph and Right-click.
9. From the sub-menu that appears, choose Synonyms.
You will now choose one of these synonyms.
10. In the list of Synonyms click on stunning to replace the word beautiful with stunning.
After using the find or replace feature, Word changes some shortcut keys. If you try to move from page to page with Control+Pagedown, Word will instead try to execute another find. You can change the browsing keystrokes back to moving page by page rather than repeating the find command by using the Go To… command.
11. With the insertion point anywhere in the letter press (Control+PageUp).
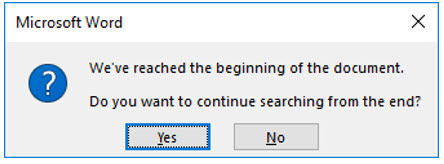
Rather than moving to the top of the previous page, the envelope in this case, Word informed you it repeated the last find command. In this case, this is not what you wanted Word to do with those keystrokes.
12. Click No in the dialog box to inform Word you do not want to perform a search.
Word will now close this dialog box. You will now inform Word that you want to once again use (Control+PageUp) as a command to move page by page through the document, now preform the Find command.
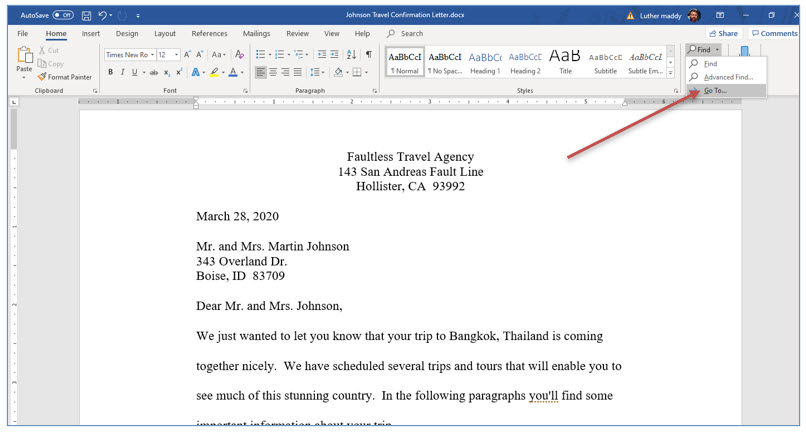
13. Click the drop down list button on the find command and choose Go To… the Goto command.
You could also use the shortcut keys (Control+G) to select the Go To... command.
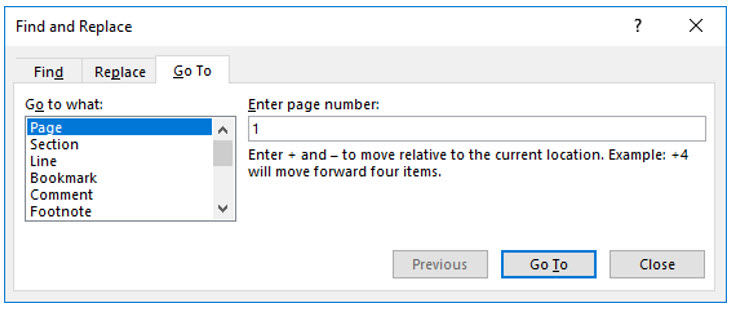
You should see the Find and Replace dialog again, but notice this time the Go To tab is selected. Here you simply enter the page number you wish to move to and then click the Go To button. This is a very quick way to move to a specific page within the document. In this case, you are using this command to change the Control+Pageup and Control+Page Down shortcut keys to page by page rather than repeat the Find command.
14. Type 1 in the Enter page number text box and click the Go To button.
15. Click Close to close the Find and Replace dialog box.
You may find that the insertion point stayed on the letter and did not move to the envelope at the top of the document. This is because Word actually numbered the envelope as page 0 rather than page 1. You will learn more about page number in future trainings. For now, check to see if the Control+Pageup and Control+Pagedown commands returned to browsing page by page.
16. Press (Control+Pageup).
Now, because you changed the function of these keystrokes back to their original setting, you moved up one page. The function of these keystrokes changes every time you use the Find or Replace commands.
17. Save and close this document.
Sponsored Ads
2346
