Envelopes and Labels
Word has many features that enable you to do a wide range of things to any document. This lesson will cover working with envelopes and labels.
Note: These instructions are an excerpt of Luther Maddy’s Word workbook. This full text is available in printed or eBook format from Amazon.com
Easily create an entire sheet of return address labels
Create custom personalized envelopes with Mail Merge
Envelopes and Labels
It is very easy to create either envelopes or labels from letters you have written. In this exercise, you will open a previously created letter and create an envelope to use for mailing that letter. After creating the envelope, you will create an entire sheet of labels with No Fault Travel’s return address.
Creating Envelopes
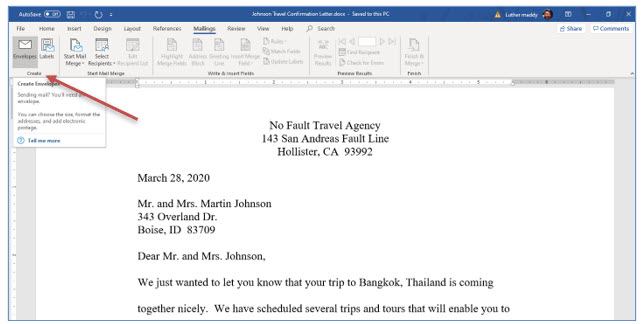
To create an envelope, first write the letter. Then, open the Mailings tab and select Labels in the Create Group. Word will then automatically pull the mailing address from the letter and place it on the envelope.
1. Open Johnson Travel Confirmation Letter.
2. Click the Envelopes tool from the Mailings tab.
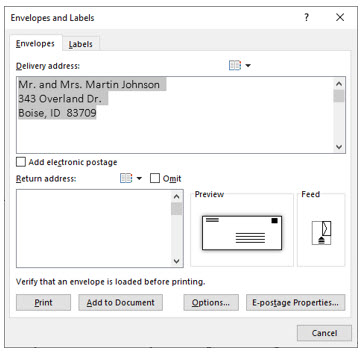
You should now see the Envelopes and Labels dialog box.
Word automatically copies the mailing address for this letter into the Envelopes and Labels dialog box. Rather than printing, you will add the envelope to your letter so you can change the case of the address. After adding it to the document, you could also change fonts, add graphic images, or add other enhancements to the envelope.
3. In the Envelope dialog box, click Add to Document.
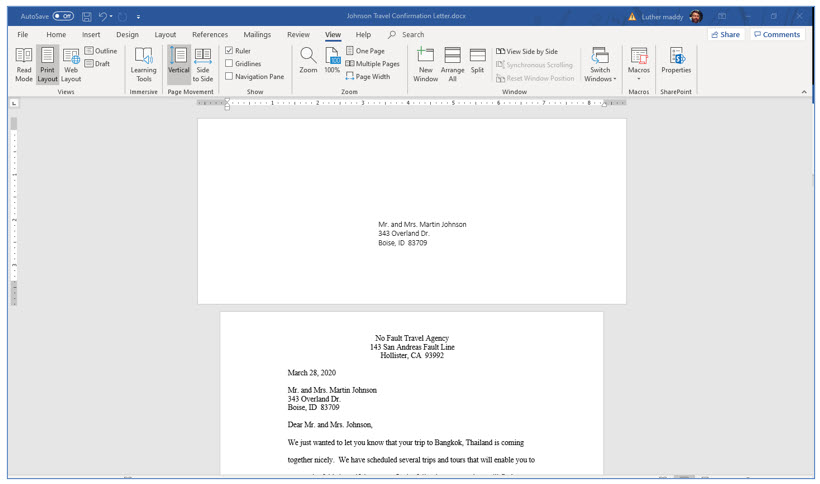
You should now see that Word has added the envelope to the top of the letter. You will now capitalize the address using (Shift+F3), the shortcut for this. Placing the address in uppercase lettering will help this envelope meet US Post Office requirements for bulk mailing discounts.
4. Click and drag to select the mailing address in the envelope. With the address selected, press (Shift+F3) to change the mailing address to uppercase.
Any punctuation in the address in the letter will be duplicated on the envelope. If you are receiving bulk mailing discounts, remove the commas and other punctuation. If you do not want to remove punctuation each time you create an envelope, consider omitting the punctuation in the address when you type it in the letter. If you are not planning on using this for bulk mailing, then punctuation and capital letters are not anything you need to worry about.
Creating Labels
Now you will create an entire sheet of labels with No Fault Travel’s return address. You can also create a single label for the delivery address. If you prefer to print labels instead of envelopes, you can tell Word which label to start printing on. This lets you run label sheets through the printer more than once. However, if you do this, use caution and examine the label sheet for loose labels before you do. You may find printing an entire sheet of the same label is practical for mailing addresses if you use them repeatedly.
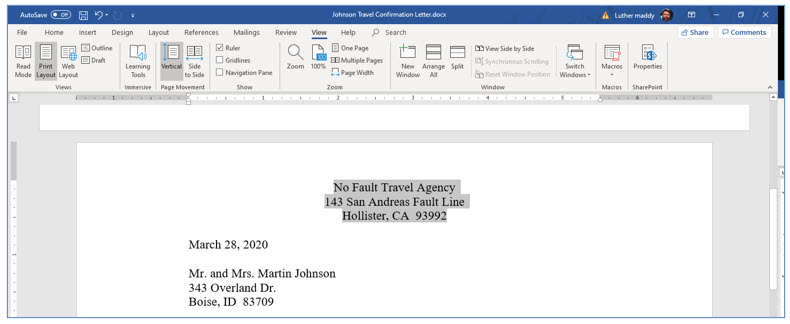
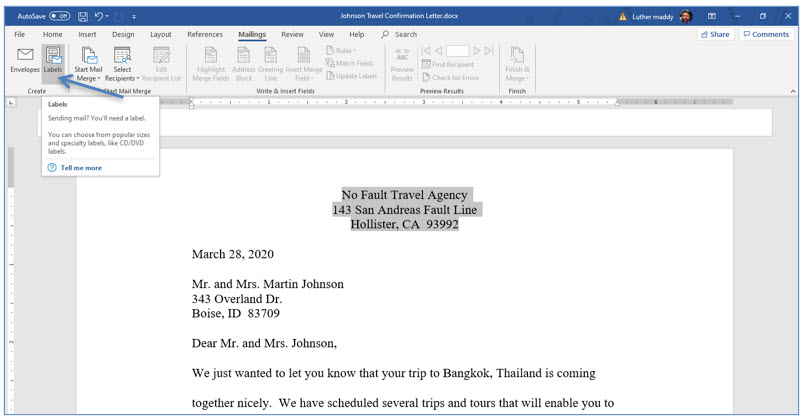
1. Move to the top of the letter with (Control+Pagedown). Select the return address at the top i.e. (No Fault Travel).
If Control+Pagedown does not take you to the next page, just move there on your own. A setting may have changed in Word to cause this keystroke shortcut not to work. You will learn to change this setting in a later lesson. Select this text by clicking and dragging, but do so carefully to make sure you do not select portions of the envelope or include the letter’s date.
2. After selecting the return address, click the Labels tool in the Mailings tab.
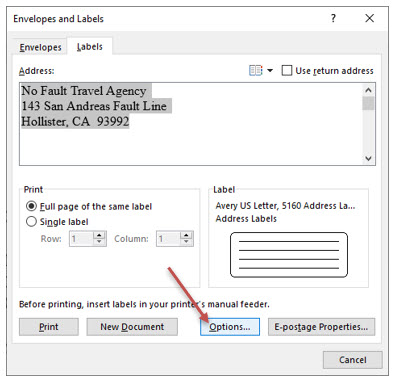
You should now see the labels dialog box. The next step will be to tell Word what kind of labels you are using and whether you want a single label or an entire sheet of the same label.
3. Click the Options button in the Labels dialog box.
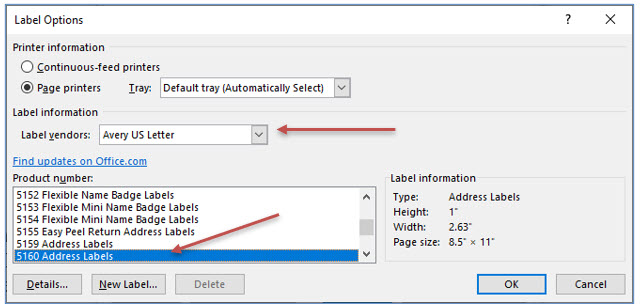
You will now need to tell Word what size of label you are using. You can usually do this by specifying the brand of label and that vendor’s label number.
4. Click the Label vendors drop down box and select Avery US Letter as the vendor. Next, scroll down and select 5160 in the Product number section.
The label vendor, size, and number you choose when actually using Word may be different, but the labels you have selected represent the “standard” mailing label size. When choosing the label option, if you are not using Avery or some other vendor listed, you can use the size of the label to select the correct label option. Sometimes other vendors will state on the packaging that their label is compatible with “Avery 5160” or some other label number.
5. After choosing the label type and size, click OK.
You have now returned to the labels dialog box. Now you need to tell Word if you want to print just one label or an entire sheet of the same label. Since we are printing labels for the company name, select an entire sheet of the same label.
6. Make sure the Full page of the same label radio button is selected and then click New Document.
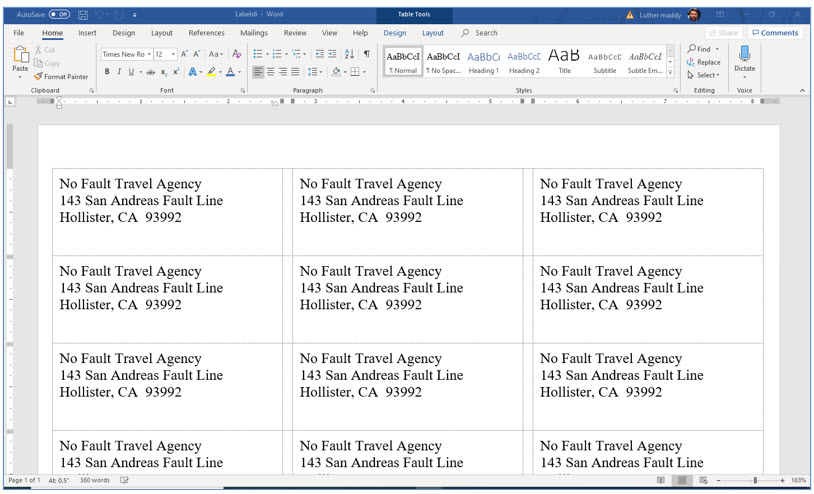
You should now see that Word has created an entire sheet filled with the return address of No Fault Travel. Now that you have this entire sheet of labels, you could easily change the font face or size by first selecting the entire sheet (Control+A) and then choosing the font change.
7. Save the labels as No Fault Return Addresses and close both files saving changes.
Sponsored Ads
2000
