Basic Paragraph and Page Formatting
Word has many features that enable you to do a wide range of things to any document. This lesson will cover formatting the page and paragraph.
Note: These instructions are an excerpt of Luther Maddy’s Word workbook. This full text is available in printed or eBook format from Amazon.com
Tips for selecting text
Add custom watermarks to your documents
Change default line and paragraph spacing
Learn to set tabe in your documents
Basic Paragraph and Page Formatting
In the previous lesson you changed the appearance of the text (words) within the document. In this lesson you will focus on changing the layout of entire pages and paragraphs in the document. Layout changes include the top, bottom, left and right margins and features like line spacing and paragraph indentation. In addition to these features, this lesson will also have you explore tab setting, which is a feature that lets you quickly put information in single spaced columns.
Page Layout
In Word, many formatting options are available in the Page Layout tab. Here you can change document margins, paper size, orientation and other document options. In this exercise you'll select a few of these options to become familiar with their use.
1. Use the File menu to create a New Blank Document.
You can also use the keyboard shortcut of (Control+N) to create a new document. You do not need to memorize the entire list of keyboard shortcuts. However, as you become more comfortable with Word you will find that you can be more productive by learning a few shortcuts for the commands you use often.
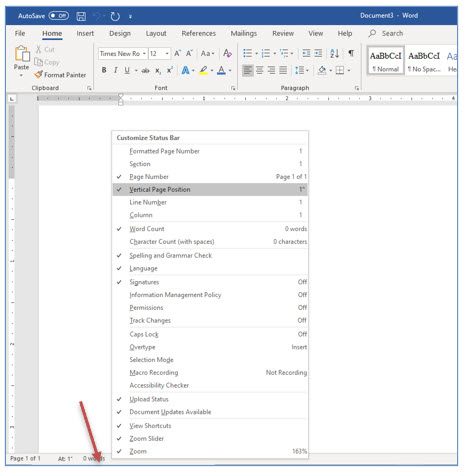
2. Right-click the Status bar and turn on Vertical Page Position if it is not already on. Click in the text area to close this menu when done.
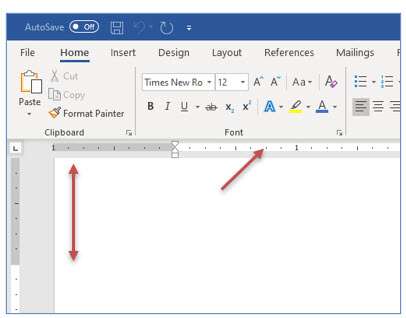
When you examine the status bar now you should see At: 1”. This shows you that the insertion point is 1” below the top edge of the printed paper. This represents the current top margin setting. You can also see this setting with the vertical ruler along the left side of the screen.
You will now going change the page margins for this document. With a smaller top margin, text will be positioned closer to the top of the printed page. The next document you create will include a letterhead which is usually closer than 1” to the top edge of the page.
In cases where you are using preprinted letterhead, you will likely want to make the top margin larger. Otherwise the text you type be printed over the letterhead instead of below it. To find out what your margin settings should be, grab a ruler and measure from the top edge of the page to the place below the letterhead where you want your text to begin.
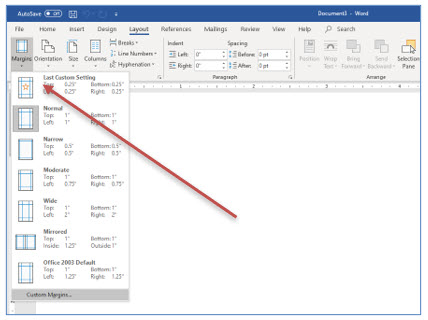
3. Click the Layout tab on the Ribbon.
4. Click the Margins tool and choose Custom Margins.
While there are many pre-set margin options you can choose from, the Custom Margins dialog box lets you set exactly the margins you want. When you are using Word for your own documents, you may often be table to use one of the pre-set margin settings. By default, Word 2019’s margins are 1” all around the edges of the page.
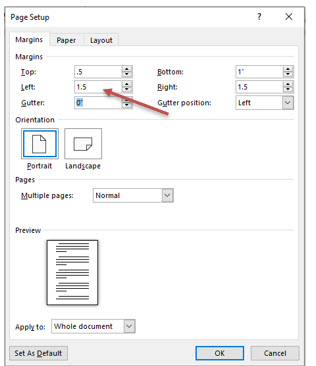
You should now see the Page Setup dialog box which allows you to specify the exact margin settings you want.
5. Change the Top margin to .5”.
You can press (Tab) to move from field to field withinthis dialog box. When you are in the correct field, just type the value you want.
6. Change the Left and Right margins to 1.5” each.
Leave the bottom margin set at 1”.
7. When done, click OK.
Since you are, or should be, in Print Layout view, you will see the margin changes reflected on both ruler bars. If the horizontal ruler is not visible in the Print Layout view, click the View tab and turn on the Ruler option on the ribbon. After making this change, the Status bar displays the vertical position as At 0.5”, reflecting the new margin setting.
8. Click the Home tab and change the alignment to Center (use the Center tool on the Ribbon) and type:
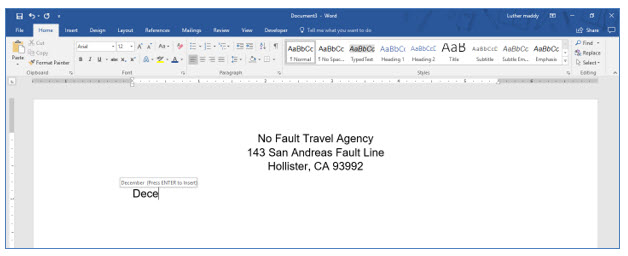
No Fault Travel Agency
143 San Andreas Fault Line
Hollister, CA 93992
9. On the line below the zip code, change the alignment back to Left and then press (Enter) one more time.
If the line with the city, state and zip code changed to left alignment instead of centering, make sure you are on the line below before changing the alignment back to Left. Pressing (Enter) twice creates two blank lines between the letterhead and the text you are about to create.
10. Type the first four letters of the current month such as Dece for December or Janu for January.
You should now see a box displaying the current month’s entire name above the letters you just typed. If the current month has fewer than five letters, just type the entire month name and skip to step #12.
11. Press (Enter) to accept the AutoComplete entry of the current month.
The AutoComplete feature will only work for months that have more than five letters.
12. After the current month is complete, press (Space). You should now see another AutoComplete box with the current date displayed above the text you are typing, press (Enter) to insert the entire date.
The date you see on the examples in this workbook will be different than the current date. Use the current date rather than the date in the following example pages.
13. Press (Enter) to accept this date. Press (Enter) again to move one line down the page.
14. Two lines below the date, type the following:
Mr. and Mrs. Martin Johnson
343 Overland Dr.
Boise, ID 83709
Dear Mr. and Mrs. Johnson,
15. Create two new blank lines below the salutation by pressing (Enter).
Paragraph Formatting
As with text enhancements, after you turn on a paragraph formatting feature, the text you type after turning that feature on will appear with that formatting option. To change existing paragraphs, you must first select the paragraphs you want to change. Then, with the text selected, choose the Paragraph formatting options you want.
For this portion of the lesson you will use the Paragraph dialog box. You will use this to change paragraph indentation and line spacing.
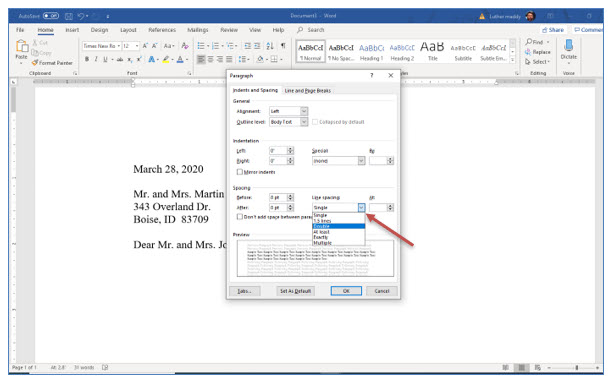
1. Open the Paragraph dialog box by clicking the dialog box launcher (square with diagonal arrow) at the bottom right of Paragraph group on the Home tab.
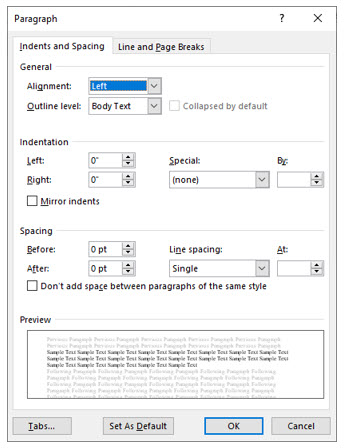
You should now see the Paragraph dialog box. You will use this dialog box to change the line spacing to double. You could have also used the Line Spacing tool on the Ribbon. The Paragraph dialog box allows you to change many additional settings.
2. In the Paragraph dialog box, click the Line spacing drop down list button and choose Double as the line spacing.
Leave the Paragraph dialog box, open for now.
Spacing Between Paragraphs
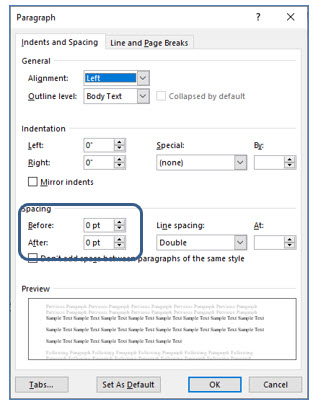
You have been adding blank lines between paragraphs by pressing the (Enter) key. Word can do this for you automatically. It does this with the Paragraph Spacing option. If you examine the Paragraph dialog box you’ll see the Spacing section here. You should also notice there is a setting for Before and After a paragraph. There may already be a default (automatic) setting here. For example, Word may already be inserting 10 points after each paragraph. Setting automatic spacing after a paragraph is helpful and eliminates you having to press (Enter) between each paragraph. However, while you’re learning Word, we’re going to have you ensure this setting to 0 points so that each blank line only occurs when you press enter.
3. In the Paragraph spacing section, ensure that both the Before and After are set to 0.
You should also notice the Set As Default button at the bottom of the Paragraph dialog box. If you click this button, any changes you have made here will be applied automatically when you create new documents. We won’t have you do this until you learn a little more about Word and the options you want to make automatic.
4. Click OK to close the Paragraph dialog box.
From this point on, all text you type will be double spaced until you change this setting back to Single line spacing. And, if you thought this was the only way to change line spacing you should know better by now. You can also change the line spacing very easily with the Ribbon on the Paragraph group of the Home tab and you’ll use that method as well later.
5. Type the following paragraph, and press (Enter) when done:
We just wanted to let you know that your trip to Bangkok, Thailand is coming together nicely. We have scheduled several trips and tours that will enable you to see much of this beautiful country. In the following paragraphs you'll find some important information about your trip.
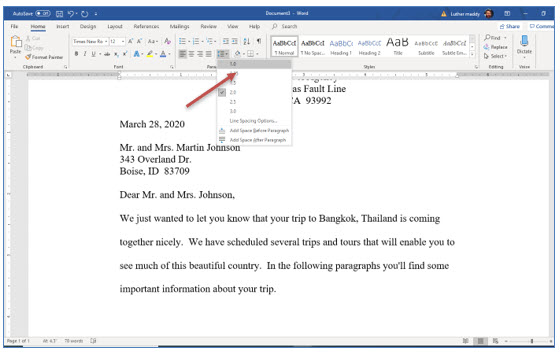
This paragraph should be double spaced. Now, you will use another method to change the line spacing back to single.
6. Make sure the insertion point is below the last paragraph, then click the Line Spacing tool on the Ribbon and change the line spacing back to Single (1.0).
Indenting Paragraphs
If you wish to offset one or more paragraphs from the text around it, you can indent that text. The Indent command will cause the entire paragraph to move to the right, rather than just the first line, as it would if you pressed the (Tab) key before typing the paragraph.
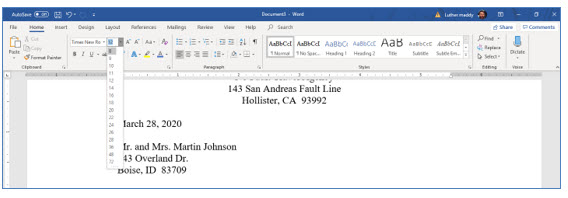
7. With the insertion point at the bottom of the document, use the Ribbon and change the Font Size to 8 points.
Depending on the font you are currently using, your lines may not break exactly as shown in this example.
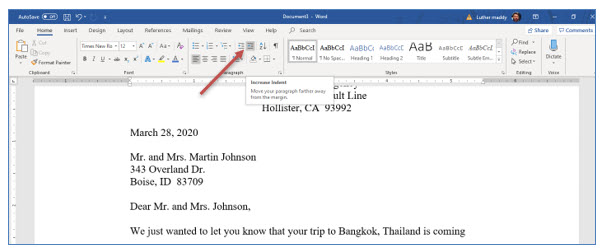
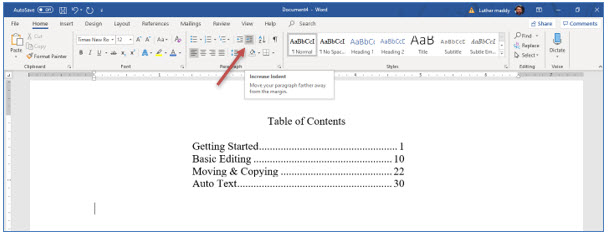
8. Locate and click the Increase Indent tool on the Ribbon one time to indent the next paragraph.
Each time you click the Increase Indent tool it indents 0.5” to the right. If you wanted to indent this paragraph 1”, you would click this tool twice.
9. Now, type the following paragraph and press (Enter) when done:
Remember that any problems you have on your trip will not be our fault. We will not be held responsible for any loss of life, limb or luggage. You assume all risks yourself.
Notice that the entire paragraph is indented, in 8 point type, and single spaced. If you wanted to indent a paragraph after you already typed it, just select the text and click the Increase Indent tool.
10. After typing this paragraph, change the Font size back to 12 points and press (Enter) key to create a blank line after this paragraph.
Just like many other commands that affect the appearance of text, the Indent command stays “on” until you turn it off. If you do not change the indent level back to the original setting, all additional text will be indented.
11. Click the Decrease Indent tool to end paragraph indentation.
You will find the Decrease Indent tool just to the left of the Increase Indent tool. This tool also decreases the indentation in increments of 0.5” each time you click it.
12. Turn on Underlining and type: Your Itinerary:
13. Turn off Underlining and then press (Enter) twice.
This is the only text you want underlined. Remember formatting changes, once turned on, stay on until you turn them off.
Hanging Indents
Word has different indentation styles. Hanging indents are useful for bulleted or numbered paragraphs or when manually creating a bibliography. There is no tool for the hanging indent command on the ribbon. You can create hanging indents from the Paragraph dialog box or even using the ruler. However, the easiest way to turn this feature on is with the keyboard shortcut (Control+T).
1. Press (Control+T) twice.
Like the left indent command, the hanging indent uses increments of 0.5”. Each time you pressed Control+T, the left indent marker on the ruler moved 0.5”.
2. Now, type 5/1/21 and press (Tab).
When you press (Tab) the insertion point will move to the bottom indentation mark. All lines of text within the paragraph you are typing will now indent at this mark.
3. Type the following paragraph and notice that it "hangs" off the date.
Arrive in Bangkok at 11:45 p.m. Next, you'll travel to your hotel and check in. After checking in you will begin your tour of the countryside.
Notice that when you pressed enter after this paragraph, the insertion point returned to the left margin. You should also see that the paragraph “hung” off the date.
4. Type the following two paragraphs by typing the date first, then pressing (Tab ) before typing the text. Use the (Enter) key to insert blank lines between these paragraphs.
5/2/21 Recover from jetlag. Do nothing.
5/3/21 Leave Bangkok and return home.
Notice that you did not need to execute the hanging indent command for each hanging paragraph. Once you turned this feature "on", it stays until you turn it "off".
5. With the insertion point below the last date line, press (Control+Shift+T) twice, until you see the paragraph indent marks both return to the Left margin on the horizontal ruler.
This keyboard shortcut turns "off" the hanging indent feature.
6. Now two lines below the last itinerary entry, type the following text:
Thank you for choosing No Fault Travel. Please call if you have any questions.
Cynthia Anderson
Booking Agent
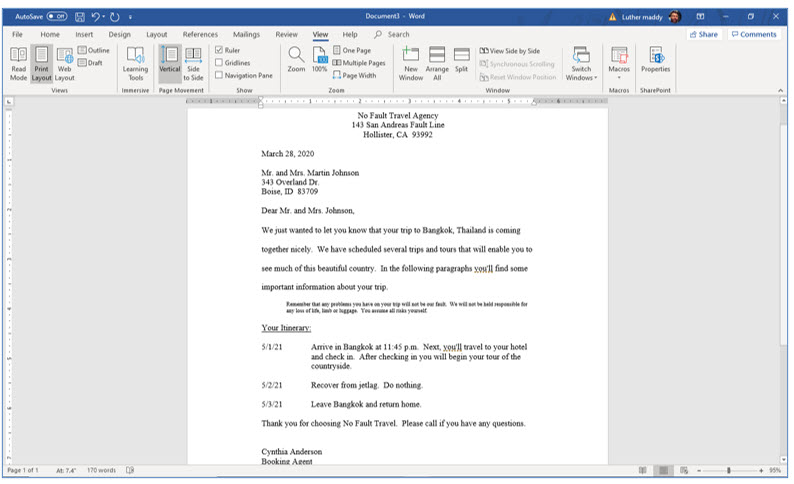
Your document should now appear similar to the one shown:
7. Save this file as Johnson Travel Confirmation Letter and close it.
The PMT() function
Tab setting is very easy in Word. You use tab stops to place portions of your text in single spaced columns. You can also place text in columns using Word’s Table feature. You’ll learn about tables later in this course, but using tab stops, as you are about to see is easy and even has some advantages over using Tables.
You can use the Ruler bar if you only need basic tab settings. You will also learn to add dots or other characters between the tabular columns in this lesson.
Setting tab stops is more efficient than pressing the (Space) bar numerous times after completing the text in one column and moving to the next column, which is extremely more productive. When you set a tab stop, you move the next column with only one keystroke, the Tab key. Setting tabs also ensures the columns will be perfectly aligned, which is difficult if not impossible when you just use the (Space) bar to create columned text.
Word allows several different types of tabs to be set, depending on the alignment you would like.
1. Use the File menu to create a New Blank Document.
2. Click the Center tool on the Ribbon and type:
Table of Contents
3. Press (Enter) to move one line down the page and change the alignment back to left alignment.
Using the horizontal Ruler to Set Tabs
To set tabs on the horizontal Ruler, you simply click you want the tab stops to be set. By default, Word sets a tab stop every .5”. You saw this when you used the Indent and Hanging indent commands. You do not need to worry about deleting the existing tab stops because Word automatically erases the default tab stops as soon as you place your own tab on the Ruler.
Word allows you to set left, right, center, and decimal table which control the alignment of the text at that tab stop. You can use the Tab button at the very left edge of the horizontal ruler to change the tab type. You will experiment with some of these tab alignments in this portion of the lesson.
Before you set tabs, we will have you check some paragraph settings to make sure they do not interfere with this portion of the lesson.
1. Click the paragraph dialog box launcher to display the paragraph dialog box.
It is possible to set tabs within this dialog box, but for this portion of the exercise you will use the Ruler. For tab stops to work properly, you must ensure that you have all other indentation options turned off.
2. In the Paragraph dialog box, ensure both the Left and Right indentations are set at 0”. Also, ensure the Special option displays “none”.
3. Click OK to leave the paragraph dialog box.
You are now ready to set tab stops using the Ruler.
4. Make sure the Horizontal ruler is displayed. Click on tab button at the far left edge of the Ruler until it displays a Left Tab indicator as shown in the example.
Release the mouse button after clicking on the tab button.
When you point to the tab stop type button on the ruler bar you should notice the tool tip informing you that this button represents a left tab. If it says something other than left, click this button until the symbol changes to appear as an "L", representing a Left Tab. Setting a left tab means the text you type using this tab stop will begin (be left aligned) at the tab stop. You will see some other tab stops in action as you continue with this lesson.
5. Now, carefully click at the 1.5” mark on the horizontal Ruler.
You have now set a tab stop at this location. This is verified with the "L" mark on the ruler at this position. If you do not set the tab exactly where it should be, you can move it by carefully dragging it to the correct location.
If you attempt to move a tab marker to another location, make sure you click precisely on the tab stop marker on the ruler. If not, you may find that you have set an additional, incorrectly placed tab stops. In that case you can click on the extra tab and drag it down, off the ruler to remove it. You are setting a Left tab, not because it is on the left of the page, but because you want the information in this column to be left aligned at the tab stop.
6. Move the mouse pointer back to the tab selector button at the left edge of the Ruler bar.
7. Click on the tab stop type twice, until it shows that you will be setting a Right Tab.
The right tab displays as a backwards “L”.
8. After selecting the Right tab stop, click at 4.75” on the Ruler bar to set a right tab at this location.
You selected a Right tab because the information in this column is to be right aligned at the tab stop.
You are now ready to type information using the two tab stops you just created.
9. Press (Tab->) and then type Getting Started.
As you pressed (Tab), the insertion point should have jumped to the first tab stop, 1.5” from the left margin.
10. Next, press (Tab->) again and type 1.
You should notice the insertion point jumped to the tab stop each time you pressed (Tab).
11. Press (Enter) and then type the following text, pressing (tab) before each topic and then again before typing the page number.
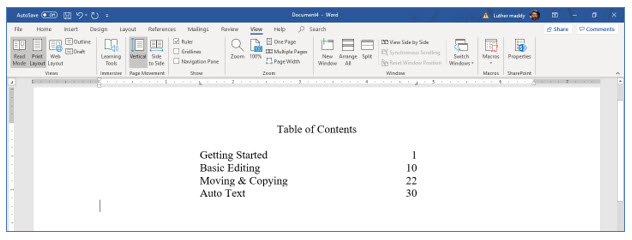
(Tab) Basic Editing (Tab) 5
(Tab) Formatting (Tab) 10
(Tab) Moving & Copying (Tab) 22
(Tab) Auto Text (Tab) 30
Your document should now appear like the illustration below. Notice the difference in the alignment of the text columns due to the tab type set for each.
Using Tab Leaders
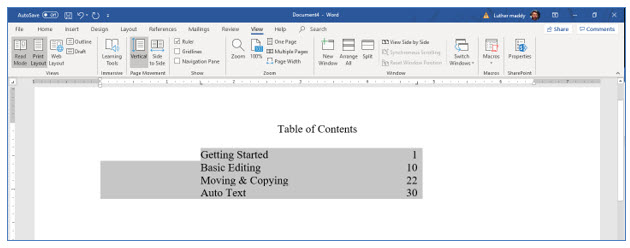
Word allows you to select a variety of leaders between tabbed columns. You can choose from dots, dashes or solid lines. To set leaders, you will enter the Tabs dialog box from the Paragraph dialog box. To add leaders to existing text, as you will do here, you will need to select the text you want to change first.
1. Use the keyboard to move to the beginning of "Getting Started" in the tabbed information.
Be careful not to select the blank line above or below the tabbed information.
2. Press and hold the Shift key. Then move to the end of the last page number with the (Down) arrow.
You have used the keyboard to select this text for accuracy.
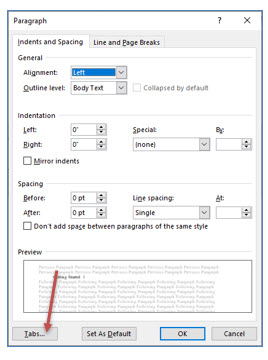
3. Display the Home tab and then launch the Paragraph dialog box (click the diagonal arrow at the bottom right) and click the Tabs … button at the bottom left of this dialog box.
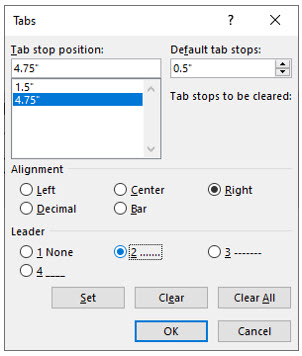
4. In the Tabs dialog box, click on 4.75” in the Tab stop positions section of this dialog box.
If you did not set your tab exactly at 4.75” you will see a different value here but that will not matter. Simply select the second tab in the list. If you have more than two tabs set here, you can click on the one you do not want and click the Clear button to remove it.
5. Next, click Leader option #2.
You have chosen to place dots between the columns. If you are making more than one change you would need to click Set after each change. This is not necessary this time because you have made only one change.
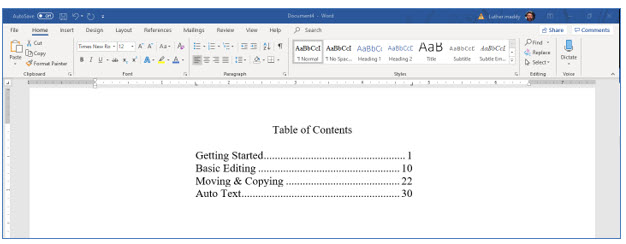
6. Click OK when done.
You should now see leaders between the columns you just created. Tab leaders come before the tab stop you apply them to. This is why you selected the second, 4.75” tab location before selecting the leaders. If you had selected the first tab, the leaders would have appeared before the first column of text.
Adjusting Tabs with the Ruler Bar
To move a tab, just drag it to the desired location on the Ruler bar. If you want to change existing text, make sure you select that text first. To remove a Tab, drag it off the ruler bar and into the document window.
1. Move to the end of the document. Make sure you are below the last line in the tabbed columns.
2. Carefully click the tab marker at 1.5” and drag it into the text to remove it. Do the same with the tab at 4.75”.
The two tab stops you set should now be removed and Word defaulted back to a left tab every 0.5”.
3. With the insertion point two lines below the last line in the tabbed columns, click the Increase Indent tool on the Ribbon once. Next type:
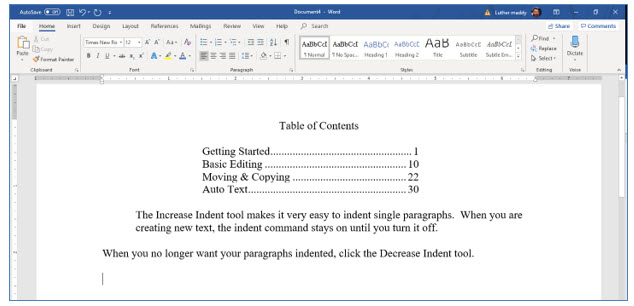
The Increase Indent tool makes it very easy to indent single paragraphs. When you are creating new text, the indent command stays on until you turn it off.
Since you removed the tab stop at 1.5”, the Increase Indent command indented the paragraph only .5”.
4. Two lines below this paragraph. Click the Decrease Indent tool in the Paragraph group. Next, type the following sentence:
When you no longer want your paragraphs indented, click the Decrease Indent tool.
Your document should appear similar to the one below. Your lines may break differently depending on the font you are using.
5. When done, save this file as Tab Practice and Close it.
Sponsored Ads
3415
