Selecting, Moving, Copying, and Enhancing text
Word has many features that enable you to do a wide range of things to any document. This lesson will cover manipulating text inside the document.
Note: These instructions are an excerpt of Luther Maddy’s Word workbook. This full text is available in printed or eBook format from Amazon.com
Tips for selecting text
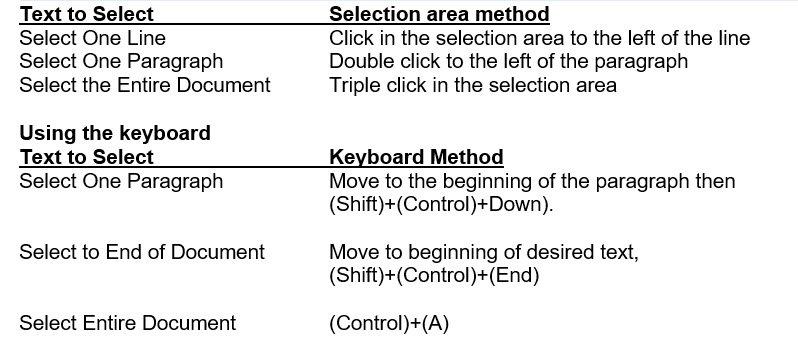
Printable shortcut guide: Selecting Text
Selecting, Moving, Copying, and Enhancing text
Selecting Text
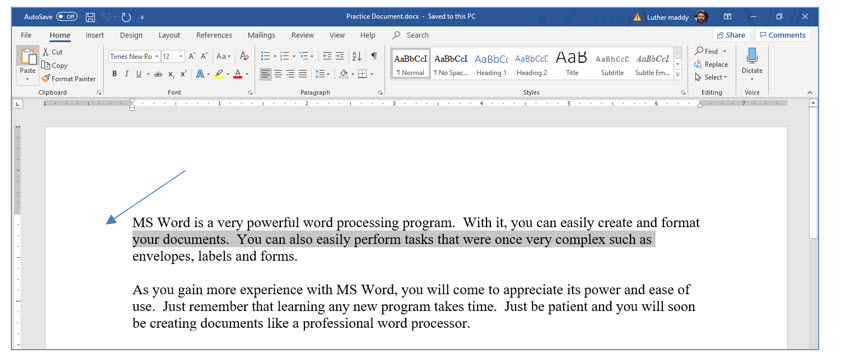
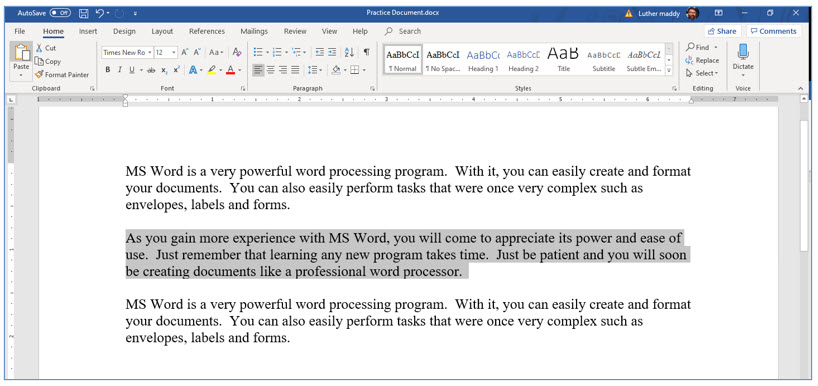
To change the appearance of existing text or move or copy text, you must first select it. Selected text will appear with a gray background, and selecting is sometimes called highlighting text. But, highlighting text is actually a different command, so we’ll keep calling it selecting text in this workbook.
You can select text using the keyboard or the mouse. One very simple way to select text is to simply click and drag across it. However, when you want to select large portions of text this method becomes impractical, so here are some other methods you can use to select text.
Selecting text with the mouse within text
Select irregular text portions Click and drag
You can also position the insertion point at the beginning of the text you want to select and then move the mouse pointer to the end of the text you want to select. To finish the process hold the (Shift) key and click. The text between the insertion point and where the mouse pointer was located should be selected when you click the mouse with the (Shift) key held down.
Using the Selection area (left margin) and the mouse
The selection area is the left margin, outside of the actual text. You can see the selection area when you are the Print Layout view. When you move mouse pointer into the selection area it will become an arrow rather than an I-beam.
Selecting Non-Contiguous Text
Sometimes you may want to select portions of your document that are in different areas (non-contiguous). To do this, select the first portion of text, then hold the (Control) key and select the other portion of text. This is useful when you want to enhance (bold, underline, etc..) multiple portions of your document that do not occur together.
Moving (Cutting) and Copying text
To move cut or copy text you can:
a. Select the text you want to move
b. Choose Cut (to move) or Copy
c. Move the insertion point where you want the moved or copied text to be
d. Choose Paste
What can make this process confusing is that you can choose the Cut, Copy, and Paste commands several ways. You can find these commands in the Clipboard group on the Home tab, or you can use Shortcut keys. You can also access these commands with shortcut menus (right-click). This lesson will give you an idea of the variety available with these commands.
You will now open the document you created and move and copy portions of the text. You will also change the appearance of existing text by selecting that text and making the desired format changes.
1. Open Practice Document.
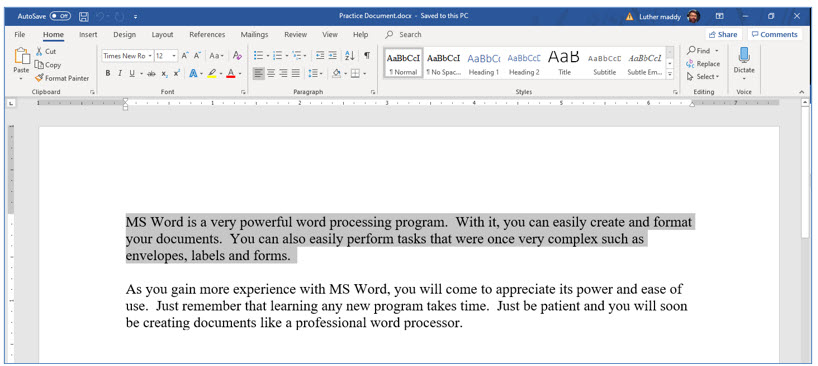
2. Move the mouse pointer into the text of the first paragraph and click three times to select the entire paragraph.
If you’re unable to select the text by triple-clicking, make sure you hold the mouse still while you click. The gray highlighting shows you the text is selected.
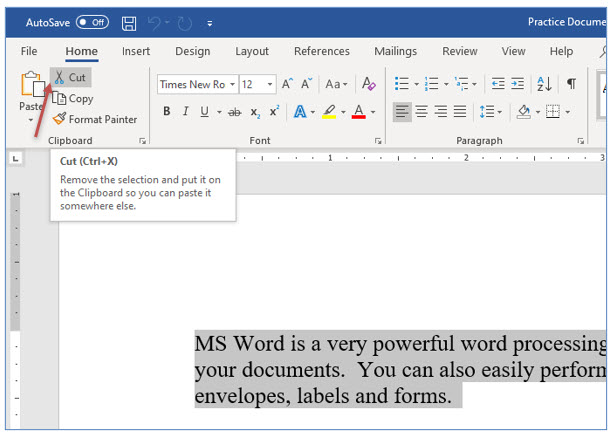
3. With this paragraph selected, click the Cut (scissors) tool on the Ribbon.
The paragraph you selected will now disappear. The paragraph is not gone forever. It is being stored in the Windows clipboard. The next step is to move the insertion point where you want the paragraph to be moved and then choose Paste.
4. Move the insertion point below the second paragraph with (Control+End).
If you cannot get the insertion point below the paragraph, you neglected to press (Enter) at the end of the second paragraph when creating this document. To correct this, just press (Enter) at the end of the second paragraph now to end this paragraph. If the insertion point did move below the second paragraph, you do not need to press (Enter).
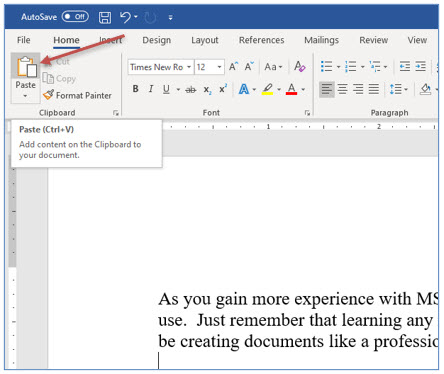
5. After moving the insertion point, click the Paste (clipboard) tool on the Ribbon.
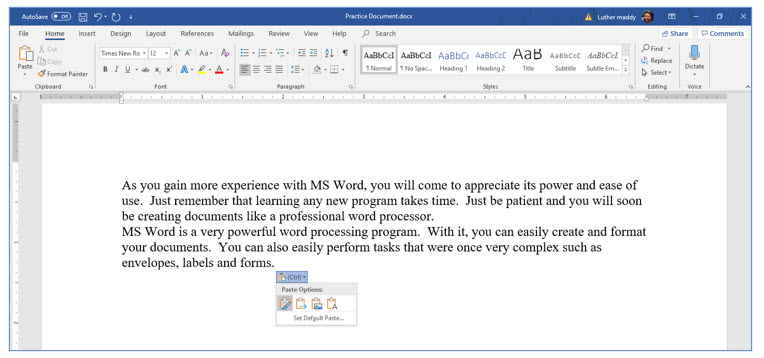
The Paste Options Smart Tag
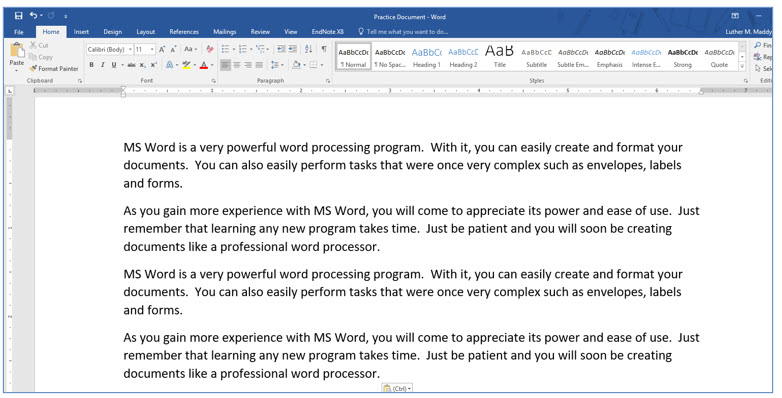
The paragraph that was at the top of the document originally should now be moved below what was the second paragraph.
You may also notice an icon appears at the bottom of the paragraph you just moved. This is a smart tag. Smart tags give you additional options after you perform certain commands.
Clicking the drop-down arrow of a smart tag key reveals the options available from that tag. This smart tag allows you to choose options that control the formatting of the pasted paragraph. Since this document has no additional formatting, we’ll ignore this smart tag for now.
Using the Undo Command
Whenever you are not happy with the results of a change you just made, you can use the undo command to reverse that change. You can undo several times. However, be careful not to go too far back or you may end up undoing something you meant to keep.
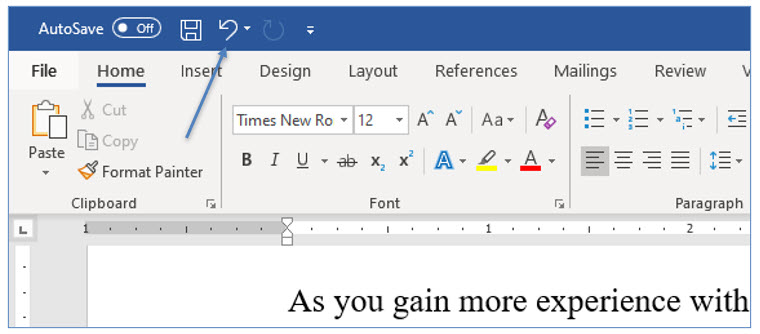
You can find the Undo command on the Quick Access toolbar. You can also use the shortcut key (Control+Z).
6. Click the Undo tool on the Quick Access Toolbar twice to undo the move of the first paragraph.
Using the Shortcut Menu to Move and Copy
If you use the mouse to select the text you intend to move or copy, you should also use the mouse to select the move or copy commands. The most efficient way to use the mouse is to employ shortcut menus. Using Word’s shortcut menus, you can quickly choose the commands you need.
1. If needed, select the top paragraph in this document (click three times).
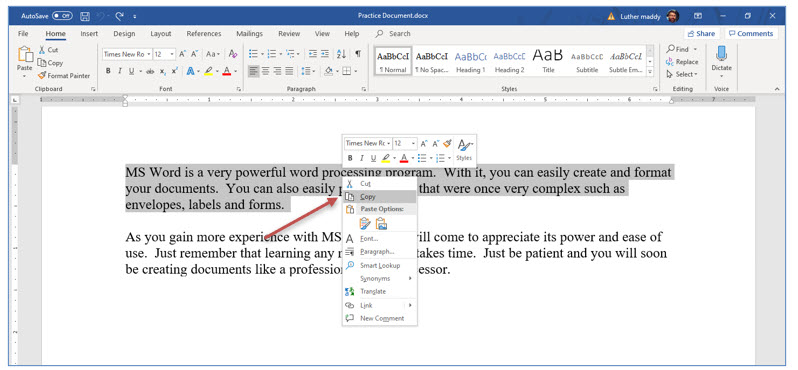
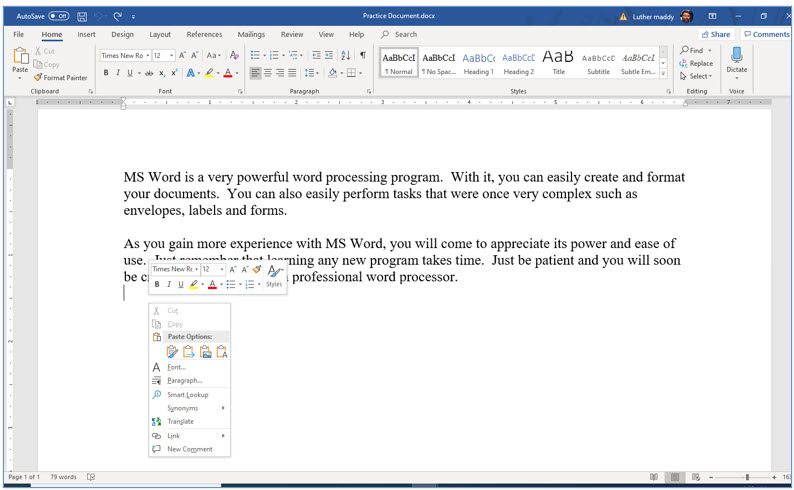
2. Move the mouse pointer into the selected paragraph. Right-click to see the menu shown above.
3. From the shortcut menu, click Copy.
4. Now, move the mouse pointer below the second paragraph and right-click.
If you cannot get below the last paragraph you need to press (Enter) to create a blank line.
5. From the shortcut menu, click the first icon, Keep Source Formatting in the Paste Options section.
As you move into the Paste Options section of this shortcut menu, Word will display the copied text in the document to let you preview the result of each paste option. The copy is only completed after you click the icon in the Paste Options dialog box.
You have now copied the first paragraph using shortcut menus.
6. Move to the beginning of the paragraph you just added with (Control+Up Arrow). If needed, insert a blank line above it by pressing (Enter).
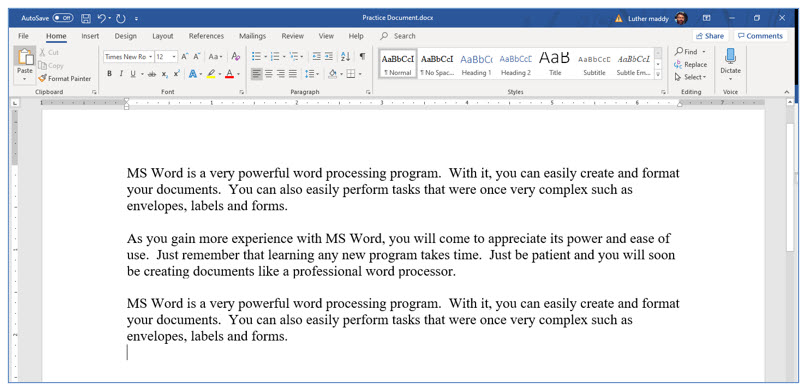
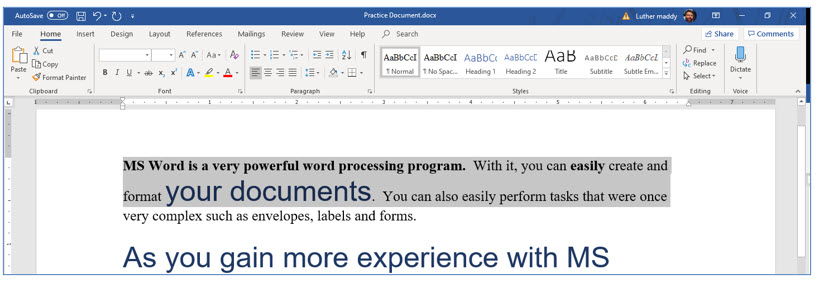
Your practice document should now appear like the example above. Add blank lines between the paragraphs if needed.
Using Drag and Drop to Move and Copy
In addition to the Cut and Paste method, you can also drag selected text to move or copy. However, this method works best when the source and destination are on the same screen.
In other words, the drag and drop method does not work well when you are trying to move or copy text from one page to another because scrolling through a multiple page document is not very accurate. Aside from being inefficient, this practice can lead to confusion and messed up documents as portions of text do not end up where you intended to move or copy them.
To move or copy using the drag and drop method, you first select the text you want to move or copy. Then move the mouse pointer into this text. Next, press and hold the Ctrl (Control key) and drag to the destination. When you release the mouse button the text will be copied to that location.
1. Select the second paragraph in this document (click three times).
2. Move the mouse pointer into this paragraph and press and hold (Ctrl).
3. Keeping the (Ctrl) key held down, move the mouse pointer to the bottom of this document and release the mouse button.
4. Press the (Down) arrow to deselect the paragraph.
After moving or copying, it is very important to deselect the text. If you do not and begin typing, the text you just moved, or enhanced, will be replaced with the new text. Deselecting simply removes the gray highlighting and returns the text to the editing mode. You can deselect text by moving the insertion point somewhere else in the document.
5. If needed, add a blank line above the paragraph you just copied by pressing (Enter) at the beginning of that paragraph.
Your document should now appear like the above.
You have explored several ways to move and copy. The best approach for now is the one you can remember. As you become more experienced with Word, you will learn that knowing more than one way to accomplish a task will increase your productivity.
Enhancing Existing Text
To change the appearance of text that is already created (existing text), you must first select the portion of the text you wish to change. Then simply apply the formatting options you want, such as Bold, Italic or other Font attributes.
1. Press and hold (Ctrl) and click anywhere in the first sentence of the first paragraph.
(Control+click) selects an entire sentence. As with editing, the (Control) key adds functionality when selecting text.
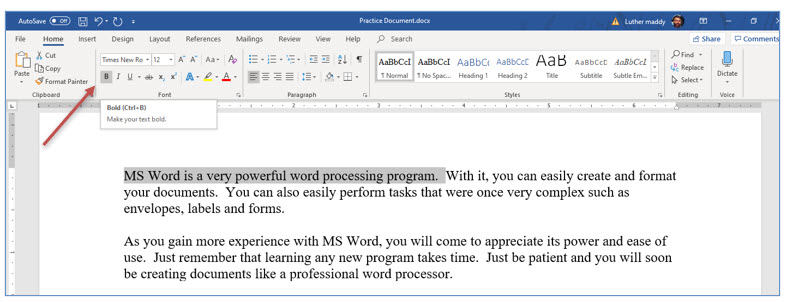
2. With this sentence selected, click the Bold tool in the Home tab on the Ribbon.
The first sentence in this document should now be boldfaced. Boldfacing text causes it to appear darker than the text around it. If you cannot see the Bold tool, click the Home tab.
3. Select the second paragraph by triple clicking in it.
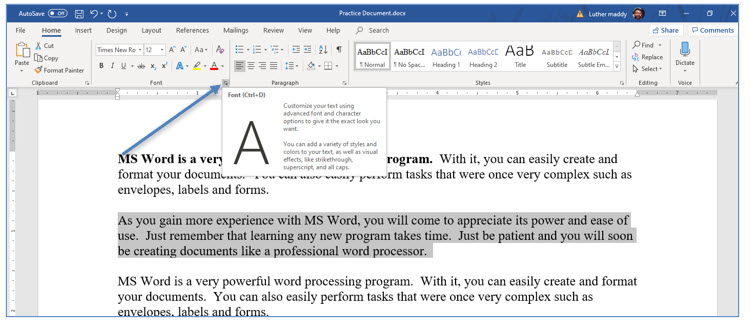
4. In the Font group in the Home tab, click the Font dialog box launcher to display the Font dialog box.
In this portion of the lesson you are using the Font dialog box to change the appearance of the text. You could also use the tools on the Ribbon to change these options. The Font dialog box however, allows you select some options that do not appear on the Ribbon.
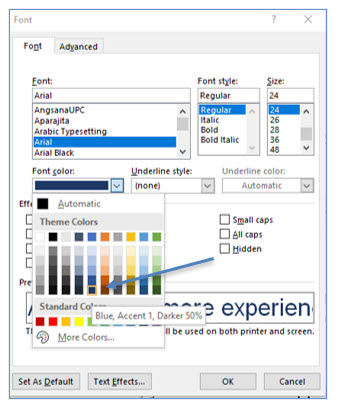
5. In the Font dialog box, choose Arial from the font selections.
Scroll down the list of font faces to find Arial if necessary.
The Preview section will show you how the selected text will appear with the options chosen in the Font dialog box.
6. Click in the Size section of this dialog box and select a font size of 24.
7. Click the Font Color drop down list button. From the list of colors, click the Blue, Accent 1, Darker 50% option and then click OK.
Clicking the More Colors option in the color selection area provides many additional colors than shown listed on the main color selector.
You can try the More Colors option on your own as you are experimenting with Word. The best way to learn a software program is through experimenting on your own. This workbook guides you through many of Word’s features, but you should not hesitate to practice the things you are learning here on your own.
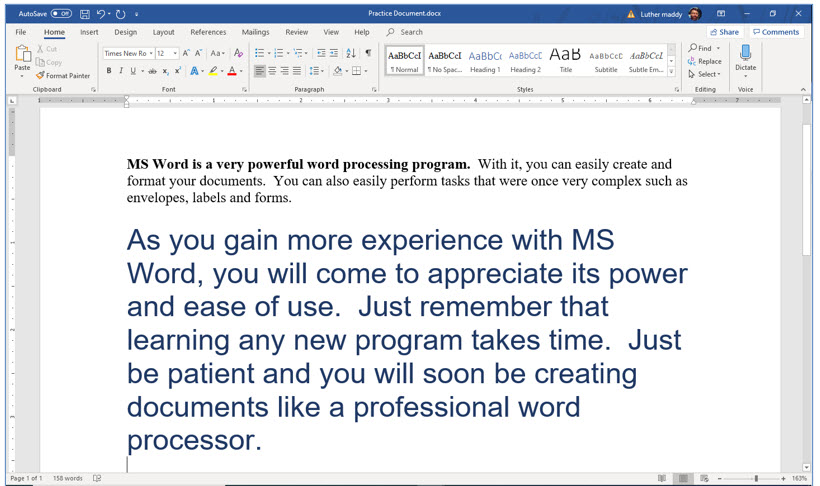
If, when you return to your document, all the paragraphs became larger and Dark Blue, click the Undo tool on the Quick Access Toolbar or with the shortcut (Control+Z). When you do, only the second paragraph should be changed.
8. Deselect this paragraph by pressing (DOWN arrow).
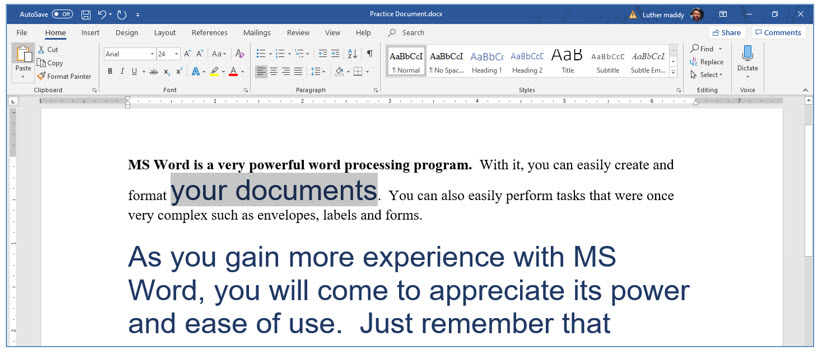
Your document should appear similar to the image above.
Using the Format Painter
If you want another portion of text to be formatted in the same way as some other text in your document, you do not have to repeat all the formatting commands you used originally. Instead, you can use the Format Painter. The Format Painter will copy formatting from one portion of text and allow you to use that formatting on additional text. The Format Painter is located in the Clipboard group on the Home tab.
You will now see how the Format painter command works.
1. Move the insertion point anywhere in the text that is formatted with the Blue, Large font and click the Format Painter tool on the Home tab.
Once you click the Format Painter tool, the next text you select will be formatted just as the text was where you clicked this tool. Word will format only the next text you select. Double-clicking the Format Painter tool will cause all text you select until you click the Format Painter tool again to be reformatted.
2. After clicking the Format Painter tool, move the mouse into the first paragraph and select the two consecutive words, your documents.
You can select these two words by clicking at the beginning, holding the mouse down and dragging to the end of the text. The text you just selected should now be formatted the same as the entire second paragraph.
If you find more text changed than should have, use the Undo command to correct this.
Using the Mini-Toolbar to Enhance Text.
As you have already seen, there are several methods available for you to enhance text. In this portion of the lesson, you will use one more, the mini-toolbar. When you select text the mini-toolbar automatically appears in the background just above the selected text. You can activate the mini-toolbar by moving into it. You will now use the mini-toolbar to bold and underline a word.
1. In the first line of the first paragraph, select the word easily.
You should now see the mini-toolbar in the background just above the selected word.
2. Click the Bold and Underline tools on the mini-toolbar.
The word easily should now be boldfaced and underlined.
Using Keyboard Shortcuts to Enhance Text.
Your head may be spinning now seeing so many ways to enhance text. But, before you give up in frustration, here is one more method. This purpose of doing this is to show you again, that there are a variety of ways to perform most commands. Keyboard shortcuts provide a very quick way to perform commands when your hands are on the keyboard.
So, to give you an idea of how this works, we will have you select and underline a word using only the keyboard.
1. Move to the beginning of the document with (Control+Home).
The insertion point should now be at the beginning of this document.
2. Hold the (Shift) key down and hit the (Down) arrow twice.
The first two lines of this document should be selected. Holding down the Shift key selects text when you move using the keyboard.
3. With these two lines selected, press (Control+U).
Control+U is the keyboard shortcut for underlining.
4. Press (Down) again to de-select this text.
Are you confused yet?
Let’s take a break and let the spinning in your head slow down. You’ve just seen several ways to do the same thing. This was not done to confuse you, but to simply make you aware that there are a variety of ways to perform some commands.
When there are several methods available, there is no one right way. The way that you can remember is the right way. There is no reason to try to memorize every possible way to do every command in Word. Instead, learn the method that appeals the most to you and get very comfortable with that method. As you become more comfortable with Word in general, you can increase your productivity by learning additional, perhaps faster ways to perform the commands that you use the most.
Using Save As instead of Save
When you use the Save command, the document changes are saved under the original file name. This lets you add to the document as you make changes or add text.
Sometimes, you may wish to keep the original document as it was and also save the changes. In this case, you would use the Save As command to make a new document (file) from the document on your screen. The original remains unaltered as long as you did not use the Save command after making changes.
In this portion of this lesson you will create a new document from the changed version of the document you are currently working with. The original will remain as it was before you started making changes.
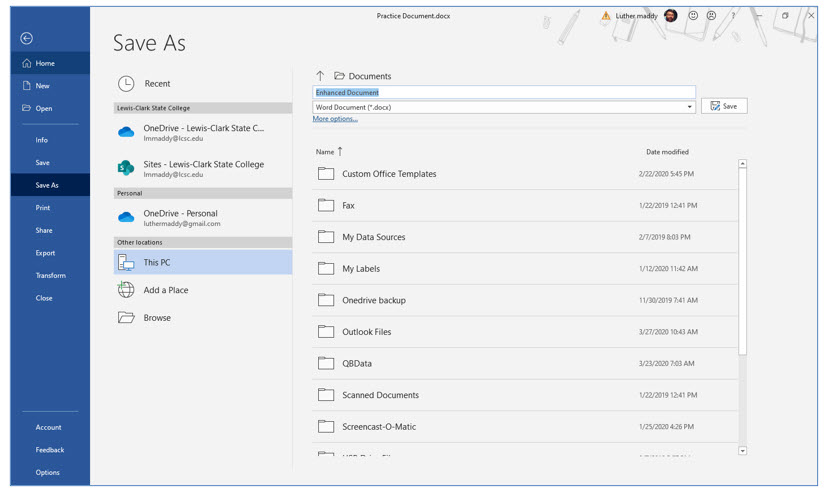
1. Open the File menu and choose the Save As command.
You are choosing to store this new document in the same folder you placed the document it was based on, Practice Document.
Word will now display the Save As dialog box. You have seen this before, when you first saved this document. Now, you just need to give this revised version a different name.
2. Type Enhanced Document in the File name text box and click Save to save this revised file with the new name.
3. Open the File menu and choose Close to close this document.
Enhancing New Text
So far in this lesson you have only changed or enhanced existing text. To do this you had to select the text you wanted to change, and then tell Word how to change that text. Only the text you selected changed.
In this portion of the exercise, you will create a new document, formatting and enhancing it, as you create it. To have the next text appear with an enhancement, you will turn on the feature you want and then type the text. When you do not want that formatting option anymore, turn it off. Once you turn on an enhancement, it will stay on until you turn it off.
1. Choose the New command in the File menu and click create a new blank document.
You can also create a new document very quickly with the keyboard shortcut (Control+N).
You should now have a new, blank document. You will now change the font size using the ribbon before you begin typing.
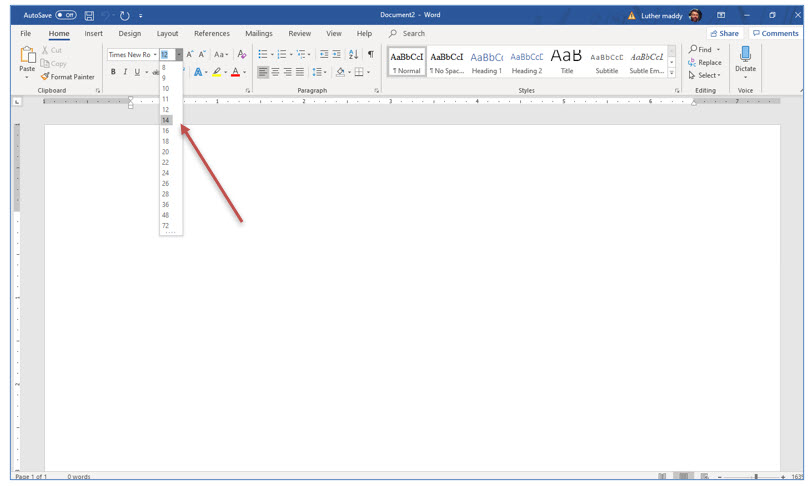
2. Use the Font Size tool on the Home tab of the Ribbon to change the font to 14 points.
This time you are using the tools on the Ribbon to change font attributes rather than the Font dialog box as you did previously. Neither of these methods is superior but, if the feature you want is available with a tool on the Ribbon, that is probably the fastest way to access that feature.
As you click the drop-down list button on this tool you can select from many pre-set font sizes, the larger the number the larger the font size. One point is approximately 1/72nd of an inch; therefore 72 points would mean the letters would be approximately 1 inch tall. This varies somewhat by font style, but is a close approximation.
3. Click the Center tool in the Paragraph group of the Home tab to change the alignment to Center.
You should notice that the insertion point moved to the center of the line. Word will automatically center what you type next. The centered text will be the heading of a memo you are going to create.
4. Type Memorandum and press (Enter) twice.
Centering remains on. To return to left aligned text you will have to turn off centering by selecting the Align Left tool.
5. After typing this text, click the Align Left tool in the Paragraph group to change the alignment back to Left.
6. Change the Font Size to 12 points.
We only want the centered heading to be larger than the rest of the text, so you are changing the font size back to the commonly used 12 point size.
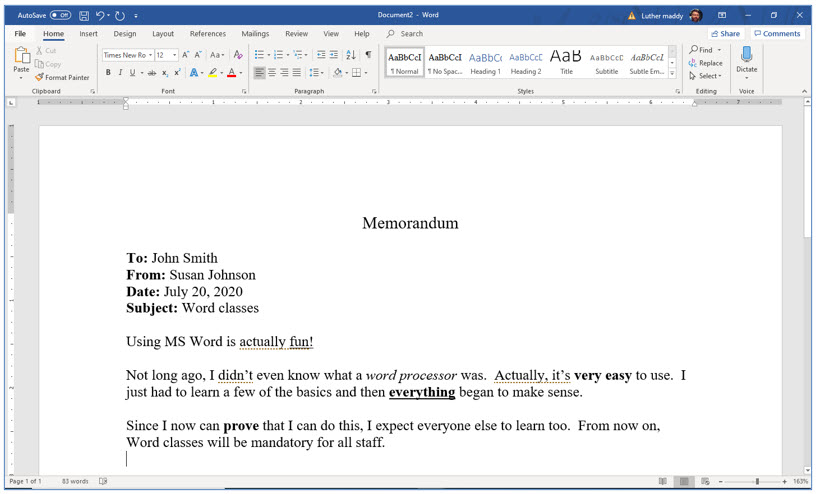
Now you are going to create the text for this memo. This memo will incorporate Boldfacing, Underlining and Strikethrough text enhancements. As you create this text you will “turn on” an enhancement when you want to use it and “turn off” the enhancement when done. You can find Bold, Underline and Strikethrough tools on the Home tab of the ribbon.
7. Now, use the Bold, Italic, Strikethrough, and Underline options from the Ribbon and the Font dialog box launcher from the font group to create the memo as shown:
Hint: Some formatting options work like toggle switches. When you are finished using an enhancement such as Boldfacing, click the same tool to turn off the feature!
The memo text above was not shown shaded, even though you are typing it so that you could see the enhancements. Notice Word’s grammar checker flagged some potential errors, including contractions that you instructed Word to look for in the previous lesson. You can ignore those errors for now.
8. When done, save this document as Memorandum, then close the document.
Removing Enhancements
To remove text enhancements such as bold, italic, or font style or size changes, begin by selecting the text you want changed. Then, with the text selected, turn off the options you do not want. If you want to remove all of one type of enhancement, such as boldfacing throughout an entire document, you can select the entire document and then “turn off” boldfacing. This is what you will do in the next portion of this exercise.
1. Open the Memorandum document
2. Select the entire document with (Control+A).
You have just used a keyboard shortcut to select the entire document. With a large document this method would be more efficient than using the mouse to click and drag through the entire document.
3. Click twice on the Bold, Underline and Italic tools on the Home tab of the ribbon.
You have now removed all the bold, italic, and underlining from this document. You click each of the tools twice because the first time, Word applied that option to the entire document. The second time, it removed that option from the entire document.
4. Save and close the Memorandum document.
The Clear Formatting Option
Word also has a clear formatting option that you can use to quickly remove all formatting. To use this option:
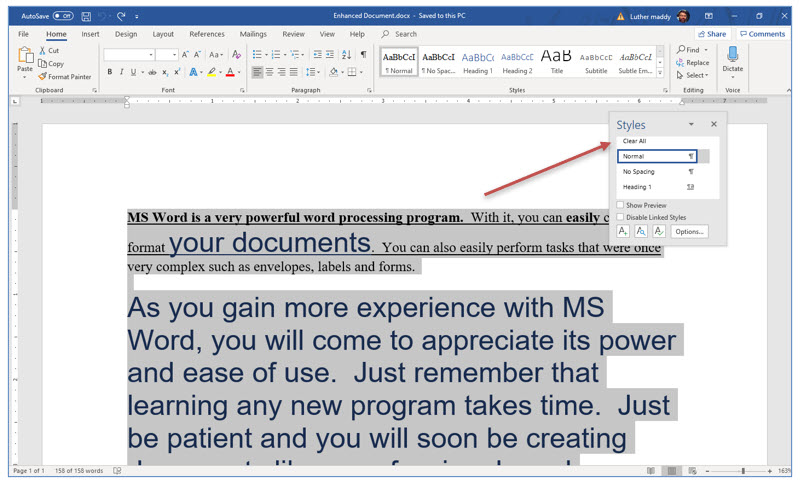
1. Open Enhanced Document, then select the entire document with Control+A.
2. On the Home tab, click the Styles dialog box launcher (the small box with an arrow to the botttom right of Styles) to display the styles drop down list.
3. Select Clear All in the styles list.
At this point, all formatting from the selected text will be removed.
4. Close the Styles list by clicking the X at the top right of the list.
5. Save and close the document.

