Creating and Saving Documents
Word has many features that enable you to do a wide range of things to any document. This lesson will cover creating and saving documents.
Note: These instructions are an excerpt of Luther Maddy’s Word workbook. This full text is available in printed or eBook format from Amazon.com
Creating and Saving Documents
The Word Window
1. Start Word if needed.
You can start Word several ways. Depending on your version of Windows, you may have to find it among the list of applications on your computers, or you may have an icon to start it on your Desktop.
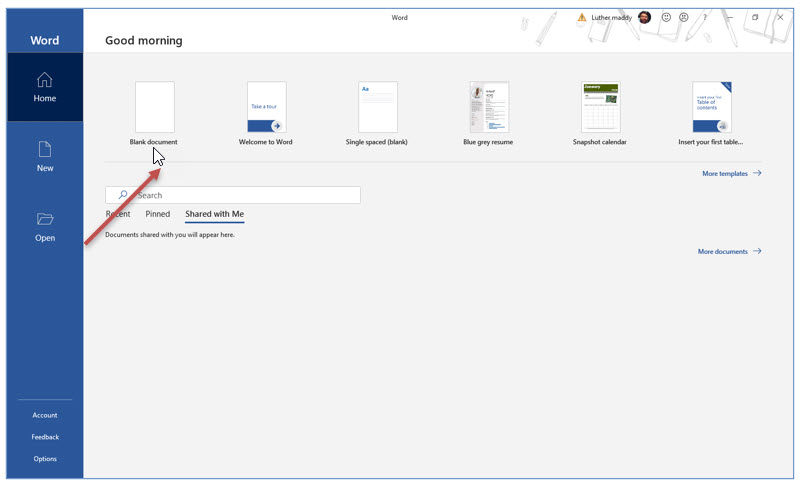
When you first open Word it will display its start screen. Here you can open a document you have recently worked on or start a new one using one of several predefined themes or with a blank document.
2. Click the Blank document thumbnail.
To learn to create your own documents in Word, you’ll start with a blank document which is Word’s equivalent to a blank sheet of paper.
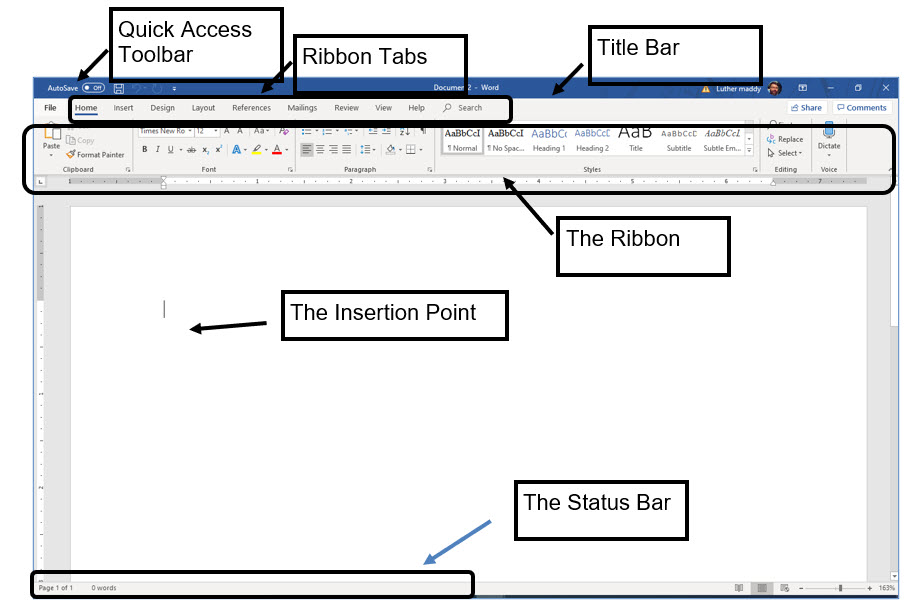
You should see a blinking vertical bar which is called the insertion point. The insertion point is commonly referred to as the cursor. Any text you type will appear at that location. The insertion point also shows you which text will be erased or changed if you are editing.
Take a few minutes to examine the Word window. Then examine the illustration on the next page for more information about what you are seeing in the Word window.
The Title Bar: Identifies the program or application you are working in. It will display the name of the document you are working on. After you created and Save a document, that name you give that document will appear on the title bar.
The Ribbon: The Ribbon gives you quick access to the feature you are working on. You can display different commands by clicking the Tabs above the ribbon. The ribbon will change, depending on what features you are working within Word.
The Quick Access toolbar: Provides a quick way to access commonly used commands, like saving a document, or undoing your last action.
The Status Bar: The Status Bar appears at the very bottom of the Word window and keeps you informed as to which page you are working on. You can modify the status bar display to show you many things about your document. You will learn about this later in this lesson.
The Insertion point or Cursor: The insertion point lets you know where you are on the screen for text editing. As you type, letters will appear at the insertion point’s location.
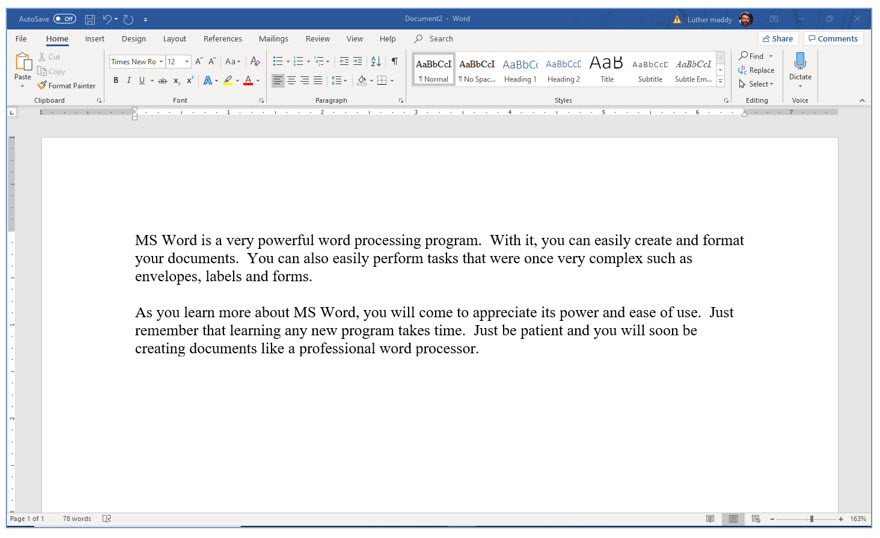
3. In an empty Word document window, type the following, ensuring that you press the (Enter) key only at the end of each paragraph.
MS Word is a very powerful word processing program. With it, you can easily create and format your documents. You can also easily perform tasks that were once very complex such as envelopes, labels and forms.
As you learn more about MS Word, you will come to appreciate its power and ease of use. Just remember that learning any new program takes time. Just be patient and you will soon be creating documents like a professional word processor.
Remember that the shading in the above paragraphs is just showing you that you will type this text. You will see that throughout this manual when you are to type something. You don’t need to shade the text you type in your documents, unless the instructions specifically tell you to do so.
Depending on the default (automatic) line and paragraph settings in Word, you may automatically get a blank line between your first and second paragraph. If you do not have the automatic line and want to have a line between the two, you can create the blank line between these two paragraphs by pressing (Enter) a second time after the first paragraph.
Your screen may not look exactly like the illustration, depending on the view you have selected. We’ll discuss view settings in the next couple of pages. The blank areas around the text in the illustration are the document margins.
Saving Documents
If you do not want to lose everything you have typed, you will need to save the Word document. Currently this document is stored in your computer’s RAM (Random Access Memory). When you lose power, or turn off your computer, everything in RAM is lost. Saving stores the file on a hard drive, flash drive or cloud storage.
Your version of MS Word may have the Auto Save feature selected. Even if you are using this feature, it is till beneficial to save the document on your own. That way you know where you have saved it, so you can find it when you want it again.
Once saved, you can then retrieve (Open) it again when you need it again. You should develop the habit of saving frequently. If you do not, you may have to re-type some long portions of text. Since hard drives can also crash, it is a good idea to store important documents in at least two places to ensure against their loss. For example, you can store the novel you are creating on your computer’s hard drive and also on a flash (thumb) drive or on a cloud drive such as Microsoft’s OneDrive. This way, should one copy of your file be lost, you have another copy.
To save a document for the first and subsequent times, use the Save command.
4. Click File on the Ribbon.
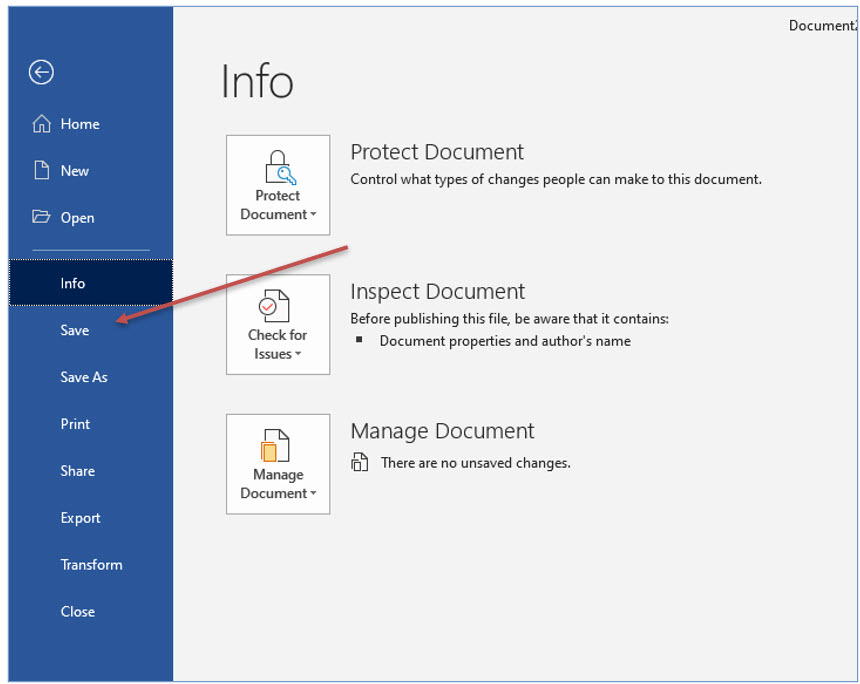
MS word will now display the Backstage view. This view allows you to select from many commands like saving and printing.
5. In the Backstage view, click the Save option.
You could also access the Save command from the Quick Access toolbar which is located above the File menu option.
The Save As Screen
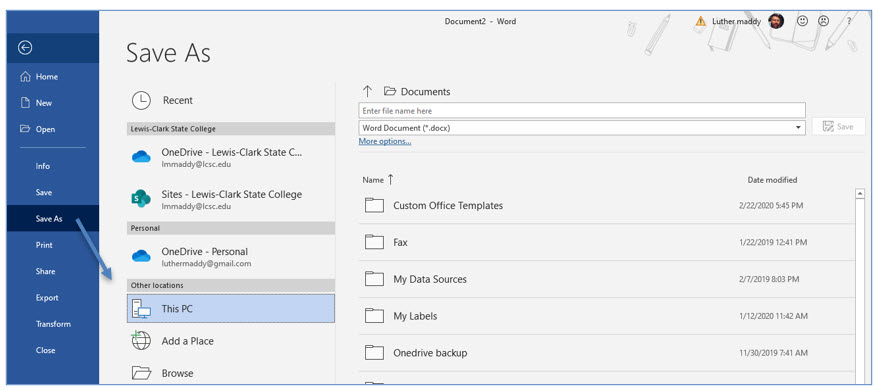
When you choose the Save command for the first time, Word will display the Save As view. This is because you have not yet saved this file and Word needs you to specify where you want to save this file and the name you want to give the file. You will refer to the file by is name when you want to retrieve it later.
Before actually saving, it is a good idea to notice the drive and folder where you are placing this file. This makes locating the file much easier. There are likely many folders on your computer’s hard drive and you may even have several drives available where you can save it. Knowing where to look for a file makes finding it easier and faster.
While there are many locations available for you to save this document, we’ll assume you are saving it in the Documents folder (or library) on your local hard drive.
6. Click the This PC option in the Save As screen.
You are informing Word you want to save this file on your computer’s hard drive and in the Documents folder.
7. If desired, choose the folder you want to place this file, or do nothing to leave it in the Documents folder.
Where you save your file really does not matter as long as you remember where you stored it. You may choose another folder or be instructed to do so and that will be all right. For this book’s purposes, we’ll assume you have used the Documents folder.
The next step is to name this file. When you name a file, you want to give it a name that is descriptive so you can recall the file’s contents in a large list of files. Filenames can be up to 255 characters in length, but file names of this size can be quite unwieldy. Spaces are allowed in filenames, but you should avoid using punctuation or other symbols because some of these are not allowed in file names.
8. Type Practice Document in the File Name textbox and click Save to save the file.
Save vs. Save As
You selected the Save command but Word displayed the Save As dialog box. This is because you have not already named this file. As you modify a document, you will want to save often. However, when you do, choose the Save command, not the Save As command. When you choose Save, Word will overwrite the previous version with the newest version and use the same name.
If you attempt to save an existing document with the Save As command Word will ask if you want to replace the existing file with the one you are saving. If you are working on the same document, you will, of course, want to replace the old with the new. Using the Save command eliminates this extra, sometimes confusing question that Word asks.
One purpose of using the Save As command is to make a copy of a file with a different name or in a different location for backup purposes. When you choose Save, Word automatically keeps the same name and the same location. Using the Save As command allows you to change the location, name, or both. If you do change either of these, you then have two files, either in the same location with two different names or perhaps with the same name but at two different locations or drives.
Changing Views
Word has several views you can use as you edit and scroll through your document. The two most commonly used are Draft and Print Layout. Of the two, the Print Layout view is usually preferred as it lets you see your document as looks printed. You can change the view using the View tab or the View buttons on the right of the Status Bar. Some of the views available in MS Word are:
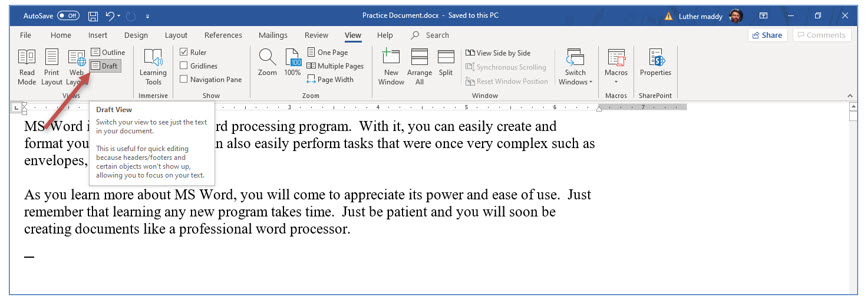
Draft View: Not all formatting and other page features will show in this mode.
Print Layout View: This mode shows the document as it will when printed. Print Layout also displays both the vertical and horizontal rulers. It also shows the top margin. This is very close to a WYSIWYG (what you see is what you get) editing mode. This view will show many formatting options that do not appear in Draft, such as Headers and Footers.
Read Mode: This mode optimizes the view for reading a document on a computer screen. This mode, by default shows two pages side by side. It also gives you the option of seeing the document just as it would appear if printed.
You will now try changing the view of the Word document you just created.
1. Click the View tab on the ribbon. If the Ruler option is not on, turn it on then click the Draft tool on the Ribbon.
Notice the ruler along the left side of the window is no longer visible. You may also notice there is no empty space at the top of the page.
2. Now, click the Print Layout tool on the Ribbon.
The vertical ruler is now visible. This is usually the preferred view when creating and editing documents in Word.
To change views you can also use the View shortcuts on the right side of the Status Bar or use keyboard shortcuts. There is no right or wrong way to switch views or select any other command in MS Word. There is usually more than one way to select Word commands.
Zoom Settings
In addition to changing the view settings, Word also allows you to choose from pre-defined or custom zoom settings. These settings include allowing you to increase the size of the text for editing purposes or shrink the view so you are looking at an entire page. You can access the zoom settings on the View tab.
1. Display the View tab, if needed.
You should now see the View ribbon options including the option of toggling the Ruler on and off.
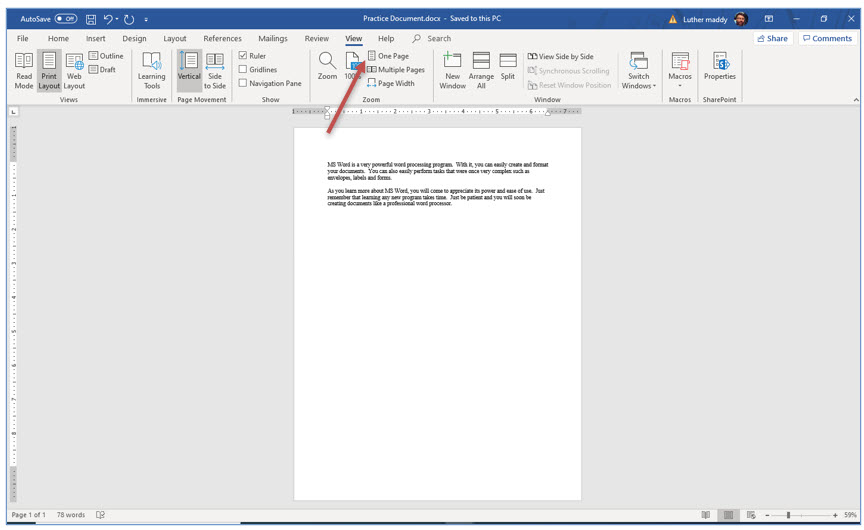
2. Click One Page in the Zoom group on the Ribbon.
You should now see an entire page of this document. This setting is very useful when you are moving and copying pictures and paragraphs on the same page.
3. Click Page Width tool in the Zoom group on the Ribbon.
This setting spreads the text out to fill the width of your screen.
4. Click 100% in the Zoom group on the Ribbon.
This is the normal or default setting in Word.
5. Choose the View option you prefer, 100% or Page Width.
Many of the screen shots in this text will use the Page Width setting. This allows the text to be more visible in this workbook.
Print Preview
The only true WYSIWYG (what you see is what you get) mode is the Print Preview mode. Here you see the document exactly as it will print.
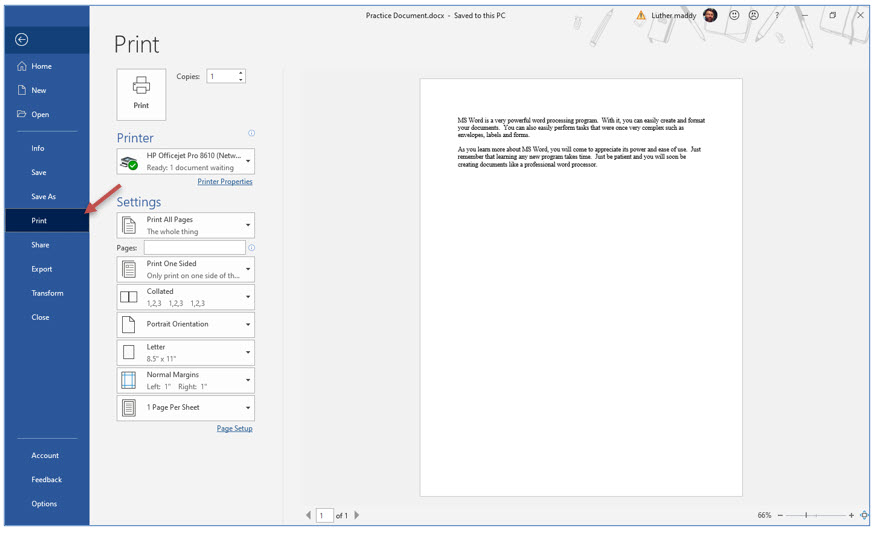
1. Click the File menu and then choose Print.
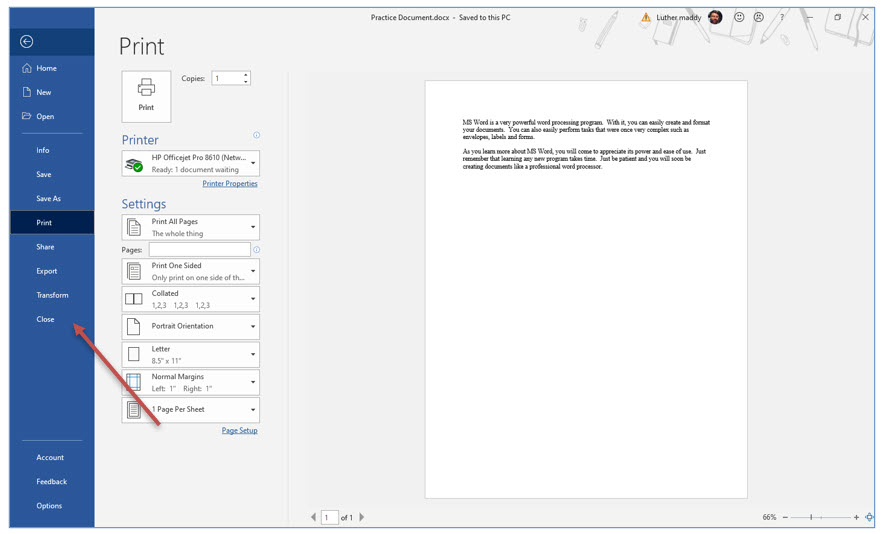
Word will now display the Print menu, which includes a preview of this document.
Printing Documents
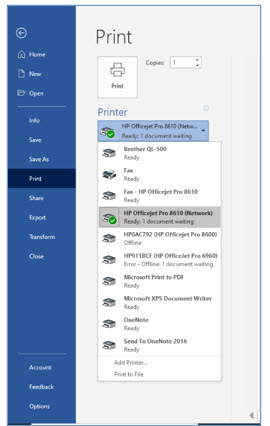
The Print menu allows you to choose several options for printing the document. The Printer section includes a drop-down menu where you can select a printer, if more than one printer is available.
The Printer Properties link below the selected printer allows you to choose printer specific options such as, changing the print quality, printing in black and white if you have a color printer and other options tied directly to your printer.
The Settings section allows you to specify options such as; duplexing (double sided printing) if your printer has the capability, specific pages to print or paper size and orientation.
To save paper, you do not need to actually print this document in this lesson.
Closing a Document:
Closing a document allows you to “put it away” and work on something else. As long as you have saved your document after making changes none of those changes will be lost. If you have made changes and have not previously saved, Word will warn you to save the document when you attempt to close the file.
2. Click the Close command in the File menu to close this document.
Sponsored Ads
2880
