Setting Field Properties
Much of the power in an Access database comes when you intitally set it up. One of the essential elements of proper database design is understanding how to use Access' field properties. This lesson will step you through modifying the design of a database and setting field properties to help maintain data intregity.
Note: These lessons are excerpted from Luther Maddy’s Access Workbooks (C) 2024 which are available in printed or eBook format from Amazon: Access: The Basics and Access: Beyond The Basics
No Fault Travel Database to complete this chapter
Changing Table Design
Generally, you want to avoid changes in table design after you have created other Access objects such as queries, forms, and reports, which are developed from table contents. Since we have not created any other Access objects yet or entered data into our No Fault Travel agency database, a table design change at this point will not have any inconvenient or time consuming consequences.
When changing the design of tables, you can add, delete, or rename fields. Another very important aspect of table design addressed in this lesson is setting field properties. Field properties allow you to add restrictions to the values that can be entered into fields, and thereby help you maintain data integrity in the database.
In this exercise you will add a field and set field properties.
1. Open the No Fault Travel database - either the one you created in the previous lesson or from the link above.
When you open an Access database downloaded from this website, you will need to click "Enable Content" to use it.
You will now enter the Design View of the Clients table, where you can make changes to the table’s design.
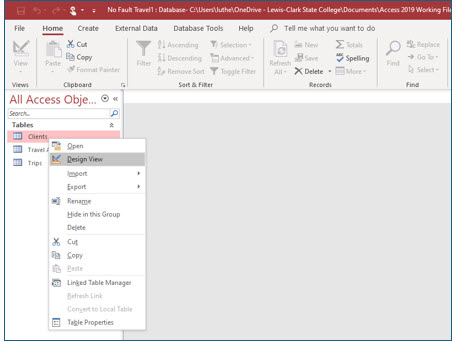
2. In the list of tables, right-click Clients and then select Design View.
Inserting a field
To add a new field, move to a blank row after the last field name and type the name for the new field. If you wish to insert a row above an existing field, move to this field and right click the gray button (i.e., the field selector) just to the left of the field name. Then, from the shortcut menu, choose Insert Row.
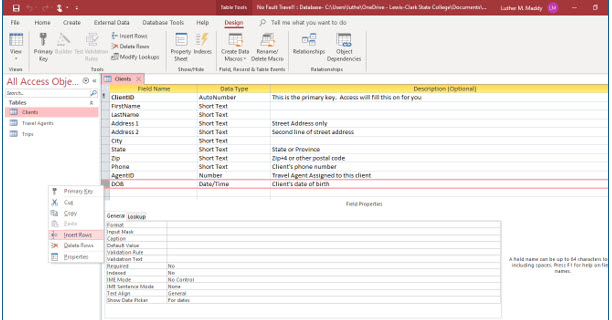
1. Right-click on the field selector for the DOB field (the box to the left of the field name).
The shortcut menu for the field should open.
2. On the shortcut menu, select Insert Rows.
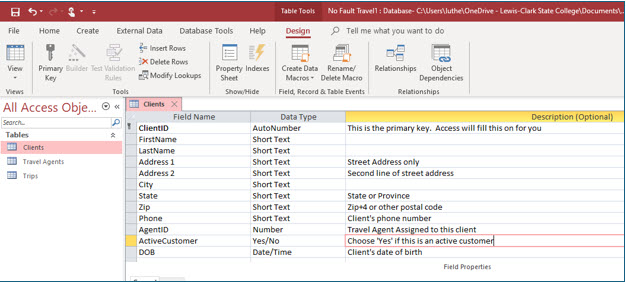
A new field should appear above the DOB field.
3. Click in the Field Name cell for this new field and type ActiveCustomer.
4. Choose Yes/No as the Data Type.
5. In the Description column type, Choose ‘Yes’ if this is an active customer.
Using a field with this data type allows you to easily specify if a customer is active or inactive. Including this field is useful because it allows you to view only active clients, or create reports which list only active or inactive clients.
6. Save the table after making these changes, but stay in Design View.
Setting Field Properties
You will now set some field properties in this table to have some control on the values entered in those fields. Notice the Field Properties section in the lower portion of the Design View window. Here you can view or make changes to a field’s properties.
1. Move up to and click in the FirstName field.
Look at the Field Properties for the FirstName field. Notice the Field Size is 255.
The Field Size Property
By default, Access sets all short text fields to 255 characters, the maximum size of short text. You will want to reduce the field size when fewer characters are needed.
For example, if you need only 6 characters in a field, keeping a field size of 255 characters increases the chances of a data entry error. When determining the field size setting, it is better to start too small and increase the field size, rather than to start too large and shrink the field. If you reduce the field size after entering data, you run the risk of truncating (cutting off) some data by making the field smaller than the size of previously entered data.
2. Select Field Size in the Field Properties of the FirstName field. Change the Field Size to 12 characters.
3. Change the Field Size of the following fields as indicated:
LastName 20
Address1 30
Address2 30
City 15
State 2
Zip 10
Phone 14
You only want to change the field size of the fields with the data type short text in this table. Leave the fields with other data types as they are for right now.
Format Property
Some field data types, such as Date/Time and Number, allow you to specify how you would like the data to appear in those fields. You can choose from several different formats for date fields. For example, you can have Access display the month name or display the date only using numbers. When you click Format under General Field Property, Access will display a drop-down arrow, which when clicked provides list of choices.
The format property for text fields does not offer a drop-down list of formatting options. However, text fields will be displayed in all uppercase or lowercase format if you enter a greater than (>) or a less than (<) symbol, respectively, as the field property for Format.
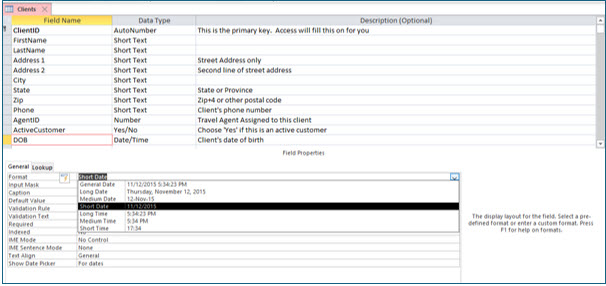
1. Move to the DOB field. Then move to Format under the Field Properties for the DOB field and click the drop-down list arrow.
2. From the list of Date/Time formats, choose Short Date.
Using Input Masks
Input masks can make data input quicker and easier by having Access automatically provide formatting features such as slashes (/) in dates and other formatting options. Input masks also help control the kind of data than can be entered into fields.
When working with dates, century compliance is a concern. If the date field will contain dates before 1930, it will be necessary for the user to input the complete four digit year, such as 1922. Otherwise, Access will assume the century is 2000 rather than 1900.
TWith our No Fault Travel agency database, the DOB field of the Clients table could contain dates prior to 1930. By entering the correct input mask you can require that every date entered here have all four digits for the year.
1. Click in the Input Mask row for the DOB field. Click the build button with three dots on the right .
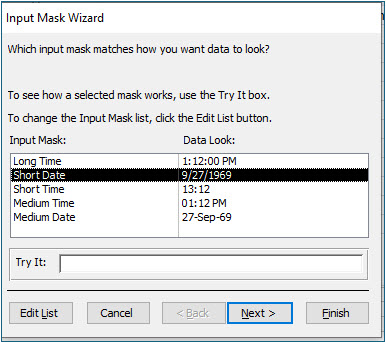
2. In the Input Mask Wizard dialog box, choose Short Date, and click Next.
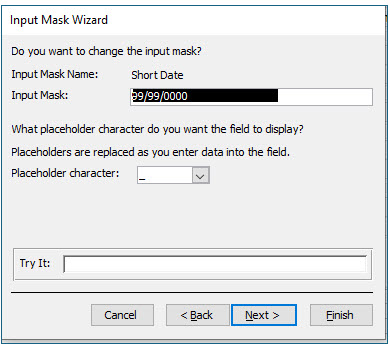
3. In the next step of the Input Mask Wizard dialog box, click Next.
You are selecting the default input mask. In a numeric input mask, 9s mean optional and 0s mean required. So, you are selecting an input mask that will allow you to enter a one or two digit month or day, but require a four digit year.
4. In the next step of the Input Mask Wizard dialog box, click Finish.
You should see the input mask entered for the DOB field.
5. Save the Clients table but stay in Design View.
Using the Input Mask Wizard
As you just saw, Access provides a wizard to assist in creating input masks. In this portion of this lesson, you will use the Input Mask Wizard again to create input masks for the phone number and zip code fields.
1. Move into the Zip field.
2. Click in the Input Mask row under the General Field Properties of the Zip field.
If Access asks you to save the table, answer Yes.
3. In the Input Mask row, click the build button, (seen below), on the right.
If Access asks you to save the table, answer Yes.
The Input Mask Wizard should open to lead you through the creation of this input mask.
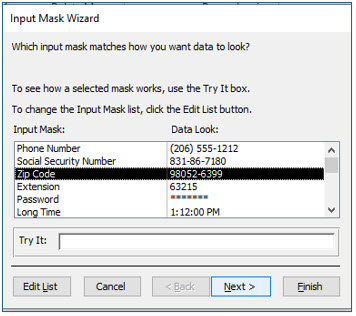
4. In the Input Mask dialog box, select Zip Code and click Next.
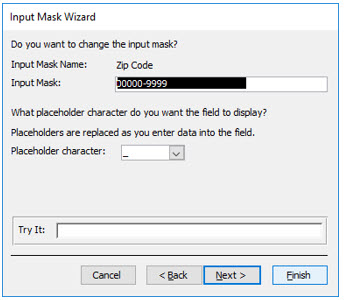
5. In the next step in the Input Mask Wizard, a nine-digit zip code format is the default provided (with a hyphen to separate the four extension digits). Click Next again.
The input mask uses both zeroes and nines. The zeros are required input for the five- digit zip code. The nines indicate that the four extension digits are optional. If you want to require all nine digits, change the nines to zeroes in the input mask.
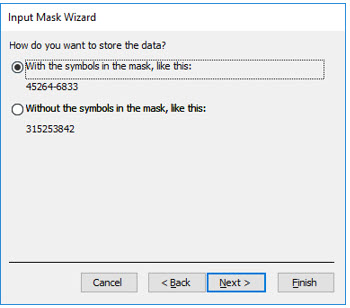
6. Select the option to store the data with symbols in the mask, and click Next.
Here you have told Access to store the hyphen (-) in the zip code so that it displays correctly in reports and labels.
7. Click Finish on the final Input Mask Wizard dialog box.
The input mask you just created should appear in the Input Mask row under General Field Properties of the Zip field in the Clients table.
8. Save the table to keep this change.
9. Move into the Phone field and click in the Input Mask row under General Field Properties.
10. Use the Input Mask wizard to build an input mask for the Phone field. Accept the default options for the data look and the input mask, (999) 000-000.
Be sure to store the data with the symbols in the mask (e.g., (976) 472-3491).
The Field Properties for the Phone field should now appear as above with the input mask created by the wizard in the Input Mask row.
Validation Rules
Validation rules let you restrict the information or values that can be entered into a field. Applying validation rules helps ensure data integrity and can make data entry easier. In the next steps, you will apply a data validation rule to the State field.
1. Move into the State Field and add -Only CA, ID, OR, and WA are allowed to the existing field description.
This description will be visible to the person entering data in the table. However, the description only makes a suggestion to the user to enter those four states into the State field; it does not prevent other states from being entered.
You will create a validation rule that will only allow the four states to be entered into the State field.
2. Move into the State field. Now, click in the Validation Rule row in the Field Properties section.
3. Type CA or ID or OR or WA and press (Enter).
You can see that Access added quotation marks, around the abbreviation for each state. Access will not allow any values other than what you typed into this field.
Validation Text
After entering a validation rule, Access will not allow any data that does not match the value(s) specified by you. If a user attempts to input incorrect data, Access will display a default error message stating that the data does not meet the validation rule. You can also replace the default message by a user-friendly one in the Validation Text property.
4. Move to the Validation Text property of the State field and type The client must live in CA, ID, OR, or WA. No other states are allowed.
Access will now display this message when incorrect data is entered into the State field.
Default Values
If the user will repeatedly enter the same value in a record field, you can have Access automatically enter that as the default value in new records. Of course, the default value can be changed by the user. In the next steps, you will add default values for the State and ActiveCustomer fields.
1. Move to the Default Value row of the State field. Type ID and then press (Enter).
Access adds the quotation marks for you.
2. Move to the Format row and insert the greater than symbol (>).
Access will display the state abbreviations in upper case letters, even if the user entered any part of the state abbreviation in lower case.
3. Now move to the ActiveCustomer field so that its field properties are accessible. Type Yes in the Default Value row.
Since most new customers will be “Active”, you changed the default value of this field to Yes instead of No.
4. Save and close the Clients table.
5. Enter the Design View of the Travel Agents table.
You probably did this by double clicking on the table in the “All Access Objects” pane, and then selecting Design View from the View Group on the Home tab. However, remember you can also simply right click the table in the pane, and then select Design View from the shortcut menu options.
6. Change the Field Size properties of the FirstName field to 12 and the LastName field to 20.
7. Save and close the Travel Agents table.
8. Enter the Design View of the Trips table.
9. Move to the DepartureDate field.
10. Change the Format property to Short Date.
11. In the Input Mask row, type 99/99/9999 and press (Enter).
This time you used 9999 in the year instead of 0000 because a trip departure date will not be before 1930. A user may enter the year into this field as either 4 or 2 digits (i.e., 2017 or 17).
12. Move to the ReturnDate field.
13. Add the same properties to this field that you added to the DepartureDate field.
14. Save and close the Trips table.
15. Close the No Fault Travel database.
