Creating Relationships
No Fault Travel Database to complete the Relatioinships chapter
After correctly designing and creating the table in your access database, the next step, before you start to use it is to create the relationships between the tables. This lesson will step you through creating Aaccess relationshiops.
Note: These lessons are excerpted from Luther Maddy’s Access Workbooks (C) 2024 which are available in printed or eBook format from Amazon: Access: The Basics and Access: Beyond The Basics
Watch the video-Understanding Relational Databases
No Fault Travel Database to complete this chapter
Creating Relationships
Relating or linking tables allows you to share information between tables. In the No Fault Travel agency database you are building in these lessons, you will link the Travel Agents table with the Clients table. You will also link the Clients and Trips tables. Relating, or normalizing tables, you should recall reduces data redundancy (which saves space) and improves data integrity. By linking the Clients table to the Trips table, only the client’s ID number needs to be included in the Trips table to link a trip to a client.
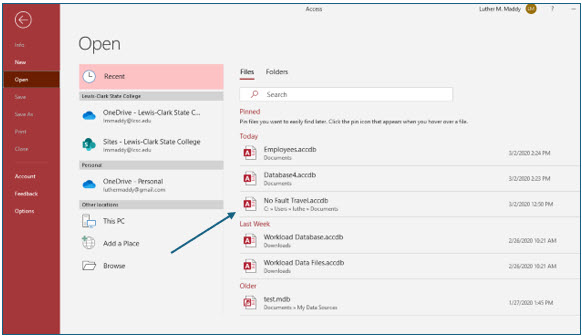
1. Click the File tab to display the Backstage view. Choose Open.
Access will display a list of files you have recently opened. In this case, the No Fault Travel database should be in this list. If not, you can use the Browse feature to find the location of the file.
2. Click the No Fault Travel database file in the list of recent files to open it.
In the next steps, you will create the relationships you need in this database. Some features you use in Access will create links in tables. These features include queries and lookup fields. Creating your own links before you start using the database allows you to choose relationship options that Access does not automatically use. Creating relationships before adding data ensures that when data is added, it will follow the relationship rules you set up.
3. Display the Database Tools tab, then choose Relationships.
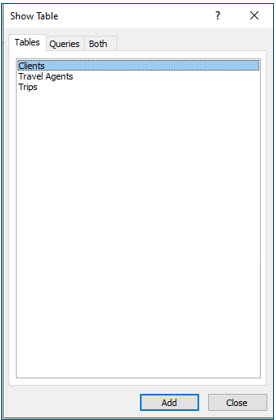
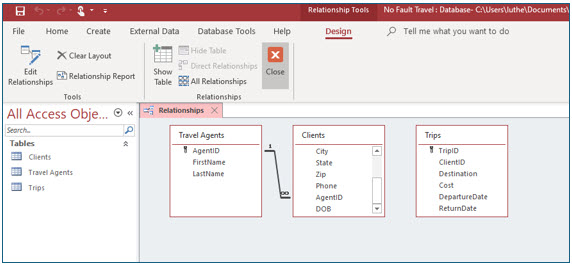
The Show Table dialog box appears where you choose the tables that you wish to relate. In this case, you will add all three tables.
4. In the Show Table dialog box, select the Travel Agents table and click Add.
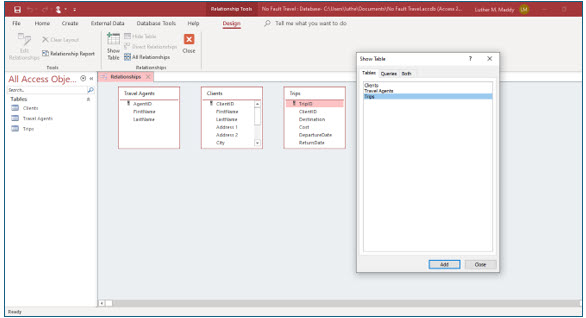
The Travel Agents table should now be displayed in the Relationships window. Move the Show Table dialog box below the area of the table information (by dragging its title bar down), so that the tables will not be covered by the Show Table dialog box.
5. Select Clients and then click Add. Next, select Trips and click Add.
6. After adding all three tables, click Close to close the Show Table dialog box.
You should now see all three tables in the Relationships window. If you inadvertently added a table more than once, you can click the title bar of the extra table and then press (Delete) to remove the extra occurrence of the table.
If you skipped a table, you can click the Show Table tool on the ribbon to open the Show Table dialog box. This will allow you to add the missing table or tables.
After adding all three tables you are now ready to create the relationships between them.
7. Scroll down in the Clients table so that the AgentID field is visible in the field list.
The relationship you will create between the Travel Agents and Clients tables will be based on the AgentID field. This field is the primary key in the Travel Agents table. It is not the primary key in the Clients table. In the Clients table, it is called a foreign key.
If the AgentID field were the primary key in the Clients table and the Agents table, that would mean that each agent could have only one client. The relationship you are about to create is a one to many relationship, which means that one agent may have many clients.
8. Carefully drag the AgentID field from the Travel Agents table and place it on top of the AgentID field in the Clients table.
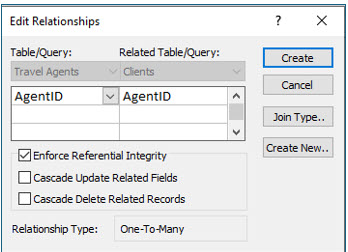
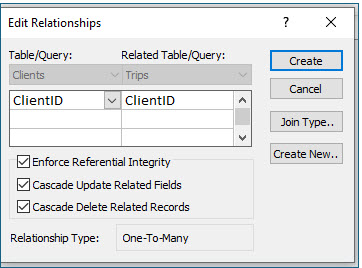
The Edit Relationships dialog box should appear where you will specify the relationship options you want between these two tables.
9. In the Edit Relationships dialog box, turn on the Enforce Referential Integrity check box.
Enforce Referential Integrity
You have told Access to check the validity of the AgentID field when this value is entered into the Clients table. You will want to enable this option for most relationships you create. This check ensures that every client will be assigned a valid travel agent identification number. Otherwise, values might be permitted in this field that do not correspond to actual agents listed in the Agents table.
Cascade Update Related Records
When you selected Enforce Referential Integrity, the Cascade Update Related Fields option became available. Turning on this option allows you to change the travel agent’s ID number in the Travel Agents table and have Access automatically change this value for all the clients assigned to this travel agent in the Clients table. This is an option you will want to enable in most of your databases; however, when using the AutoNumber field type for the primary key as we did in the AgentID field in the Travel Agents table, this option has no effect.
1. Turn the Cascade Update Related Records option on.
2. In the Edit Relationships dialog box, click Create.
You should now see a join line between these two tables. You should also notice that Access has created a one to many relationship (i.e., one agent may have many clients).
3. Now, scroll up in the Clients table to display the ClientID field.
4. Drag the ClientID field from the Clients table and place it on top of the ClientID field in the Trips table.
You should once again see the Edit Relationships dialog box.
5. In the Edit Relationships dialog box, enable the Enforce Referential Integrity option.
6. Enable the Cascade Update Related Fields option.
Cascade Delete Related Records
With this option enabled, if you delete a client from the database then all the trips booked for that client would also be deleted. This option causes the deletion of the “many” records associated with the “one” when the one record is deleted.
Use extreme care when determining if this option should be enabled! In our No Fault Travel database, this is an option you will enable. If you delete a client, you do not want the Trips table keep trip information without identifying who took those trips. If you delete a client, all the trips for that client should also be deleted. Of course, use caution any time you delete a record.
1. Enable the Cascade Delete Related Records option in the Edit Relationships dialog box and click Create.
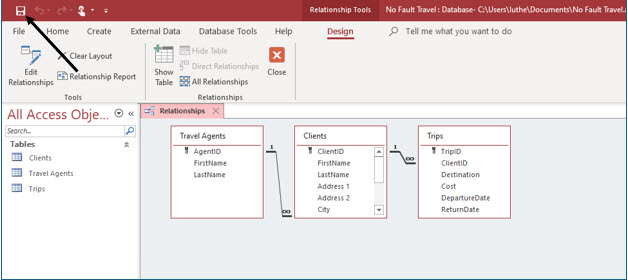
You have now created a relationship between the Clients and Trips tables. You should see that this relationship is also “one to many.” With this relationship, each client may book one or more trips.
2. On the Quick Access bar, click Save.
This saves the file with the new relationships.
3. Close the Relationships window by clicking the Close button in the Relationships group.
If you do not save before closing the relationships, Access will display the dialog box above.
4. Close the No Fault Travel database.
