Creating and Using Forms
Access forms can be very powerful database objects. This lesson and future lessons will show you how to create and use forms to work with your data in Microsoft Access.
Note: These lessons are excerpted from Luther Maddy’s Access Workbooks (C) 2024 which are available in printed or eBook format from Amazon: Access: The Basics and Access: Beyond The Basics
No Fault Travel Database to complete this chapter
Creating and Using Forms
Forms allow you to enter, edit, and view data. You can create custom forms and even create a form that is duplicates a paper form you may be already using to collect data. An Access form can show one or multiple records depending on the layout. Showing one record per screen allows you to see fields, which may not be viewable from table Datasheet View in one screen width. Forms are very easy to create and use. In this lesson you will explore creating and using forms.
1. Open the No Fault Travel database.
2. Click the Create tab.
Currently, there are no forms in this database, only tables.
3. Click Form Wizard from the Forms group.
Using the Form Wizard
Using the Form Wizard, Access creates a form based on the choices you make. You decide on the basic layout, which fields you want to display, and the background style.
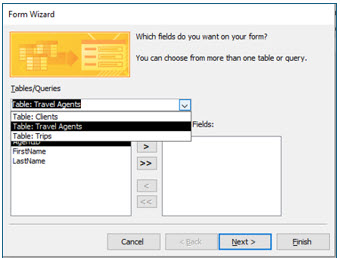
4. Click the drop-down arrow under Tables/Queries, choose Table: Travel Agents from the selections provided.
Next, you need to select which fields you want on the form in the order you want to see them.
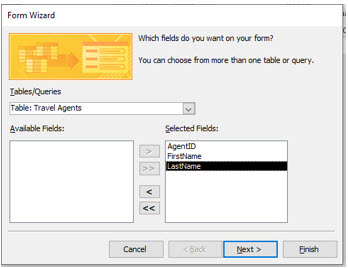
5. Click the double 'greater than' button to add all the fields.
Use the single 'greater than' button, if you want to add one field at a time. The buttons with the left pointing arrows similarly will remove the selected fields all at once or one at a time.
6. After selecting all the fields, click Next to continue.
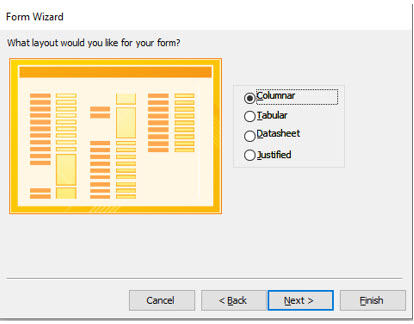
7. Choose Columnar as the layout for this form and click Next.
Access will layout the form in columns with one record per form. Tabular, which appears similar to the table view, displays multiple records in rows.
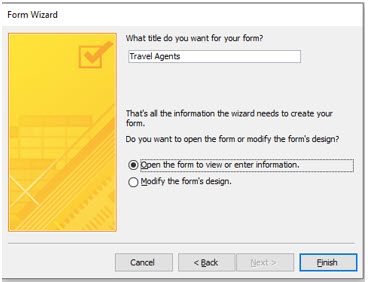
8. If needed, type Travel Agents in the text box for the form title and click Finish.
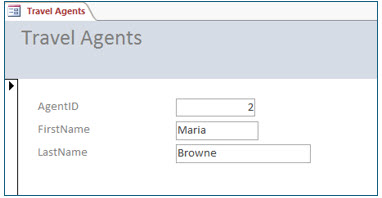
You should now see the form you created using the Form Wizard.
Now, we you will change the layout of this form. To do this you will enter the Design View.
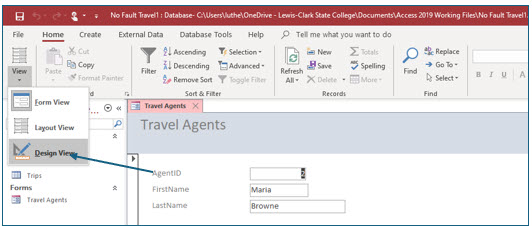
9. In the Views group on the Home tab, click the View drop-down arrow. Choose Design View.
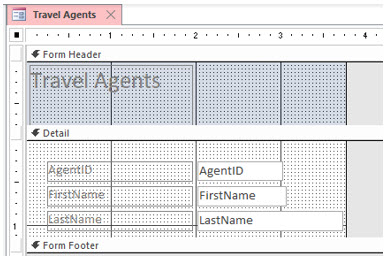
In Design View you can adjust the size of fields, add fields, or change the layout of the form. In this portion of the exercise you will adjust the size of the fields as they are displayed on the form.
10. Click the AgentID textbox. Move the mouse pointer to the right edge. When you see the sizing arrow, drag left to decrease the size of this field.
Although it is not necessary, it is a good practice to leave the text box large enough so that the field name is visible when using Design View. The field name identifies the text box and makes future editing of the form easier.
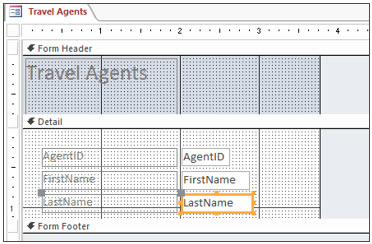
11. Adjust the text box sizes for the other fields on the form so that their widths appear similar those in the image below.
If you find at a later time that your field width is not large enough, you can re-enter the Design View of this form and increase the size of the field displayed.
12. Save and close the form.
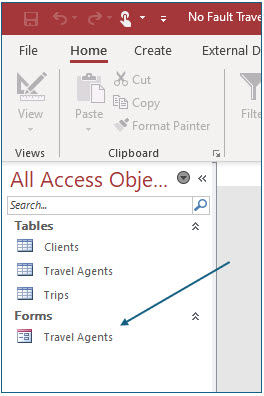
You should see the Travel Agents form listed under Forms in the All Access Objects pane on the left side of the screen.
Creating a Form using Form Design
The Form Wizard is a quick way to easily create form. But to modify the form, you need to use the Design View. In this portion of the lesson, you will create an entire form in Design View to help you learn more about forms and how to modify a form layout.
You will not create a Client entry/edit form that will resemble a paper form.
1. Click the Create tab, then the Form Design tool in the Forms group on the ribbon.
You are now in the form design view. You have a blank form and will layout the form one field at a time, exactly as you want the fields to appear.
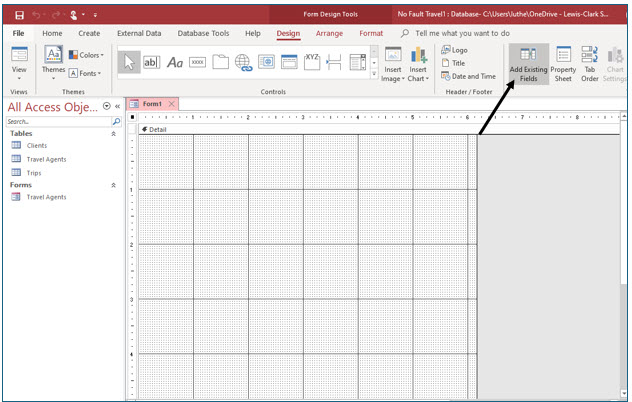
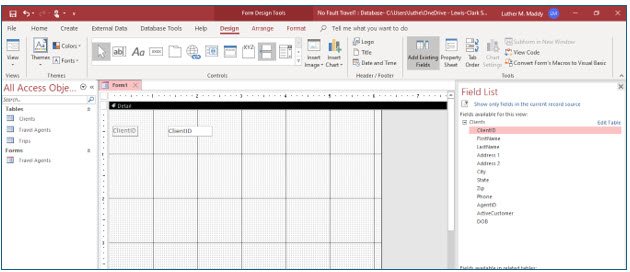
2. Click the Form Design Tools Design tab. Then, in the Tools group, click the Add Existing Fields tool.
You will need to specify for which table you wish to use this form before you select the fields you want included on the form.
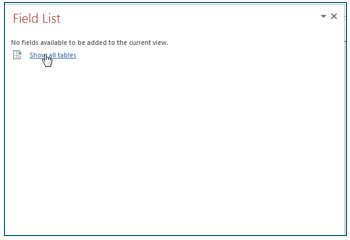
3. In the Field List pane, click Show all tables.
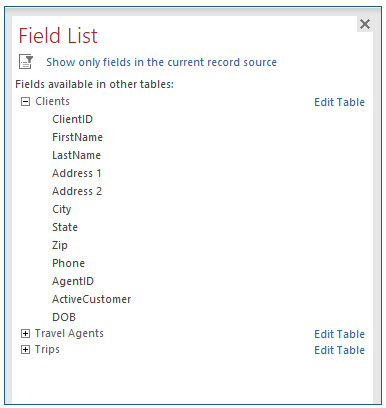
4. Expand the Clients field list to view all fields by clicking the to the left of Clients. Next, drag the ClientID field onto the form as shown.
Drag to approximately 1.25” in the horizontal ruler to make room for the attached label control.
When you drag a field onto the form, Access places two controls with the same name on the form. The gray control is the label, the name of the field. You will not alter the field label when you enter or edit data on the form. However, you can edit the field label in Design View, so that the label displays other information to the form user, besides the field name.
The second control is the field text box, which holds the field information in the table. You can use the text box to enter or edit data. You do not want to edit the field name in the text box control when you are designing a form because that would break the link between the control on the form and the table field with the same name.
When you drag a field, Access places the top left edge of the field’s text box at the mouse pointer’s location. Access automatically places the label to the left.
You can move and size both the field label and text box, as you did previously. The text box and label are linked. If you move one, the other also moves unless you drag the top left corner of the field label or text box.
Tab Order on a Form
When using an Access form, you can move from field to field by pressing the (Tab) key. The tab order is defined by the order in which you dragged the fields onto the form. If you drag ClientID to the form first; Access assigns it the first tab stop. If DOB is the last field dragged to the form, Access will assign it as the last tab stop, no matter where it is placed on the form.
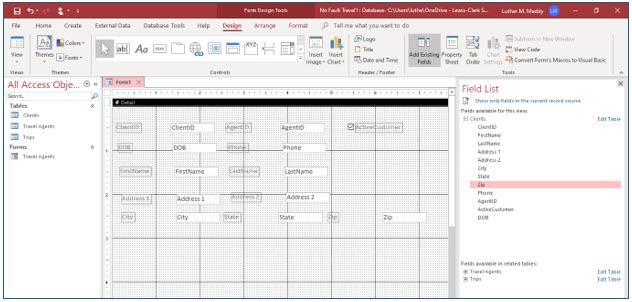
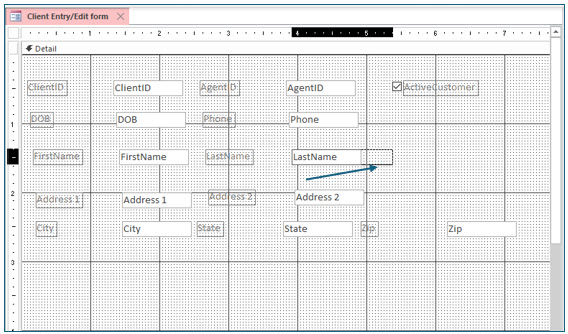
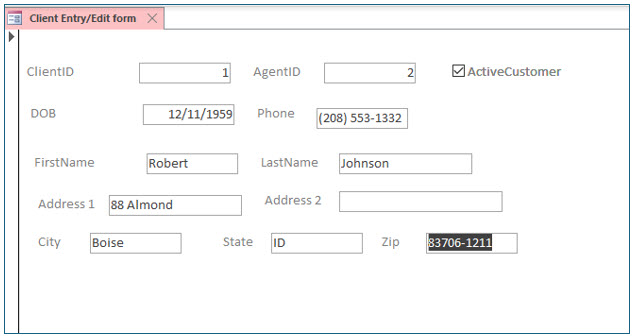
5. Continue adding fields to the form so that it appears similar to the image shown.
You can also move the fields in an attempt to properly align them. To move a field, click on the textbox control and look for the black crosshairs and then drag. The label will come along with the textbox. Don’t worry if your form isn’t perfect just yet, you will learn a better way to align fields later in this lesson.
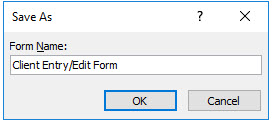
6. Close the Field list pane. Save the form as Client Entry/Edit Form, but leave it open and in Design view.
Modifying the Form’s Design
After you create the basic form layout, you can move and size fields. In this portion of the exercise you will re-design this form to improve its appearance.
Selecting Controls
You must select a control before you can move or size it. To select a control, just click it, and eight sizing handles (gold squares) will appear at the corners and midpoints on the box sides.
To select multiple controls, press and hold the shift key as you select each control. Each selected control will have sizing handles.
1. Click on the text box for the LastName field.
The text box is the white box which in Form View you will see the actual data in the field. The label control is the gray box which displays the field name
Moving and sizing controls
When you selected the text box for the LastName field, the associated field label was also automatically selected. Whether you move one or both controls (i.e., field text box and label), or just size the selected control (in this case the text box) depends upon the shape of your mouse pointer when you drag.
The “four-headed arrow” will move all selected controls. You will find this control when you point to any edge on the selected control, not near a sizing handle. (Reminder: If you point to the top left corner of a control, only that control will move.)
The “double-headed arrow” lets you size the control. The arrow direction indicates the direction of expansion -- vertically, horizontally, or diagonally as the example arrow here. The arrow direction depends on which sizing handle you are pointing to.
2. Move the mouse pointer to the sizing handle on the right side of the LastName field text box. A horizontal double-arrow should appear.
3. Carefully drag the double-arrow right to increase the width of the text box by approximately ½ inch.
This will allow space for longer last names.
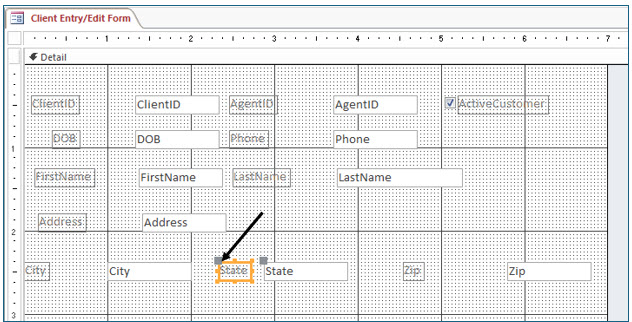
4. Click the State field label control to select it.
The field label is the control to the left of the field text box (also a control).
5. Move the mouse pointer to the top left corner of the State label control. This is referred to as the “move handle”.
You should see a four-headed arrow, which indicates you can move this control. Dragging from the top left corner allows you to move just that control, and not its associated control (in this case, the State field text box). Otherwise, the four-headed arrow would move both controls.
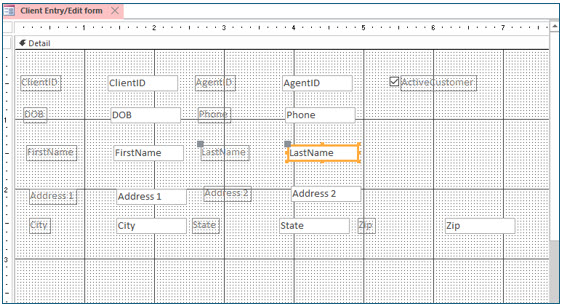
6. Drag the State label control left so that it is closer to the State text box as shown.
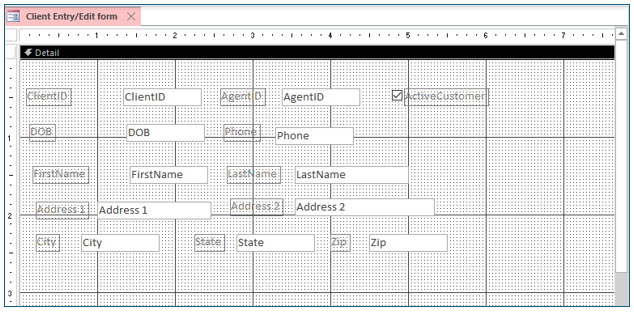
7. Now, repeat the moving and sizing methods to move and resize labels and text boxes to create a form similar to the one shown below.
Entering Data in a Form
When you enter data into a form, press (Tab) or (Enter) to move to the next field. If you want to move to a previous field, press (Shift+Tab). After you have entered data in the last field and press (Tab) or (Enter), Access will display a new record for you to fill in.
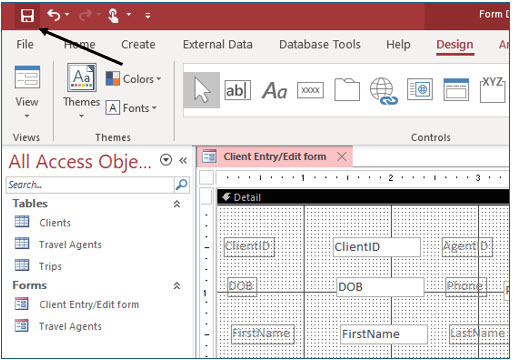
1. Click the Save tool on the Quick Access toolbar to save database with the modified form design.
2. In the View group on the Design tab, click the View drop-down arrow and select Form view.
You have left design mode and can now work with the data. If, as you are entering data you find one of the text boxes is too small you can enter the design view and adjust the size of the control.
3. Enter the data in the form as shown.
Remember to skip over (i.e., just press Tab) the ClientID field. Access will automatically assign the ClientID number. You should also notice that “ID” appears as the default state. You should recall setting this up in the field properties lesson.
4. Press (Tab) after entering the last field, the zip code. Then, press (Page Up) to view the record you just entered.
5. On the Home tab ribbon, click the New tool in the Records group.
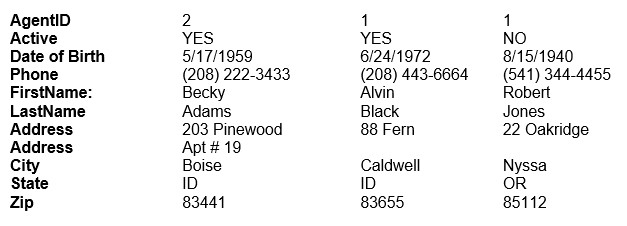
6. Enter the following data for three additional records:
The Record Navigation Bar
You can use the record navigation bar at the bottom of your form window to move easily from record to record. The two left buttons move to the first record (left arrow with line) or the previous record (left arrow no line). The first two right buttons move to the next record (right arrow no line ) or the last record (right arrow with line). The third right button (right arrow with orange square) creates a new record.
7. After entering these records, use the record navigation bar to go to the first record and then the last record.
8. In the last record, change the state to UT and press (Enter).
A Microsoft Access validation error message should appear and inform you that this is not a valid state.
9. Click OK on the error message box. Then press (Esc) to return to the original data entered.
You should also notice that when the State field is active, the field description shows at the bottom of the form.
10. Close the Clients form. Answer “Yes” if asked to save the design changes to the form.
You will now create a tabular form based on the Trips table.
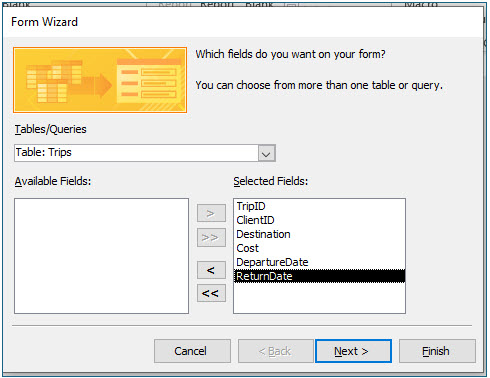
11. Click the Create tab, and click the Form Wizard tool in the Forms group. Choose the Trips table and select all the fields in this table (Double greater than sign), and then click Next.
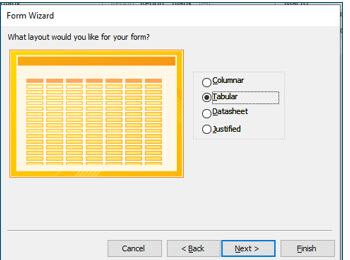
12. Choose Tabular as the layout and click Next.
13. Title the form Trips Entry/Edit and click Finish.
Editing a Columnar or Tabular Form
In this portion of the lesson you will enter the design view and make changes to the form’s design.
1. Use the View tool on the Home tab to enter the Design View.
2. Click in the DepartureDate label and change it to read Depart.
The labels in a tabular form are the controls in the Form Header.
After clicking once to select the field label control, you will need to click a second time for the insertion point to appear so you can change the text.
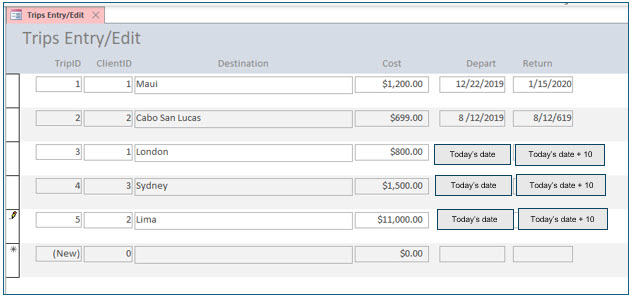
3. Modify the textboxes and labels on the form so they appear similar to the image above.
You will need to decrease the width of the Cost and the Destination controls (field labels and text boxes). Change the text in the ReturnDate field label as well. You should also increase the size of both date fields.
As we discussed earlier, do not change the field names in the text boxes. If you change the field names in the text boxes, you will break the link to the field data in the table, and an error message will appear when you view the form.
The Center tool can be accessed from the Text Formatting group on the Home tab on the ribbon. You can use it to center the text in the labels on the Form Header.
4. Save the modified form.
5. Display this form in Form View and enter the records as shown below:
Note: For trips with TripID 3, 4, or 5, enter a departure date one day after today’s date. Enter a return date 10 days after today’s date.
If you need to adjust the size of a field so the data displays properly, just enter the design view and make the changes.
The Ditto Command
When you are entering several values that are the same in different records, you may use the ditto command. Moving to the field you want to enter duplicate information in and pressing (Control+apostrophe) will cause the field information from the previous record to appear in the current record.
6. Close the form when done.
If you did make design changes, be sure to save the form.
The Find command
You can use the Find command to quickly locate a particular record. The first step is to move into the field you wish to search. Then, select the Find command and specify the value you want to find in that field. To find specific records in large files, choose your search value carefully.
1. Open the Client Entry/Edit form.
Access will display the first record in the table. By default, the records are sorted by the Primary Key value.
2. Press (Tab) until you move into the Last Name field.
In this exercise, you will search for a value in the LastName field.
3. In the Find group on the Home tab ribbon, click the Find tool.
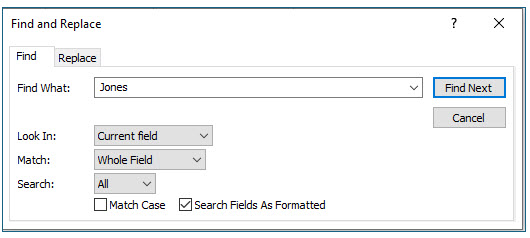
The Find and Replace dialog box should appear.
4. In the Find What text box type Jones, and then click the Find Next button.
Access will now display the first record found with Jones in the LastName field. If the Mr. Jones in the displayed client record were not the Jones you were seeking, you could click the Find Next button until you located the correct record.
5. Close the Find dialog and then close the No Fault Travel Database.

