Creating a new database
In these step-by-step instructions you will learn to create a new database in Access with multiple tables. You will also learn about field types and descriptions and the importance of the Primary Key. Additional lessons will help you crated forms, reports, and queries.
Note: These lessons are excerpted from Luther Maddy’s Access Workbooks (C) 2024 which are available in printed or eBook format from Amazon: Access: The Basics and Access: Beyond The Basics
Creating the Access database file
Before you can create tables, you must create the Access file that will hold the database tables, forms, queries, and reports. You will use this file name to open the database when you wish to use it.
1. Start Microsoft Access.
You may start Access from either the Desktop or the Start menu. How you start Access depends on your computer.
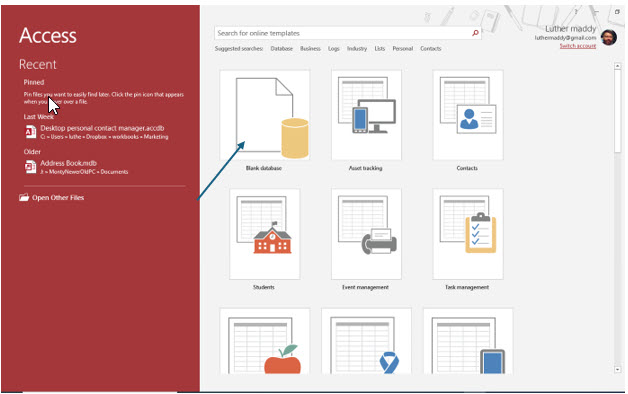
Each time you start Access you will see this screen, the Backstage view, which lets you open a new or existing database file. The default option (marked by the arrow above) is creating a new blank database. You can also open an existing database file using the menu on the left side.
When creating a new database, you can also select a premade database template on this screen. We will choose a blank database in this course, not only to learn the features of Access, but also because a custom designed database is tailored to your needs.
2. Click Blank Desktop Database to create a new database.
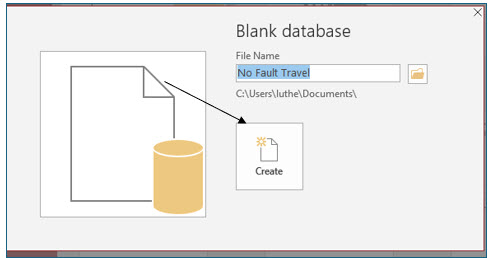
You will now be prompted to name the Access database file. A default location is selected, but you can also select its location.
1. If needed, you can click the browse tool to store this file in another drive or folder. After selecting the desired folder, enter No Fault Travel as the file name and then click the Create button.
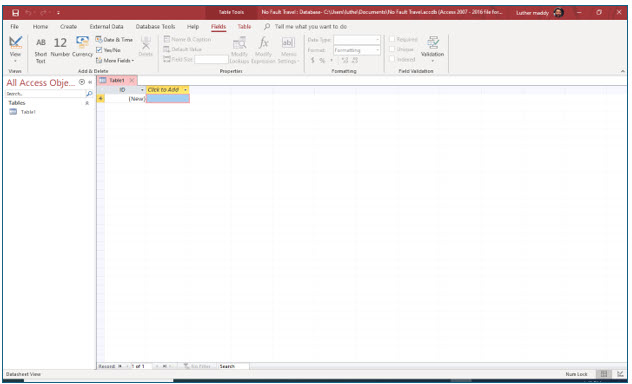
You have now created the Access file that will hold the tables and other objects of this database.
You will now create the first table for the No Fault Travel agency database. To further emphasize the structure of databases, we will have you create your tables in Design View. Later, as you better understand database structure, you can use the tool in the Add & Delete group to add fields to your tables. Overall, while it may be more complex in the beginning, the Design View allows you to see the entire structure of your tables.
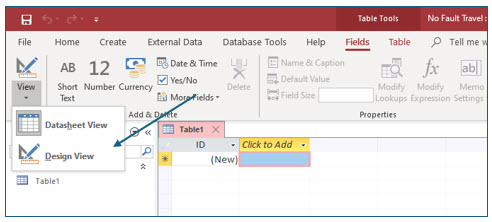
2. In the Views group on the left side of the ribbon, click the View button to change the table view to Design View. (Note: You can also accomplish this by clicking on the drop-down arrow.)
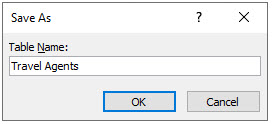
The Save As dialog box appears. You will now name this table.
3. Type Travel Agents in the text box and click OK.
Access has named this table Travel Agents and switched to Table Design view, which allows you to create or modify a table. You can specify the name, data type, and description for each field in a table using Table Design view. You can also set Field Properties, which you will learn about later in this course.
Field Names
Field names can be up to 64 characters long and consist of letters or numbers. Although spaces can be included in a field name, you should avoid them if you wish to later integrate your Access database with other database systems.
4. Replace ID with AgentID as the name of the first field in this table and then press (Tab).
You are now in the Data Type column, where you can specify the type of information. When you create a new table, Access will name the first field ID and set it as the Primary Key. By default, the Data Type is set to Auto Number. If you would prefer another name for your first field, you can change it as you did here.
You will now view the different data types available in Access.
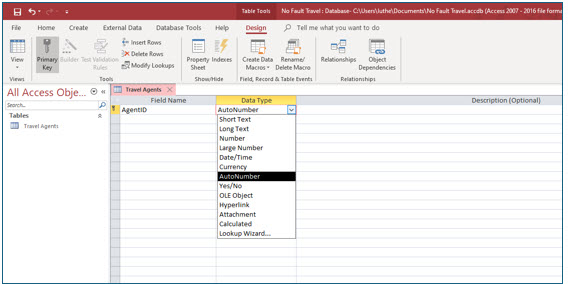
5. In the Data Type column, click the drop-down list to display the various field types.
Field types
As you can see from the list, there are several field types. A definition of the field types is as follows:
Short Text: Short text fields hold alphanumeric information such as names and addresses. You should also use text fields to store numeric information that you will not use in calculations such as zip codes. Short Text fields can hold a maximum of 255 characters.
Long Text: Long text fields hold the same kind of information as short text fields. However, memo fields can store a maximum of 65,535 characters.
Number: Number fields hold numeric information that you intend to use in computations such as quantity or temperature.
Date/Time: Date/Time fields hold dates or times. You can view and enter this information in various formats. Storing dates and times in this field type also allows you to perform computations with your date and time data.
Currency:Currency fields hold numeric information. However, numbers stored in this field type will automatically be displayed in currency format ($33.44) for example. Currency fields would be used for fields like PayRate and Price.
AutoNumber: An Autonumber field type generates a unique sequentially increasing number for each new record. In tables created by default, the first field in a blank Access table is the primary key named ID of field type, AutoNumber. However, other fields containing unique information such as social security number can be used for the primary key and Autonumber is a useful field type to provide sequential numbers even when not used as a primary key.
Yes/No: Yes/No fields contain only the values Yes or No. Use this field type for enabling certain categories or answering simple yes or no questions. For example, a field named Active Customer would be a Yes/No field.
OLE Object: Use this field type when you want to store graphic information, such as a client’s photograph.
Hyperlink: A hyperlink lets you store a link to something else. You could, for example, have a field named Vendor Web Site. Storing the vendor’s Internet address in a Hyperlink field would enable you to quickly link to their site directly from Access. You can also use this field type to link to a document in Word or Excel.
Attachment: Attachment fields let you attach files such as pictures, documents, or spreadsheets to the record.
Calculated: Calculated fields allow you to perform computations based on other fields in the table.
6. Choose AutoNumber as the data type for the AgentID field and press (Tab) to move to the Description column.
When choosing a data type, you can just type the first letter of the data type to move to that data type. Typing an “s” for example, moves to the Short Text type.
Field Descriptions
Field descriptions are optional. However, the text you type in this column will show up on the status bar at the bottom of the screen when you are in that field. The field description is a good way to inform users what the field’s purpose is and how it works.
7. In the field description for AgentID type: This is the primary key. Access will fill this value in for you and then press (Enter).
You entered this description so users of this database will know they should not attempt to enter information into this field.
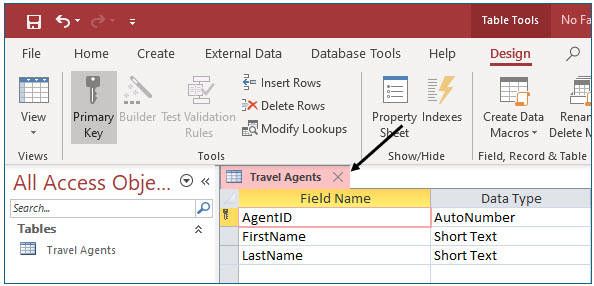
8. Name the next two fields, FirstName and LastName, with Short Text as the data type and no descriptions.
Both of these fields will be short text fields. You do not need a description for these fields.
The first table for the No Fault travel agency is now complete. It has been constructed to store each travel agent’s ID, first name, and last name.
Setting the Primary Key
As mentioned when discussing the AutoNumber field type, Access automatically sets a primary key when it creates the first field in a new table. Although you can change the primary key to another field, using the first field in the table as the primary key is a good practice. You can set or unset a primary key by clicking Primary Key in the Tools group on the Table Tools Design tab.
Saving the Table
Now that you have added all the fields to this table, you are ready to save the table.
1. Click the Save icon on the Quick Access bar.
You will now close the Travel Agents table so you can create another table.
2. Click the small x in Travel Agents tab.
You are closing only the table. The Access database file will remain open.
You should see Travel Agents in the list of tables in the All Access Objects navigation pane on the left. In the next steps, you will create two additional tables for the No Fault travel agency database.
First, you will create a table to store information about the travel agency’s clients.
3. Display the Create tab and click the Table Design tool in the Tables group.
You will be working in the Table Design View to create this table. Directly choosing to create a Table Design (instead of first creating a Table) saves the step of having to switch into Design View. Also note, when you create Table Design, rather than a Table, the first field is not automatically set as the primary key with field name ID of type AutoNumber.
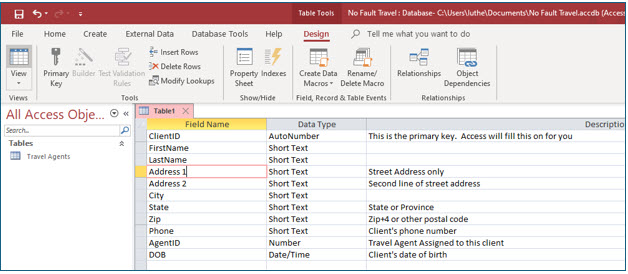
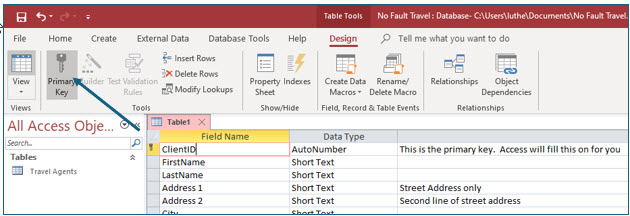
4. Enter the field names, types and descriptions as shown. Be sure that the Data Type for the field ClientID is set to AutoNumber. Set the Data Types for the AgentID field to number and the DOB field to Date/Time.
You are setting the AgentID field to number so that you can enter the number Access assigns the agent in the Travel Agents table. If you used Auto Number here, Access would automatically fill in the field for your and it might not match any agent in the firm.
You will add formatting to these fields later too ensure consistency in the way users enter data, such as date of birth and phone number.
Although Access does allow spaces in field names, learning not to use them is a good practice in the long run because some of Access’s intermediate and advanced features are easier to use when spaces are not present. Furthermore, other database systems like SQL and MySQL do not always work well with or allow the use of spaces in field names.
5. Move into the ClientID field and click the Primary Key tool to set this field as the primary key.
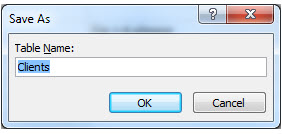
6. Save this table as Clients and then close it.
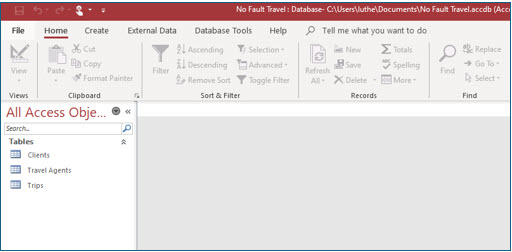
Notice that both the Clients and Travel Agents tables are visible in the Access objects pane.
You will now create a third table to store the trips that clients have booked.
1. On the Create tab, click the Table Design tool.
2. Enter the field names, data types and descriptions as shown.
3. Make the TripID field the Primary Key of this table.
To do this, move into the field and click the Primary Key tool on the ribbon.
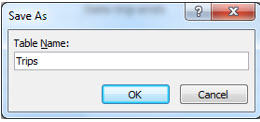
4. Save this table as Trips and then close it.
You now have three tables in this database file, No Fault Travel. These tables will hold the records you enter in this database. You will be adding additional database objects such as forms, queries, and reports as you continue the lessons in this workbook.
5. Click the File tab to open the Microsoft Office backstage view. Select Close to close the No Fault Travel Access file.
You have closed the database for the No Fault travel agency. Now you can create a new database or open an existing database.
