Creating and Using Macros
Much of the power in an Access database comes when you intitally set it up. One of the essential elements of proper database design is understanding how to use Macros in Access. This lesson will step you through creating and using Macros.
Note: These lessons are excerpted from Luther Maddy’s Access Workbooks (C) 2024 which are available in printed or eBook format from Amazon: Access: The Basics and Access: Beyond The Basics
Creating and Using Macros
Macros allow you to automate repetitive tasks. You can create a macro to run a particular report, or even to open a certain form and find a specific record. In this lesson, you will create a macro that previews a report and one that automatically sets a trip’s return date after a departure date is entered. This macro will set different trip lengths based on destination. Macros can be very useful in forms.
Macros execute when they are triggered by an event. An event might be clicking a “Run Report” button or, an event might be changing the value in a field.
Creating macros
Macros can be created by using the Event tab in the Property Sheet or the Macro tool on the ribbon’s Create tab. Either way, you must link the macro to the control and to the event you want to trigger the macro.
You will now create a macro that runs the trip report and then tie that macro to a button you will create in the clients form.
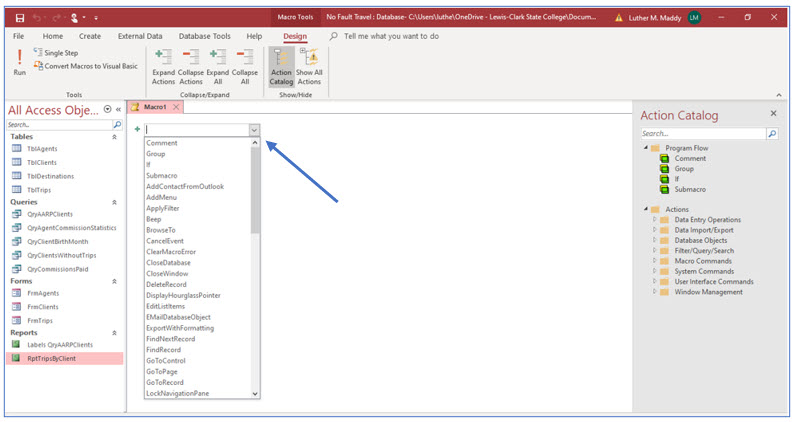
1. If not already open, open the No Fault Travel database. On the Create tab, click the Macro tool in the Macros & Code group.
The Macro Builder should open. Unlike other Microsoft Office programs, you do not record macros to create them in Access. Instead of recording them, you will build them action by action.
2. In the Add New Action dropdown list just below the Macro tab, click the dropdown arrow to open the list.
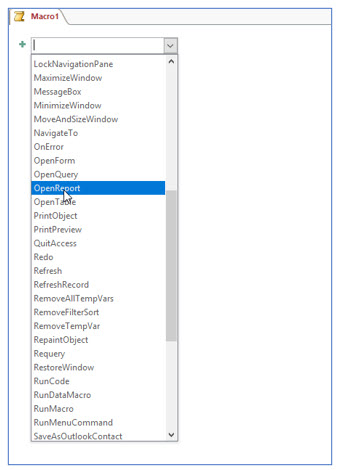
3. From the list of commands, choose OpenReport.
The OpenReport command will cause Access to open a report. In the next step, you will specify which report you want to open.
4. Click the dropdown list arrow in the Report Name text box and choose RptTripsByClients.
The next step is to specify how you want to view the report: in Design View, Report View, Print Preview, or in print (on paper).
5. Click the dropdown list arrow in the View text box and choose Print Preview.
When you run this macro it will open the report in Print Preview mode.
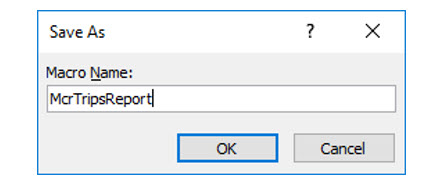
6. Save this macro as McrTripsReport and close it.
You may need to close both the macro and Macro Builder. The macro is now complete.
Linking an event to a macro
After creating the macro, the next step is to open the form that contains or will contain the control you want to link to this macro. To link a control to a macro, you use the control’s Event Properties. There are several events you can use to trigger a macro. In this portion of the lesson you will create a button in the clients form and then link the report macro to the button. The macro will run when you click the button you are about to create. The event you will tie to the macro is “on click”.
1. Open FrmClients in Design View.
2. In the Controls locate and click the Button tool.
3. Move the mouse pointer to an empty area in the Form Header section and click.
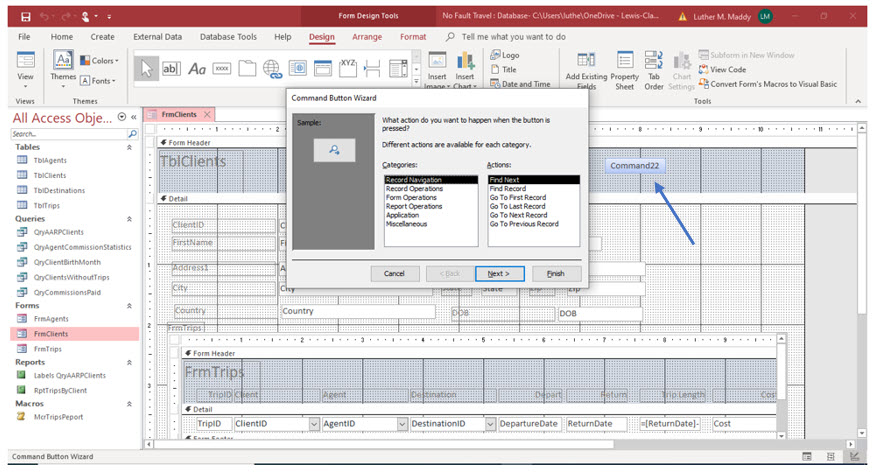
You will now see the Command Button Wizard dialog box. The Command Button Wizard would help you build Visual Basic code to automate operations like opening forms and reports. This feature is often easier to use than creating macros. The advantage of creating macros is that macros are easier to modify for specific operations if you are not a Visual Basic programmer.
You could easily use the Command Button Wizard to cause this button to open the same report, but by creating and linking macros, you are also learning a little bit about events. Experimenting on your own with the Wizard will help you learn its power and how easy it is to use.
4. Cancel the Command Button Wizard.
You will now see a button in this form. You will now change the text this button displays and link the macro you just created to this button.
5. Select the button you just created and display the property sheet for this control.
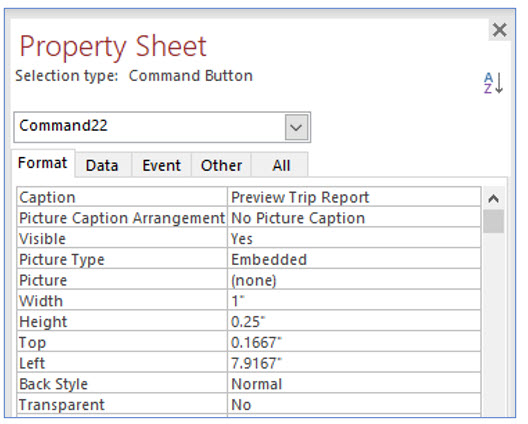
6. Click the Format tab on the Property Sheet. Change the Caption property to read Preview Trip Report.
The button will display the Caption property text. You will now tie the macro you created earlier to the On Click property of this button. You will do this on the Event tab,
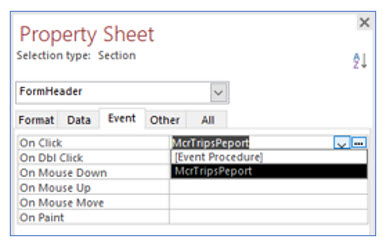
7. Click the Event tab and then click in the On Click property.
8. Click the dropdown arrow in this row and select the macro McrTripsReport.
When you click the dropdown arrow, all existing macros will be listed so that you can use the same macro in multiple places if you wish. Notice there are other event you could tie this or other macros to for this button. Different types of controls will have different events that can be used to execute macros.
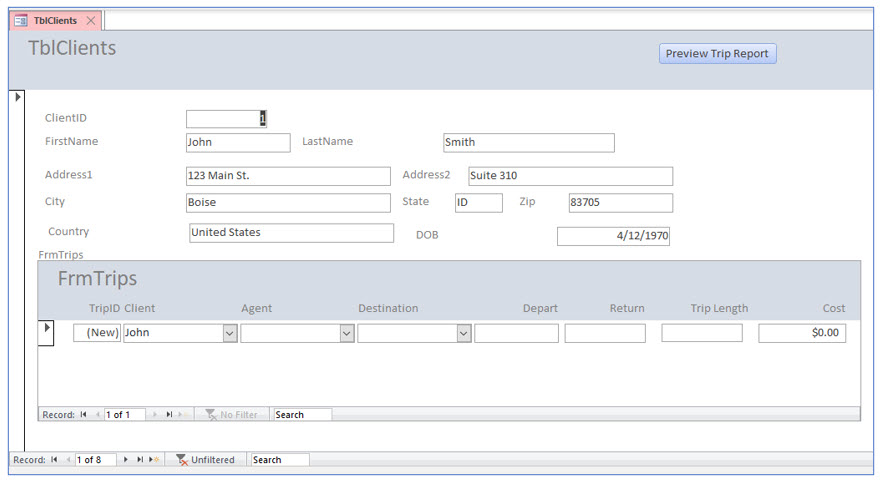
9. Close the Property Sheet. Save the form and view in Form View. Click the Preview Trip Report button and verify that the macro works correctly.
If needed, expand the Control button to display the entire text.
After clicking the button in the form you should be viewing the Trips report. If the macro does not work, go to the macros tab and open the macro. Make any needed corrections and try the process again.
10. Close Print Preview.
You should now be back in the clients form.
11. Close the clients form,
You will now create and link a macro that automatically sets the return date based in the departure date in the Trips Form.
The Set Value Action
The macro you are about to create will automatically set the return date once a departure date has been entered. We will assume that most trips are 10 days long. Our macro will use the set value action to set the return date equal to 10 days after the departure date.
The set value action allows you to enter expressions in equation arguments which will determine the value of the equation. In other words, the set value action will set the return date to a value equal to the departure date + 10.
1. Display FrmTrips in Design View.
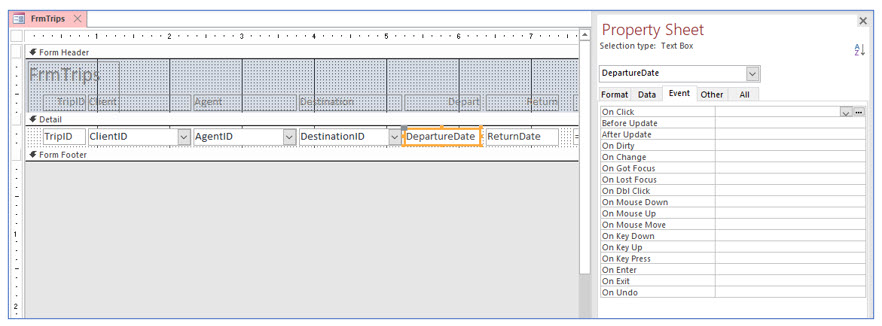
2. Select the DepartureDate text box. Display the Event tab in the Property Sheet.
You will link the macro to the departure date field. After the user enters the departure date, the macro will set the return date in the return date field. In this exercise, you will create and tie the macro; in the previous exercise, the macro was created before you tied it to a control.
3. Click in the After Update row and then click the build (...)button.
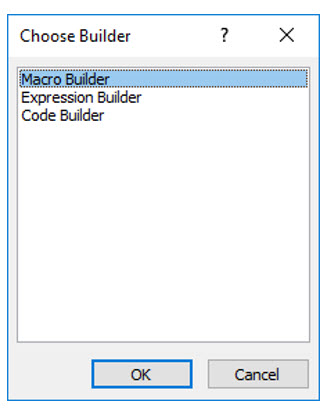
4. In the Choose Builder dialog box, select Macro Builder and click OK.
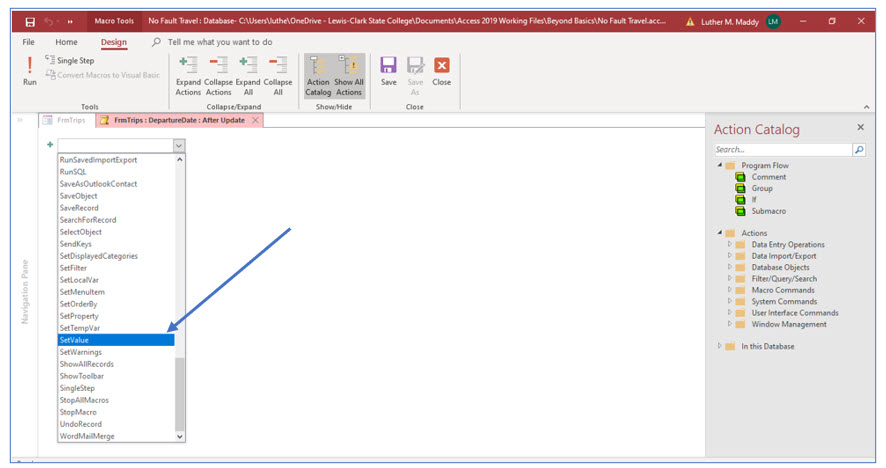
5. In the Design tab, select the Show All Actions tool.
If this option is not selected, you will not be able to find the SetValue action that is needed for the next step.
6. Choose SetValue as the action from the dropdown menu.
You will now set the arguments for the SetValue action. You will specify for which control you want to set a value. In this case, you want this macro to set a value in the return date field.
7. In the Item row, type [ReturnDate].
Remember that Access always requires brackets when referencing field names.
8. In the Expression row, type [DepartureDate]+10.
The expression is the value you want to appear in the return date field. As with the other expressions you have created, field names are always enclosed in brackets.
By default when the user enters a departure date, a return date 10 days later than the departure date appears in the return date field.
Using conditions in macros
The macro schedules all trips as 10 days in length, but the return date can be changed by the data entry person. While the majority of trips scheduled by the No Fault Travel company are 10 days, trips to Hanoi or Paris are typically 15 days long. With the present macro, the user always has to change the return date for trips to Hanoi or Paris.
A more useful macro would use a 10-day trip length, unless the destination was Hanoi or Paris. If the case of those two destinations, the trip length would be set to 15 days. To accomplish this, you will have to add a condition to the macro to check the destination before setting the return date.
1. Ensure the Action Catalog is displayed. If not, click the Action Catalog tool in the Design tab on the ribbon.
The Action Catalog allows you to include comments for documentation or to add conditions to your macros. In this portion of the lesson, you will add a condition which changes some return dates to 15 days after departure, depending on the destination. You will also add documentation to each macro step.
2. Under Program Flow in the Action Catalog pane, double click Comment.
A text area should appear where you can describe what this macro step does.
3. In the comment area, type: This sets the return date of all trips, except Hanoi and Paris, to 10 days after the departure date. Hanoi and Paris are set as 15 day trips.
The next step is to add the condition by selecting the If option under Program Flow. The condition will be dependent on the trip destination field, DestinationID.
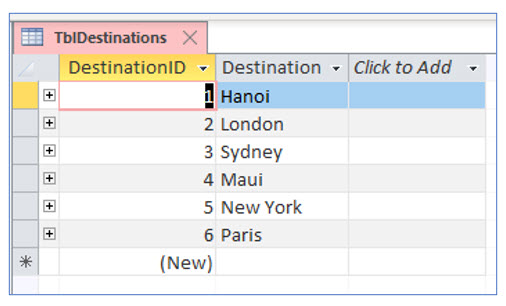
In an earlier lesson, you created the DestinationID field as a lookup field on the trips table which lists the destination from the destination table. Although the destination dropdown list hides the destination ID, the DestinationID field actually stores the identification number for each destination. Therefore, the condition you will use to select Hanoi will be [DestinationId]=1 not [DestinationId]=”Hanoi”.
The table TblDestinations below shows the respective identification numbers for each destination. To prove to yourself that the DestinationID field in TblTrips and FrmTrips is a number, open TblTrips in Design View and notice that the DestinationID field (which is entered, modified and viewed in FrmTrips) has a number data type.
4. Under Program Flow in the Action Catalog pane, double click If.
You should now see that Access has added rows to enter the condition and the action to take if the condition is met.
5. In the If row, type: [DestinationID]=1 Or [DestinationID]=6.
6. Click in the “Add New Action” box and select SetValue. Enter [ReturnDate] in the Item row and [DepartureDate]+15 in the Expression row.
7. On the Design tab, click the Save tool to save this macro. Close the Action Catalog and macro after saving.
You are now ready to test this macro.
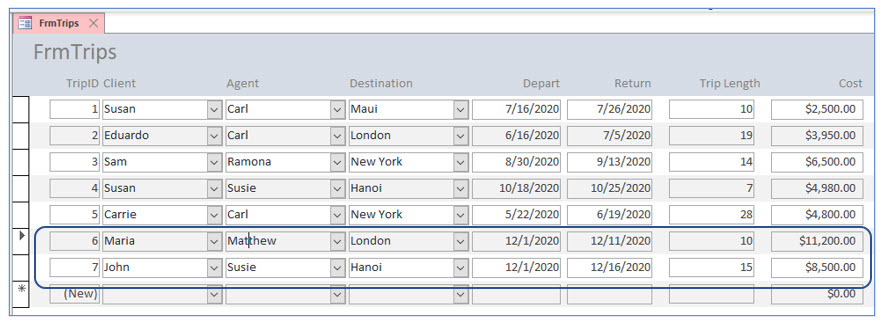
8. Save the trips form and display it in Form View. Add the two new trips shown above.
As soon as you enter the departure date for the two new trips, the return date field should auto populate as 10 to 15 days after departure, depending on the destination.
9. Close the trips form, FrmTrips.
