Creating Calculations in Queries
Much of the power in an Access database comes when you intitally set it up. One of the essential elements of proper database design is understanding how to use Access' Queries. This lesson will step you through creating calculations in queries.
Note: These lessons are excerpted from Luther Maddy’s Access Workbooks (C) 2024 which are available in printed or eBook format from Amazon: Access: The Basics and Access: Beyond The Basics
Working with Calculations in Queries
Access makes is very easy to create calculations within queries, forms, or reports. Creating computations within queries are often the most useful because you can use a calculated field in a query in multiple reports or forms as needed. Even though calculations in queries are often the most useful, calculations are also very useful in reports for creating summary computations. In this lesson you will create calculated fields in queries, reports, and forms.
1. Open the No Fault Travel database, if it is not already open.
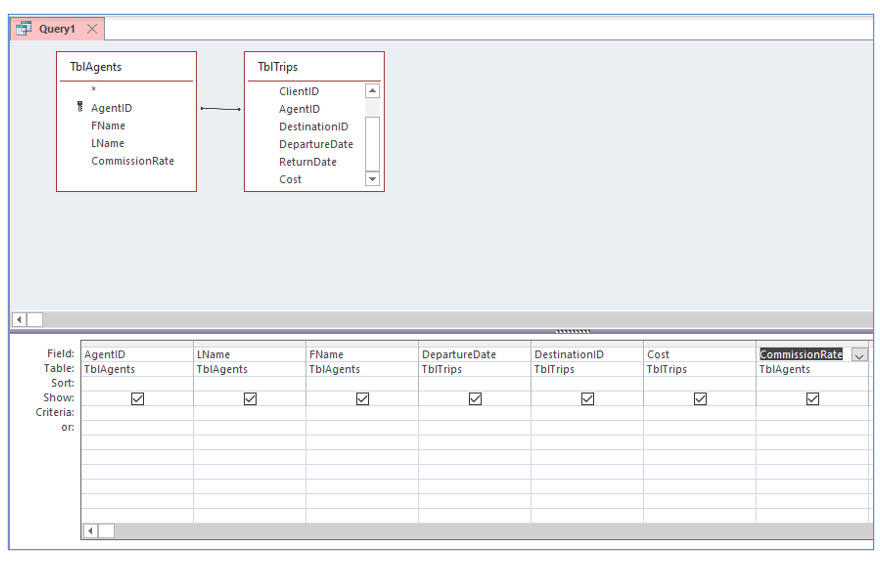
2. On the Create tab, click the Query Design tool to create a new query based on TblAgents and TblTrips.
3. Add the fields: AgentID, LName, FName, DepartureDate, DestinationID, Cost and CommissionRate.
Recall that you created the DestinationID field as a lookup field. While the actual destination will be displayed in the dropdown list, the destination’s identification number is actually stored in the field.
Creating computed fields in a query
To create calculations within a query, go to a blank column because you are creating a new field. In the top cell for field name, type the name of the new field, but do not press enter. After the field name, type a colon (:) and then the formula. In Access formulas, field names must be enclosed in brackets [ ]. For example, the following text would create a calculated field Length, which computes the difference between two date fields.
In the next steps, you will create a new field Commission which will compute how much the agent earned in commission for each trip booked.
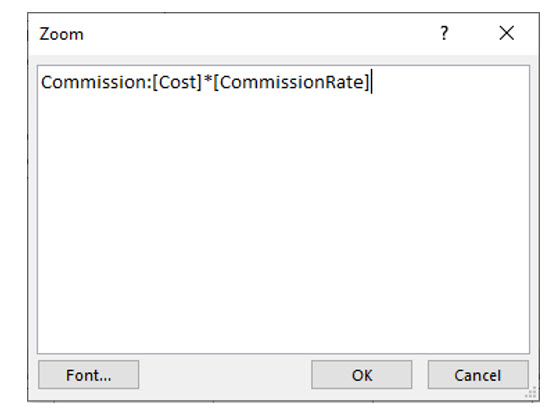
1. In the blank column just after the CommissionRate field, click in the Field row. Right-click to open the shortcut menu and select Zoom.
Using the Zoom dialog box makes typing longer formulas easier because it provides a larger visible window. Earlier, we used the shortcut keys (Shift+F2) to open the Zoom dialog box.
2. In the Zoom dialog box, type the following expression and then click OK: Commission:[Cost]*[CommissionRate].
Expressions are not case sensitive, so upper or lower case does not matter. However, spelling does! Be sure to spell the field names exactly as they are appear in the table.
3. View the results of this query.
You should see the new field Commission and its computed values. Next, you will add currency formatting to the field to improve its appearance.
4. Return to Design View of this query.
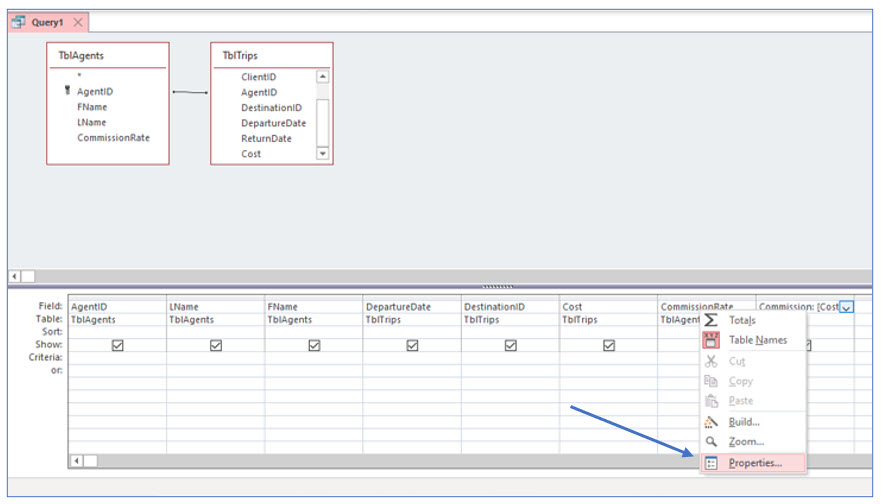
5. Right-click in the Field row of the Commission field. Choose Properties on the shortcut menu.
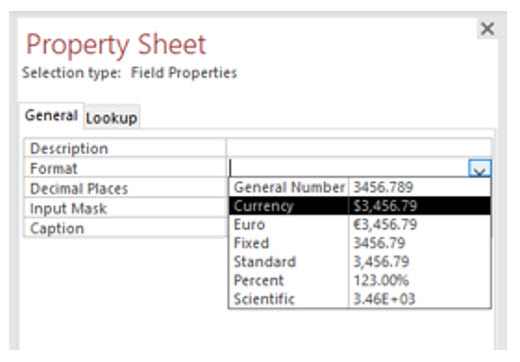
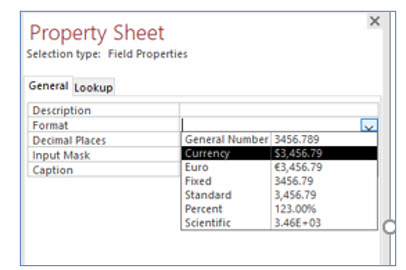
The Property Sheet task pane should open. (We used this earlier to create table validation rules.) The text Selection type: Field Properties appears just under the Property Sheet title on the task pane; this lets you know that only the properties for one field can be modified and not the entire table because a specific field was selected.
6. In the Format row of the Property Sheet, click the dropdown arrow and choose Currency. Close the Property Sheet.
7. Save this query as QryCommissionsPaid and then view the query results again.
Now the commission field should be formatted in currency format.
8. Return to Design View. Right click on the Commission field you just created and choose Properties.
9. In the Format row, choose Currency as the format. Save the query and view the results.
You have changed the format property of the calculated field to improve its appearance.
10. Close the query.
Since this calculated field was created within a query, it is available in any forms or reports based on this query. It can even be used in another query if that query is based on this query.
Using functions in queries
Microsoft Access has many built-in functions, which can be used to create formulas in queries, reports or forms. The functions in Access are divided into different categories including Date/Time, Financial, Math, and Text. Built-in functions simplify creating complex expressions in Access, just like they do in Excel.
In the next steps, you will use the Month() function to determine each client’s birth month. Computing the birth month makes generating a list of clients with a birthday in a particular month easier. Many companies send customers birthday greetings or special discounts during the month of their birthdays.
The syntax for this date function and all Access functions is: Month([DOB]). All functions require parenthesis ( ), which identifies them as functions (rather than fields) in expressions. Also, note the brackets around the field DOB. Field names are always included in brackets [ ], even when used inside functions.
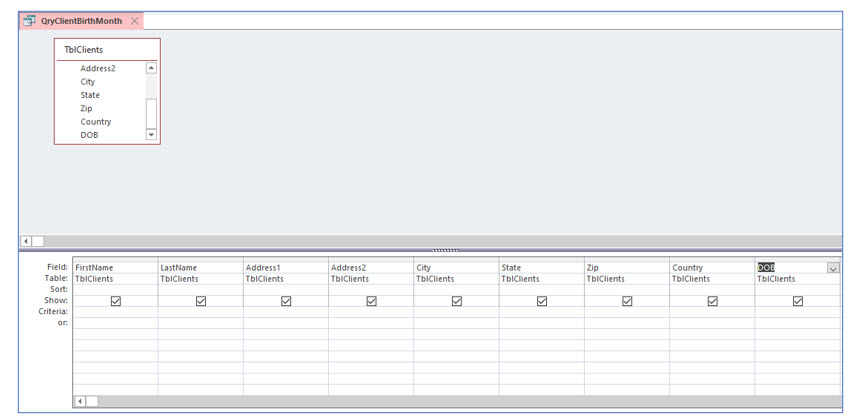
1. On the Create tab, select the Query Design tool to create a new query based on TblClients. Add all the fields except ClientID to the query grid.
2. Save this query as QryClientBirthMonth but stay in Design View.
Using the Expression Builder
When creating complex expressions, especially those that use functions, Access provides the Expression Builder to make creating them easier. The Expression Builder provides a list of all available functions. The Expression Builder is typically opened by right-clicking and choosing Build… on the shortcut menu.
In the next steps, you will use the Expression Builder to create a calculated field which lists the birth month of each client. You will later use this query to print mailing labels for clients who have a birthday in a particular month.
1. In the empty column next to the DOB field, right-click in the Field row.
2. Choose Build… from the shortcut menu.
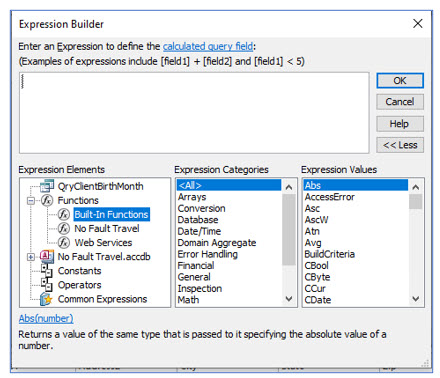
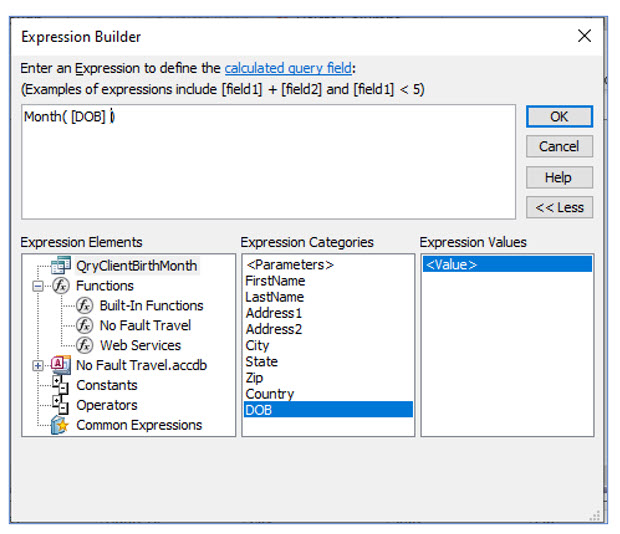
The Expression Builder dialog box should open. You will use this to build the formula to return the month from the date of birth field.
3. In the Expression Builder dialog box, locate and double-click Functions in the left column.
Double-clicking expands the functions folder to allow you to choose from Access’ built-in functions or functions specific to this database.
4. When the Functions folder expands, click once on Built-In Functions.
In the middle column, Expression Categories, you can now choose the type of function you would like to use.
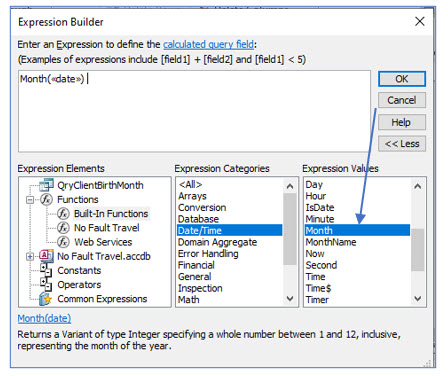
5. Click once on the Date/Time category in the middle column.
The date/time functions should appear in the right column, Expression Values.
6. Scroll down and double-click the Month function in the right column.
In the text box used to enter the expression for the calculated field, Month(<>) should appear. The text <> indicates that Access wants you to insert the date field inside the Month() function.
7. In the expression, click once on <> to select it.
In the next steps, you will replace <> with the field you wish to use to return the month. First you will select the query which contains the field you want to use and then you will select the field. You could simply type the name of the field, but with the method you will use in the next few steps, Access inserts the name and includes the brackets for you. Doing it this may not be faster, but does ensure the field names and brackets get inserted correctly.
8. In the left column Expression Elements, click once on QryClientBirthMonth to select it.
A list of fields in the query should appear in the middle column, Expression Categories.
9. In the middle column, double-click the DOB field and click OK.
The completed expression should appear in the text area. This method is useful when you are working with many fields in complex expressions.
10. View the results of this query.
The last column, named by default Expr1, should display the month number from each client’s birthdate. In an earlier portion of the lesson, we named a calculated field and provided an expression for it in the Field row by manually entering it rather than using the bilder. When we clicked on the Field row in the empty column to create a field for the birth month, we could have named it before we used the Expression Builder. Since we did not provide a name, Access named it Expr1. You will now edit this expression and change its name.
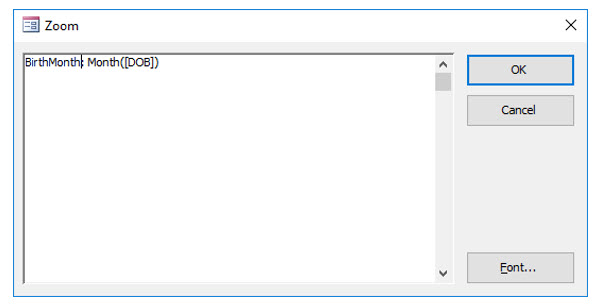
11. Return to Design View. Click in the Field row of Expr1. Open the Zoom dialog box from the shortcut menu or by pressing (Shift+F2).
12. In the Zoom dialog box, change Expr1 to BirthMonth and click OK.
Be careful not to delete the colon (:). You could have also used right+click to select Zoom.
13. View the results of this query again.
Now the calculated field has a more useful name, which makes referring to it in a form or report much easier.
14. Save and close this query.
Using Functions in Query Criteria
In an earlier lesson, you created a query that selected all clients born before 1970. You should recall naming this query, QryAARPClients. The problem with this query is that it is good for the year 2020. If you opened this query in subsequent years, you may miss clients who just turned 50. The solution is to use criteria that selects clients who are 50 years old as of the date you view the query results. You can accomplish this creating an expression that pulls the current date from your computer and basing the criteria on that. In the next few steps you will correct QryAARPClients so it works far into the future.
1. Open QryAARPClients in design view.
You will now replace the current criteria with one that uses functions.
2. Erase the current criteria in the DOB field, then right click in the Criteria row and choose Build.
You will use the Expression builder to create this field’s criteria.
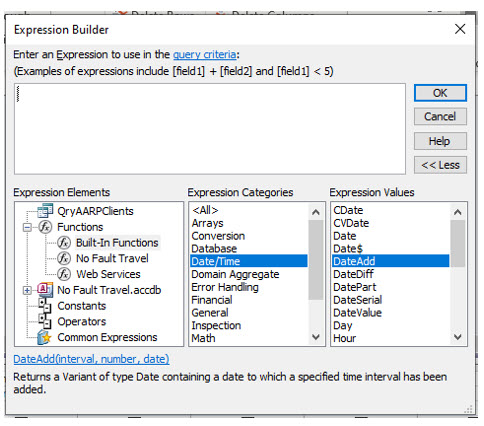
3. In the Expression Builder, double-click Functions and then click Built In functions. Finally, select the Date/Time function category.
4. In the Expression Values column of the Expression Builder, double-click the DateAdd function.
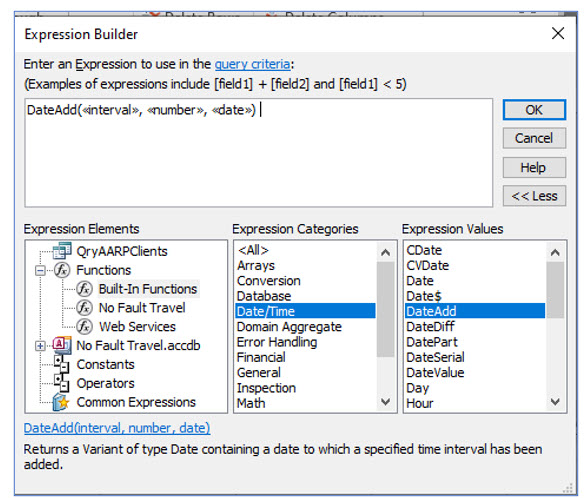
Access has now added this function to the expression. Next, you will edit the expression to place the correct arguments within this function.
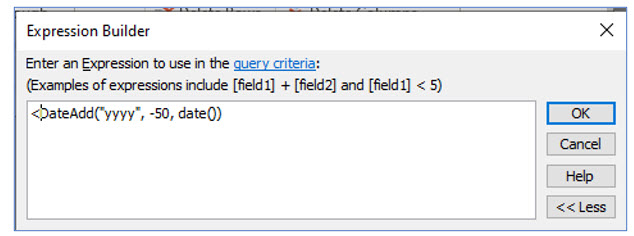
5. Edit the Expression to appear as the above and click OK.
Don’t forget to add the less than (<) at the beginning. You are also informing Access that the interval to “add” to the date is years. The number to “add” to the date is -50 and the Date() function pulls the date from your computer. With this criteria, this query will select those 50 years of age an older regardless of the actual date.
6. View the query results and then save and close it.
Creating Totaling Queries
Assume that you would like to know how much each travel agent has been paid in commissions. One way to get this information would be to create a report that totals the commissions paid for each travel agent. However, if you did not want to go through all the report creation steps to answer that question, you could use a totaling query. Totaling queries compute summary data such as sums, averages and other statistics for numeric fields. When you create a totaling query, you can compute summary data for all records, or only those records meeting the criteria you specify. You can also compute summaries of all the records, or group them by a particularly field to create subtotals, much like you can do in a report.
For this example, you will create subtotals for teach travel agent since rather than a grand total of how much commission the company paid altogether. In this portion of the lesson, we will use Access’ totaling feature to calculate statistics for each travel agent’s commissions.
1. On the Create tab, click Query Design.
Creating a query based on a query
Up to this point, we have created queries based on tables. However in the next steps, each agent’s total commission will be based on a calculated field you created in the QryCommissionsPaid query to compute the commission for each trip. You will create a totaling query that displays the names of each travel agent and the total commission each agent has received.
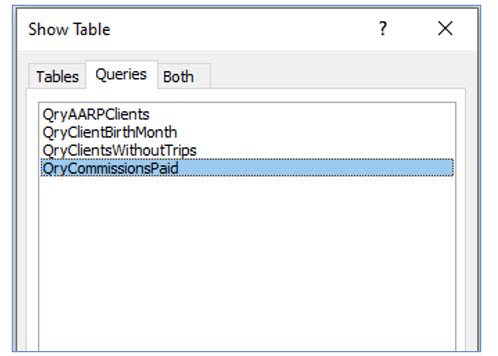
1. In the Show Table dialog box, click the Queries tab, add QryCommissionsPaid and then close the Show Table dialog box.
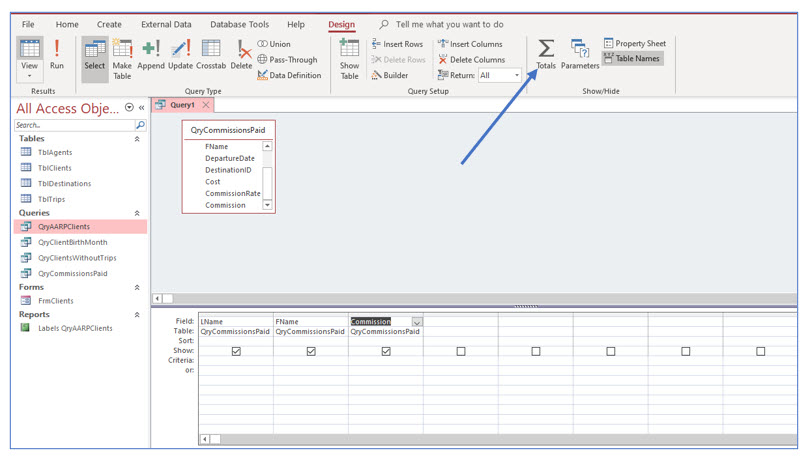
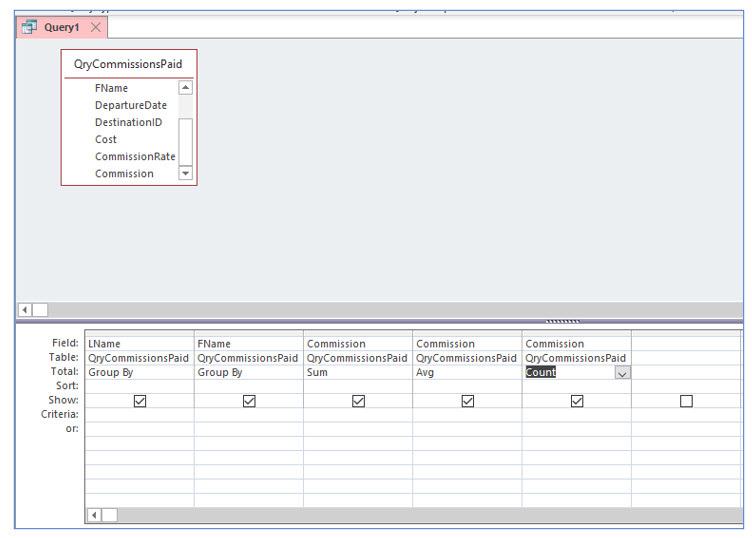
2. Add the fields Lname, Fname, and Commission to the Query Grid.
You will be grouping by the agent’s name and computing the total commissions earned for each agent.
To do summary computations in an Access query, use the Totals tool on the ribbon. This will add a new row in the Query Grid that will allow you to either choose Group By or to compute a summary calculation.
3. Click the Totals tool in the Show/Hide group.
Notice that a new row, Total, has been added to the Query Grid. Here is where you specify whether the field is a grouping field or should be a calculation.
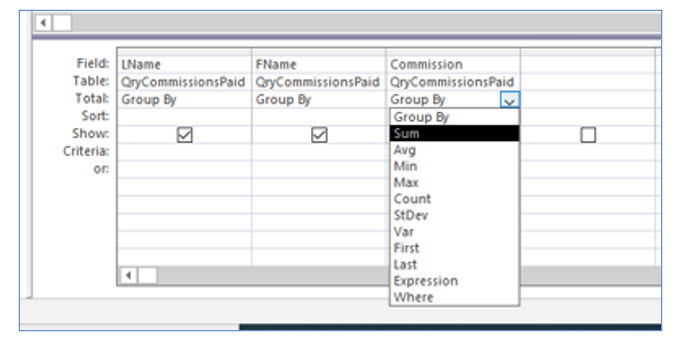
4. In the Commission field column, click in the Total row. From the dropdown list, choose Sum.
5. View the results of this query.
Notice the total commission field for each travel agent. Increasing the width of the last column will reveal its title, SumOfCommission. We will change the name and the field’s formatting later.
Before that, you will add more summary calculations to this query. You will need to add the Commission field again for each computation you want.
6. Return to the Design View of this query and add the Commission field two more times.
You can quickly add a field from the field list by double-clicking.
7. Change the computation for the second Commission field to Avg and change the third Commission field to Count.
You have now instructed Access to compute the total (sum), average, and the number of commissions for each travel agent.
8. View the results of this query to verify that it computes the two additional statistics. Adjust the column widths to view the field names.
Changing field captions
The names of the calculated fields may not be what you want for later reference. Access allows you to change the field name that the query displays by changing the field’s caption property. In this portion of the lesson, you will change the caption and formatting options for the computed fields.
9. Return to the Design View of this query.
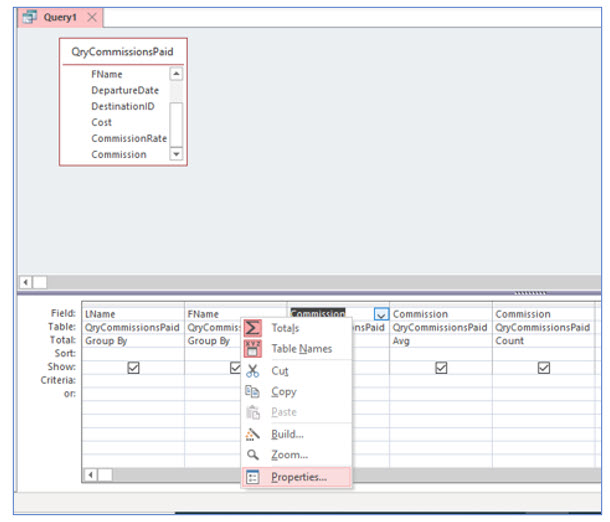
10. Right-click in the Field row for the SumOfCommission field and choose Properties.
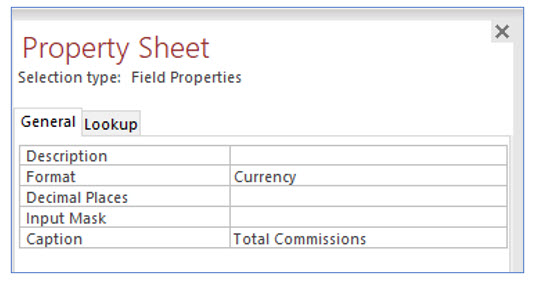
11. Change the Format property to Currency. In the Caption property, type Total Commissions. Close the Property Sheet.
12. In the Average column, change the format property to currency and the caption to Average Commission.
13. In the Count column, change the caption to # of trips booked.
You are not changing the format to currency for this field because the number of booked trips is an integer number, not a dollar amount.
14. View the results of this query. Change the column widths as needed to view the new captions.
15. Save this query as QryAgentCommissionStatistics and then close it.
