Working with Join Properties
Much of the power in an Access database comes when you intitally set it up. One of the essential elements of proper database design is understanding how to use Access' Join Properties. This lesson will step you through working the Join Properties.
Note: These lessons are excerpted from Luther Maddy’s Access Workbooks (C) 2024 which are available in printed or eBook format from Amazon: Access: The Basics and Access: Beyond The Basics
Working with Join Properties
TWorking with related tables in queries
When you create queries based on related tables, even though you do not specify any criteria, you will only see the records that are related in each of the tables. For instance, with this database, if you created a query based on TblClients and TblTrips, you would only see the clients who had scheduled trips. If a client has taken more than one trip, that client would show up more than once in the result of the query because their ID number was associated with more than one record in TblTrips.
Currently, there are no records in the trips table. If you created a query based on both the trips and clients tables, there would be no records in the query. In the next steps, we will add some records, so we can see how queries and related tables work.
1. If it is not already open, open the No Fault Travel database. Open TblAgents in Datasheet View.
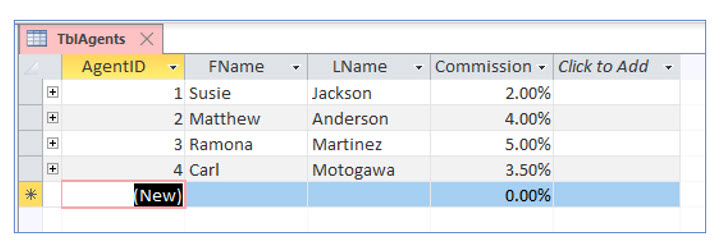
2. Enter the records shown below in the travel agents table.
3. Close TblAgents. Open TblTrips.
In the next step, you will enter trip information in the trips table. In Lesson 2, we created lookup fields in this table for the ClientID, AgentID, and DestinationID fields. For these fields, you will simply select the information from a dropdown list so data entry is easier!
4. Enter the records in the trips table as shown below.
You will see a list of names in the ClientID and the AgentID fields. Please recall that we designed the lookup fields to show names in the dropdown lists, but the fields actually store the client and agent identification numbers.
5. Close the trips table. Create a new query using the Query Design tool.
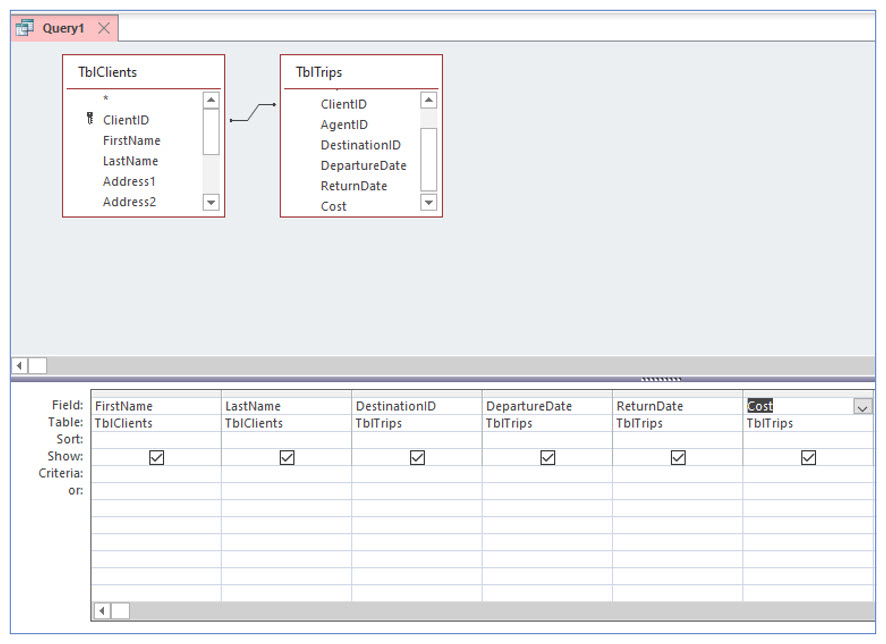
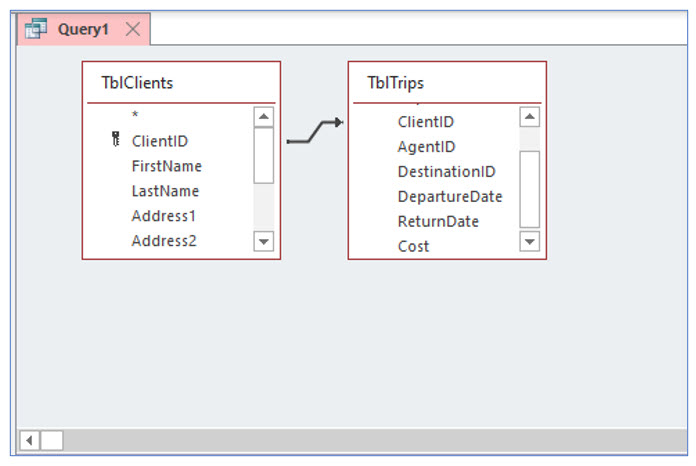
6. In this query, add TblClients and TblTrips. Add the fields: FirstName, LastName, DestinationID, DepartureDate, ReturnDate, and Cost.
The join line between the two tables indicates that they are related or linked. This relationship was created when the lookup field in TblTrips was created in Lesson 2.
7. View the results of this query.
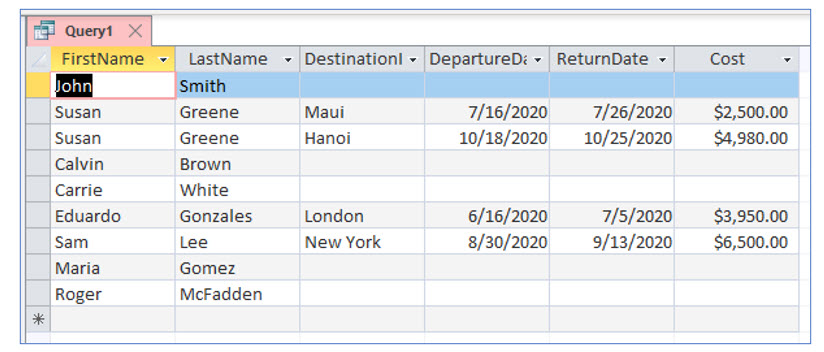
You can see that only three clients’ names appear in this query. There are eight clients (records) in TblClients but only the clients who have booked trips appear in the query results. Susan Greene appears twice -- once for each trip she has booked.
Changing the join properties
Assume that you work for the No Fault Travel agency and you want to increase the number of trips booked. After running this query, you realize that some “clients” have never booked a trip. These clients probably requested information from No Fault Travel, but have not booked a trip. From a marketing standpoint, these people are potential customers because they are interested in travel and you have their contact information.
You could simply manually compare the clients table with the query to determine which clients have not booked trips, but manual comparison is not practical for large data sets.
The best solution is to create a query which lists the clients who do not appear in the trips table. This query will have to be based on both tables, but you will have to change how records are chosen.
The 'join' properties tell Access which records to display in the query. By default, the join properties only show the records that occur in both tables. But you can change the join properties to have Access show you all the records from either table. Then you can set criteria so that the query show only the records of clients who have not scheduled a trip.
This is a long explanation and the good news is that actually changing the join properties is probably easier than understanding why you would want to change them.
1. Return to the Design View of the query.
2. Carefully double-click the join line between TblClients and TblTrips.
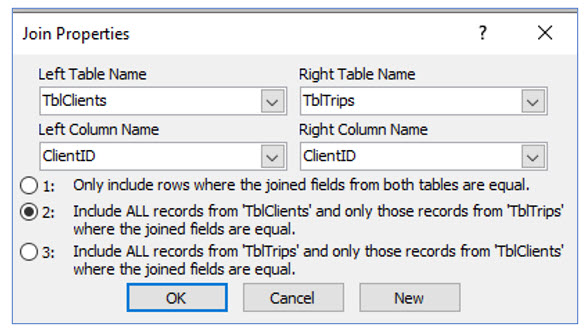
You should now see the Join Properties dialog box. Here you can change how the query treats related records.
3. In the Join Properties dialog box, choose the second option, “Include All records from TblClients…” and click OK.
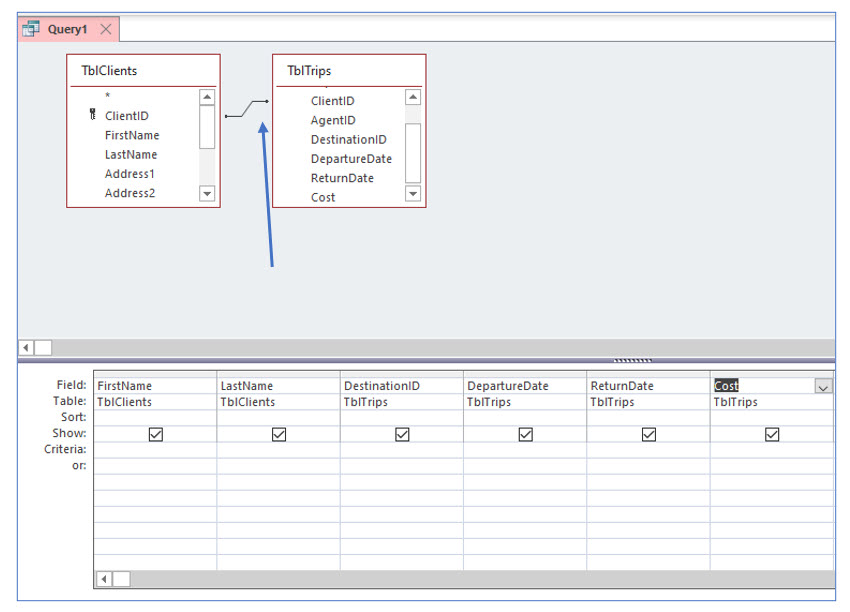
This option tells Access to display all the records in the clients table, whether or not the trips table contains a record for that client.
Notice that the join line between these two tables has changed in appearance. There is an arrow pointing to the trips table. When you see a query with an arrow in the join line, you should realize the join properties have been altered.
4. View the results of this query with the join properties changed.
Notice that all clients are now displayed. The next step is to set criteria to show only those clients who have not booked a trip.
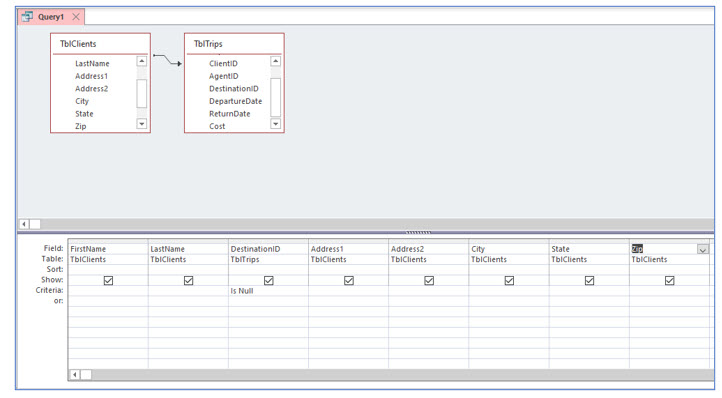
5. Return to the Design View of this query. In the Criteria row of the DestinationID field column, type is null.
You are telling Access to show only the clients who do not have a value in the DestinationID field, or in other words, those who have not booked a trip.
6. Delete the DepartureDate, ReturnDate, and Cost fields from the query. Add the Address1, Address2, City, State, and Zip fields from TblClients. Uncheck the Show checkbox for the DestinationID field.
You can remove fields from the query by selecting the column heading and pressing the (Delete) key.
7. View the results of this query.
You now have the names and addresses of individuals in TblClients who have never booked a trip.
8. Save this query as QryClientsWithoutTrips and close it.
