Working with Filters
Much of the power in an Access database comes when you intitally set it up. One of the essential elements of proper database design is understanding how to use Access' Filters. This lesson will step you through working with filters.
Note: These lessons are excerpted from Luther Maddy’s Access Workbooks (C) 2024 which are available in printed or eBook format from Amazon: Access: The Basics and Access: Beyond The Basics
Working with Filters
Filters provide a quick and easy way to view certain records in a table or form. A filter can select specific records based on conditions or criteria, similar to a query, but filters are easily applied to tables and forms. While queries can become the basis of reports, mailing label and even forms, filters are more of a temporary way to view specific records. With a simple mouse click to turn a filter on or off, you can switch between looking at a subset and the entire record set.
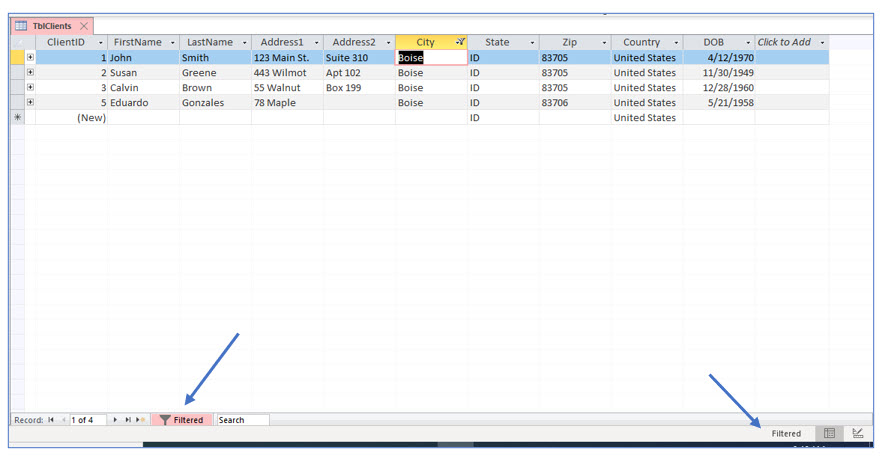
When you apply a filter, the word Filtered appears in the navigation bar (after the number of records) to indicate that you are looking at a filtered subset of records. Filters are very useful for doing simple record counts.
1. Open the No Fault Travel database if it is not already open.
2. Open TblClients in Datasheet View.
You can apply a filter by using the toolbar or right-clicking. In the next steps, you will use the right-click method.
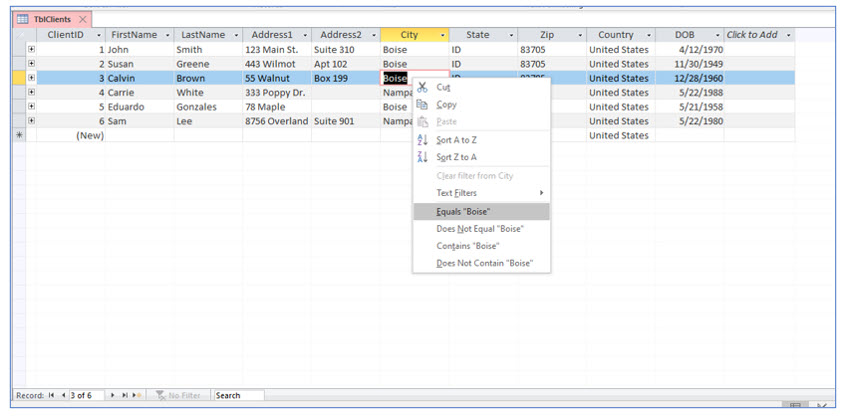
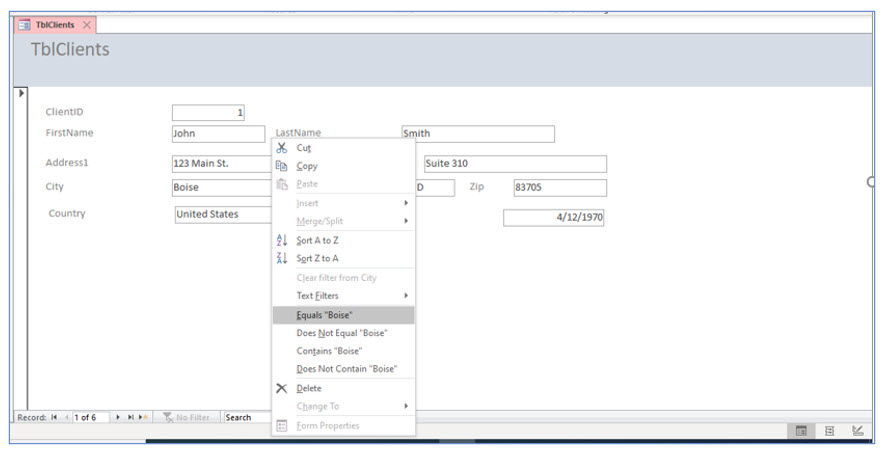
3. Right-click any cell where Boise occurs in the City field.
Filter by selection
You will now see a shortcut menu with several filter options. The Equals “Boise” option will instantly create a filter based on the text you have selected, Boise in this case.
4. In the shortcut menu, choose Equals “Boise”.
You should now only see the records with Boise in the city field. The navigation bar displays the number of records that meet this criterion and the word Filtered to indicate that a filter has been applied to the list of records you are viewing. When you are using Access on your own, you will want to watch for the Filtered indicator when you open a table or form and it appears some of your records are missing.
Removing a filter
After applying a filter you will eventually want to return to the unfiltered record set. The Toggle Filter tool on the ribbon will cause Access to toggle between the unfiltered and filtered record sets.
1. Locate and click the Toggle Filter tool on the ribbon to turn the filter off.
You should now see all the records in the table. The navigation bar should also display Unfiltered.
Filter Excluding Selection
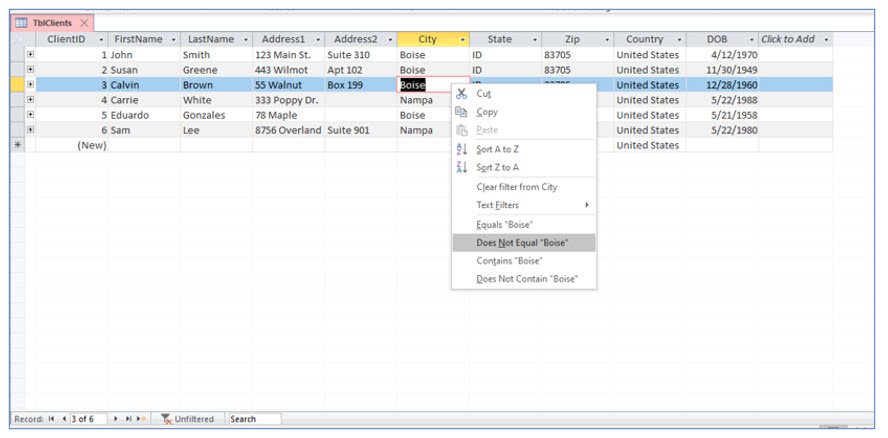
In the previous steps, you used the Equals option to show all the records which have that value in the field. Access also allows you to filter all records which do not match the value you have selected with the Does Not Equal option.
1. Right-click on Boise in any cell in the City field.
2. From the shortcut menu, select Does Not Equal “Boise.”
You should now see all the records which do not have Boise in the City field.
3. Click the Toggle Filter tool to turn off the filter.
You can also easily turn off a filter by clicking on the Filtered indicator on the navigation bar.
Using multiple criteria in filters
Similar to queries, you can impose filter criteria on more than one field. You can add a filter(s) to filtered record sets or use a feature called Filter By Form. We will explore both options.
1. In the Datasheet View, right-click Boise in the City field and use the Equals option to view only the records with Boise.
The records for Boise should be listed as they were earlier. Now you will apply a second filter to the filtered set of records. In other words, you will apply a second condition, but to only those records with Boise in the City field.
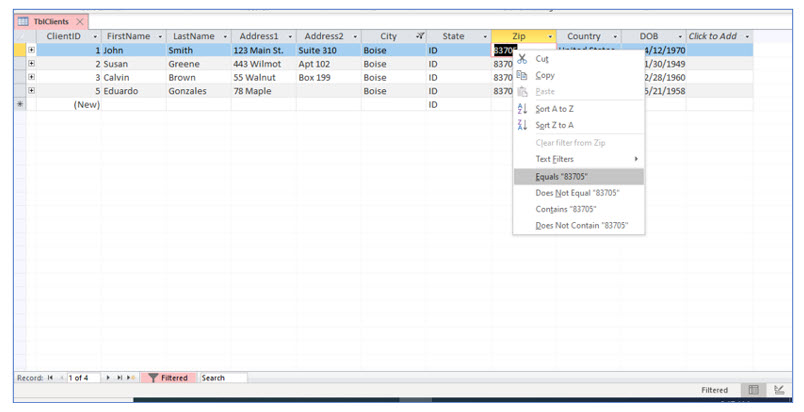
2. Viewing the filtered records in the table, right-click 83705 in the Zip field and choose the Equals 83705 filter option.
Only the records with Boise in the City field and the zip code 83705 in the Zip field are displayed. This example shows that you can use multiple filters to further narrow the record set.
3. Turn off both filters by clicking the Filtered indicator on the navigation bar.
We will now use the Filter By Form option to set filter criteria with more than one field..
4. Click the Advanced tool in the Sort & Filter group and select Filter By Form.
The Filter by Form window appears with the last applied criteria. You can modify and delete criteria using this form. You can apply filters to multiple fields.
5. In the Filter by Form window, delete the criteria in both the City and Zip fields.
To delete existing criteria you can highlight the criteria and then press the (Delete) key.
6. In the Filter by Form window, click the dropdown arrow in the City field and choose Boise.
Using the Filter by Form option makes it easy to specify criteria in multiple fields. It also allows you to use comparison operators such as > or < in filters. You will now use a comparison operator to add a criterion to the date of birth field.
You may also notice that Access added hashtags (#) to the date and quotation marks (“) to the city. These symbols indicate that Access recognizes the date as numeric and the city as text.
7. Click in the DOB field and type >12/31/1964. Click the Toggle Filter tool.
You should see a list of the clients who live in Boise and were born after 1964.
8. Click the Toggle Filter tool to view all records.
Access remembers the last filter you applied. You saw this when you first opened the Filter by Form. The criteria for Boise and the zip code of 83705 where already stored in the form. If you close a table, or even the database, the last filter you applied will still be stored and available for use. You will now see this demonstrated in the next few steps.
9. Close the TblClients table and the No Fault Travel database.
Access did not ask you about saving changes to the table, unless you made some design changes on your own. Even though it did not ask, Access did save the last filter you applied.
10. Open the No Fault Travel database again and display TblClients in datasheet view.
You should be viewing all the records in the table.
11. Click the Toggle Filter tool.
You should be viewing only those records in Boise with a date of birth after 12/31/1964.
12. Click the Toggle Filter tool again and close TblClients.
Once again, you are viewing all the records in this table.
Using filters in forms
You can also use the filter by selection option when viewing records in a form. This is different than the Filter by Form option we just explored. In the next steps, you will apply a filter in a form. You will also add some additional records.
1. Open the clients form, FrmClients.
2. In the first record, right-click Boise in the City field and choose Equals Boise in the shortcut menu.
3. Scroll through the records.
Notice that only the records for clients in Boise are displayed. Look at the navigation bar. The filtered indicator appears and only four records are included. You are viewing records with a filter applied.
4. Turn off the filter. Then, enter the following two additional records using the form.
We applied filtering in forms to illustrate that Access filter options are available in both tables and forms. You will now view No Fault Travel’s clients in the table format.
5. Close FrmClients and open the clients table, TblClients.
Using “containing” in filters
In the previous exercises, the filters set criteria for the entire value in a field. However, it is also possible to set criteria for just a portion of the field. For example, you may want to find the records of clients who live on an avenue. In this case you would filter the Address field with a filter Containing “Ave.” These filters are not case sensitive.
1. Carefully select only land in the Address field for Janice Johnson.
Instead of accessing filter options by right-clicking to open the shortcut menu as we did earlier, we will use filter tools on the ribbon in the next steps. Either method can be used.
2. Then click the Selection tool in the Sort & Filter group and choose the Contains “land” option.
Notice the Ends With “land” and Does Not End With “land” options alsoavailable for filtering. If you had instead selected 875 in this cell, filter options would have included Begins With 875 and Does Not Begin With 875. .
Once the Contains “land” filter option is applied, only the records whose Address field contains “land” will be listed.
3. Toggle the filter to turn it off. Close the clients table.
The last filter you applied, Contains “land”, is now stored as part of the table information. The next time you open the clients table, this is the filter that will be applied when you click the Toggle Filter tool.
4. Close the database.
