Lookup Fields and Validation Rules
Much of the power in an Access database comes when you intitally set it up. One of the essential elements of proper database design is understanding how to use Access' Lookup Fields and Validation Rules. This lesson will step you through modifying Lookup Fields and Validation Rules
Note: These lessons are excerpted from Luther Maddy’s Access Workbooks (C) 2024 which are available in printed or eBook format from Amazon: Access: The Basics and Access: Beyond The Basics
Lookup Fields and Validation Rules
A lookup field creates a dropdown list, which makes entering and editing data much easier. Instead of having to type the data into the field, you will be able to click on a option from a list of choices. Along with being faster, lookup fields also help ensure data integrity since you will only be able to choose from a value in the dropdown list.
You can create lookup fields on forms or tables. One advantage of creating lookup fields in tables is that when you create a form based on that table, the lookup fields will automatically be included on the form. In addition, if you enter or edit data on the table directly using the Datasheet View, the lookup fields in the table will make entering data there easier.
The values for the dropdown list can be manually entered when the lookup field is created or the data can be obtained from another table. Using a table is the best choice because if you need to edit or add additional items to the dropdown list, editing existing values on or adding new records to a table is easy. If you enter the items directly into the list control, changes would require that you edit the control and add or revise the items in the list. This adds a level of complexity and an additional skill you would have to learn. Using a table as the basis of a drop down list means all you have to do is open the table and make the changes. Those changes will show up in the drop down list in the table or form.
In this lesson, you will create a new table that contains the trip destinations which can be booked through this travel agency. This table will provide the values for a dropdown list which is used when new trips are scheduled for clients.
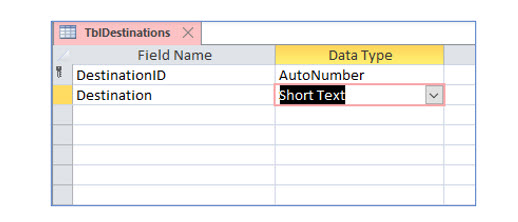
1. Open the No Fault Travel database, if needed and create another table named TblDestinations with the fields as shown.
This table will link to the Trips table using the DestinationID field.
Although your goal is to create a dropdown list of the destinations, two fields will be included in the new table, DestinationID and Destination. DestinationID provides a unique identification number for each destination; it is the primary key with an AutoNumber data type. The destination will be visible in the field, but it is actually storing the primary key, DestinationID.
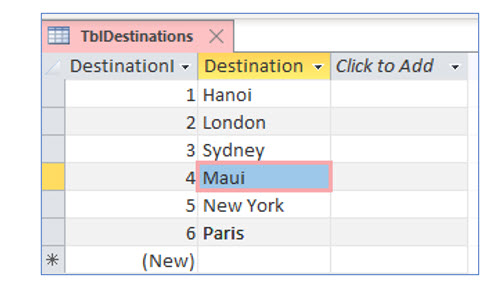
2. Enter the records as shown into the Destinations table and then close it.
You will now link the destination field in the trips table to the DestinationID field in the destinations table. You will begin this process by entering design view.
3. Open TblTrips in Design View.
Creating a lookup field
Access makes it very easy to create a lookup field using the Lookup Wizard. You will do this by using the Lookup wizard.
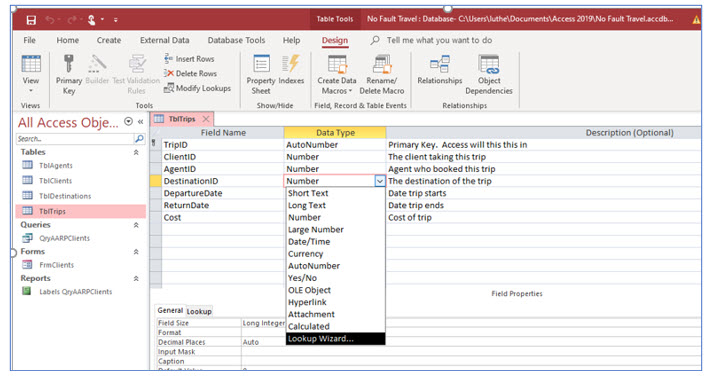
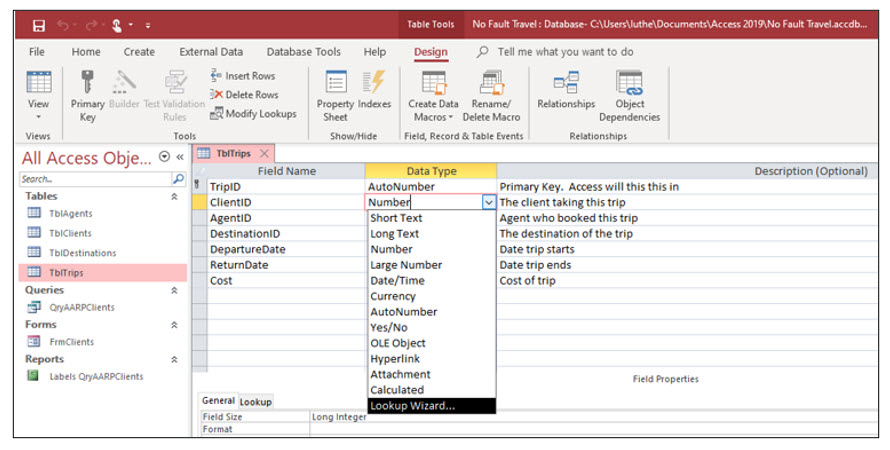
4. Click the drop down list button in the data type column of the DestinationID field. Then, select Lookup Wizard from the list of choices.
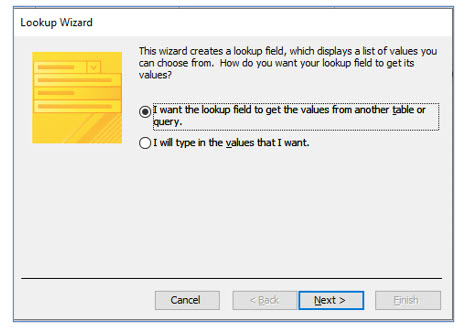
Access will open the Lookup Wizard. The Lookup Wizard will guide you through the creation of a lookup field.
5. In the first step of the Lookup Wizard, be sure that the first option, “I want to look up values in a table or query”, is selected and click Next.
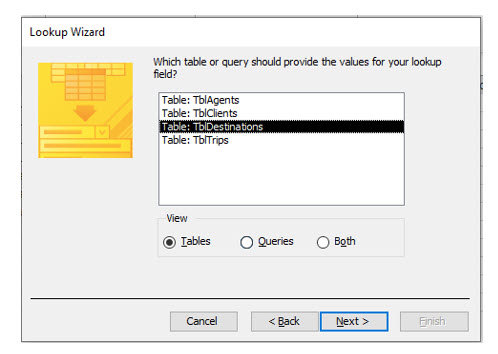
You will now select the table or query that contains the list of values you want displayed when you click the dropdown arrow for this field.
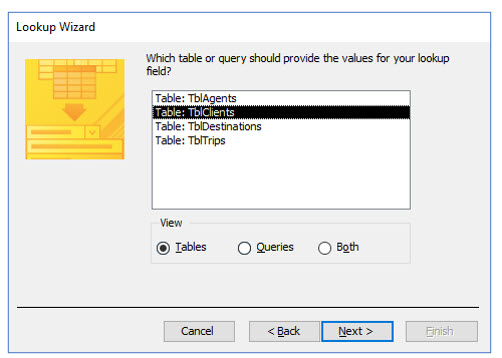
6. In this step of the Lookup Wizard, choose TblDestinations and click Next.
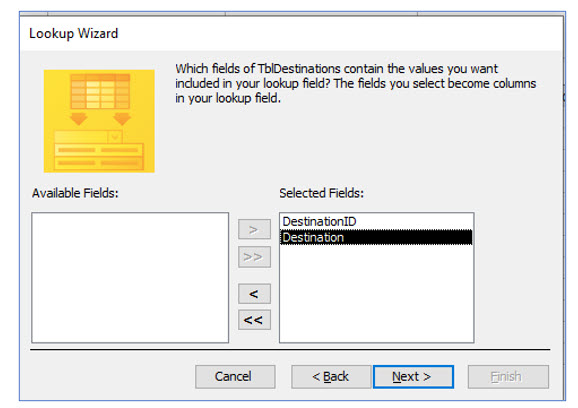
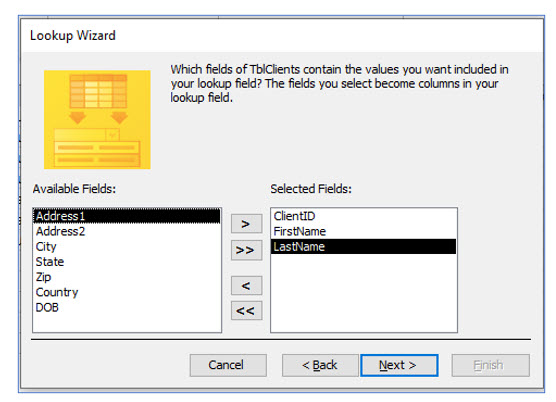
Next, you will select which fields from the table to display in the dropdown list. In this case, you will select both fields, DestinationID and Destination. The DestinationID will actually be stored in the field, but you will see the destination (not the ID) in the dropdown list.
7. Select both fields with the double arrow that points right and then click Next.
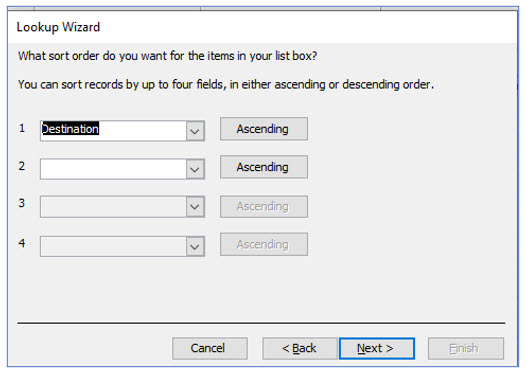
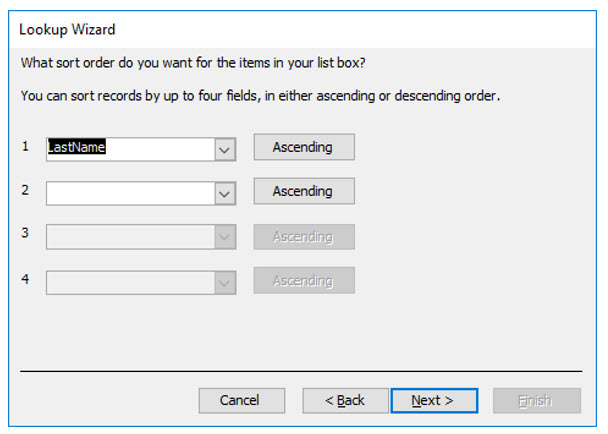
The next step in the wizard asks how you would like the records sorted for the dropdown list you are creating. You will sort the records in ascending order based on the destination field (alphabetically), rather than based on the destination’s identification number field (numerically).
8. Click the dropdown list arrow next to sort level 1 and choose Destination. Make sure the sort order is Ascending and then click Next.
In the lookup field you are creating, Access will store the ID number for each destination. You will set up the lookup field so that the destination rather than its ID number appears in the dropdown list. Linking to an ID number field ensures that if you change the spelling of a destination in the TblDestinations table, the spelling will also be updated in the dropdown list and in all records of the TblTtrips table where that destination ID was stored.
Instead, you could have created TblDestinations with a single field for the destinations, which would have also served as the primary key. However, if you edit the destinations in the single-field table, the dropdown list should also reflect the changes, but the corresponding records in the TblTrips table will retain the original stored values and will not be updated because there is no unique identification number to serve as a cross-reference.
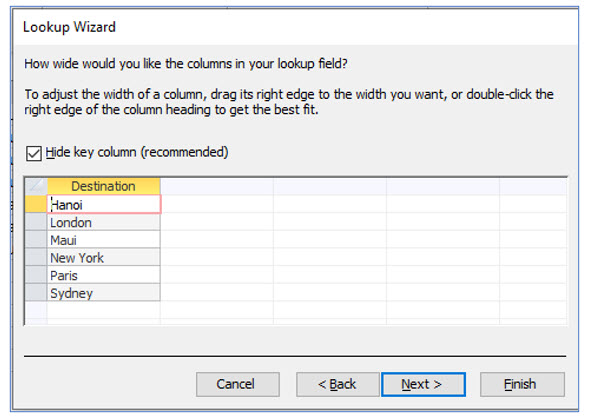
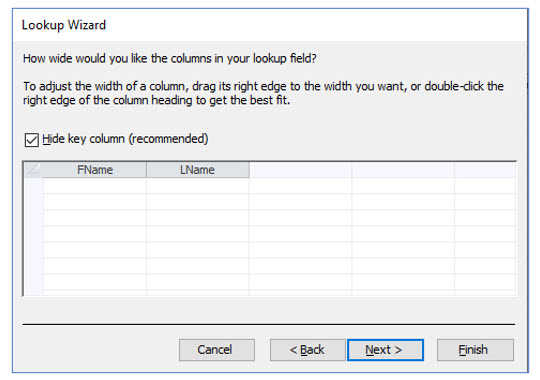
9. In the next step, leave the Hide key column option selected. Click Next.
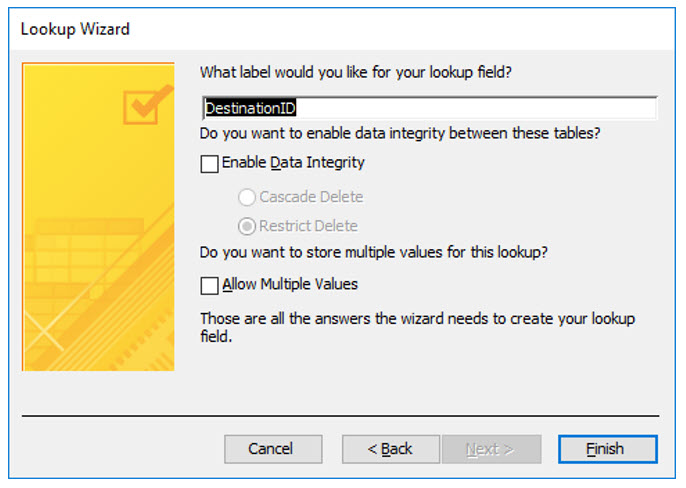
In the final step, the Lookup Wizard asks what to call this field. You have already named this field, so you keep the default name, DestinationID.
10. When asked what to label the lookup field, make no changes and click Next.
11. When asked if you want to save the table, choose Yes.
You may notice that this dialog box informs you that Access will create a relationship between the two tables. This relationship will ensure that database users can only choose a destination in TblTrips from the linked field in the TblDestinations.
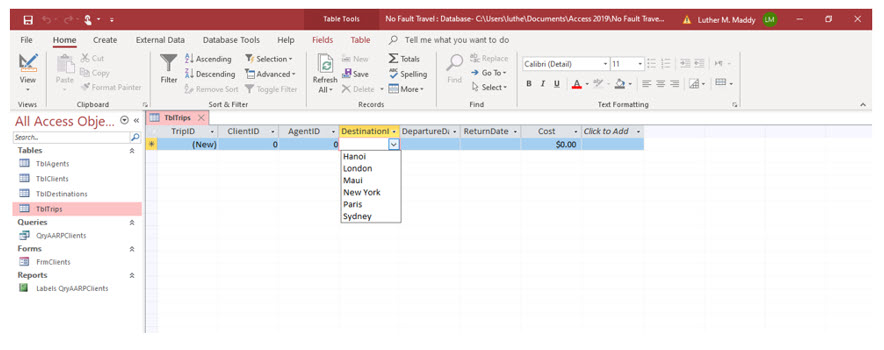
You are now ready to test the lookup field. When you enter Datasheet View, you should notice the destination field has a dropdown list arrow.
12. Display the Tbltrips table in Datasheet View and verify that the DestinationID field is now a lookup field.
As you can see, creating lookup fields makes data entry and editing easier. It also ensures that only data contained in the linked table (destinations in TblDestinations here), can be entered into that field.
Two other fields in this table should also be lookup fields. These are the ClientID and the AgentID fields. In the next few steps, you will turn these fields into lookup fields and link them to the clients and agents tables using the Lookup Wizard.
13. Return to the Design View of TblTrips.
14. In the Data Type column of the ClientID field, click the dropdown list arrow and choose Lookup Wizard.
15. When the Lookup Wizard opens, select the option which links to a table or query. Click Next.
16. In the next step, choose the TblClients table and click Next.
Here you will select the fields to display in the dropdown list for the ClientID field. You will have Access store the client’s identification number but display the client’s first and last names for easier recognition.
17. Select the ClientID, FirstName, and LastName fields.
You can select an individual field by selecting it in the left column and then clicking the single arrow pointing to the right. You can also double click a field to select it.
18. Sort the records by LastName and click Next.
19. Leave the Hide key column option selected and click Next.
20. Choose the default name for this field and click Finish. Answer “Yes” when Access asks if you want to save the table to create relationships.
21. Repeat this process to turn the AgentID field into a lookup field that links to the agents table. Keep the key field hidden.
The columns are empty in the dialog box which asks you about lookup field column width (i.e., dialog box with Hide key column box) because you have not yet entered agent data. You will enter records in this table soon.
Table Validation Rules
Field validation rules allow you to specify the information allowed in a specific field. A field validation rule can only check the information entered into one field. There may be times when you want to verify the data in more than one field, such as comparing two dates, or other values. Table validation rules allow you to compare values in more than one field. For example, in the TblTrips table, both the departure date and return date fields will store trip dates. To help ensure that both dates are entered correctly (and not reversed), a simple validation rule might be to require that the return date occurs after the departure date.
In the next steps, you will create a table validation rule which requires that the return date occurs after the departure date.
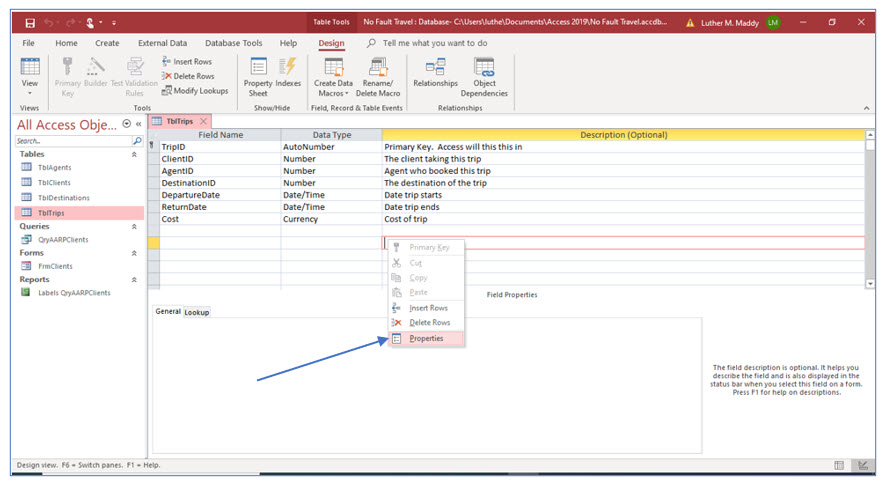
1. In the Design View of TblTrips, notice if the Properties Sheet task pane appears on the right side of the screen.
2. If the task pane is not visible, right-click an empty row in the Description column and select Properties from the shortcut menu.
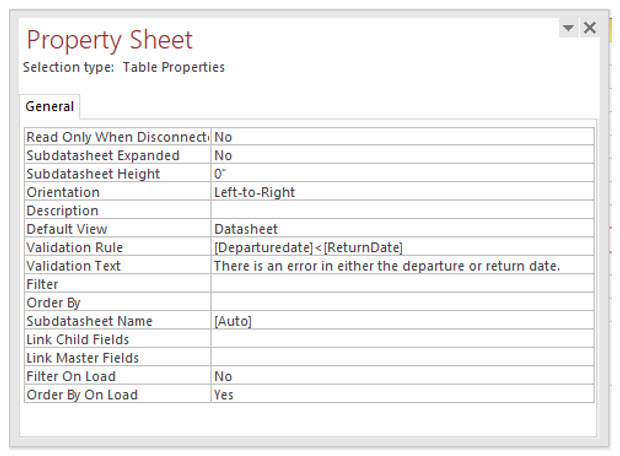
Access should now display the Property Sheet tab. Notice that the selection type is Table Properties. In this sheet you can set properties for the entire table, as opposed to the individual fields in the Field Properties area.
Under the General properties tab, notice Validation Rule and Validation Text. In the Validation Rule row you can specify the rule or condition for valid data in that field. The validation text is the message that Access displays when improper data is entered.
You will now enter an expression (formula) in the validation rule row to have Access compare the return date and departure date for the record being entered or edited.
3. In the Validation Rule row type: [DepartureDate]<[ReturnDate].
When you create expressions, or formulas, field names must be enclosed in brackets, [ ]. If you are typing expressions yourself, you will also want to ensure you spell the field names correctly. You will learn to use the Builder tool that will do some of the typing for you as you continue through this lesson.
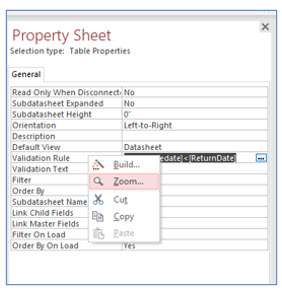
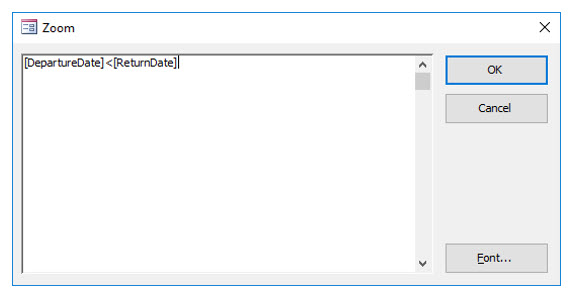
If you would like a larger viewable area to enter this rule, you can increase the size of the Table Properties task pane by dragging its left edge farther left. Alternatively, you can right click on the Validation Rule row and select Zoom from the shortcut menu. (Shift+F2) is a shortcut key combination for zoom as well.
The expression, or formula you entered will cause Access to evaluate these two fields when a record is entered in the table. If the validation rule is not upheld, Access will display the error message contained in the Validation Text row.
4. In the Validation Text row type: There is an error in either the departure or return date.
5. Save and close the table.
You should not have any records in the trips table. If you do, an error message may appear when you try to save the table. If this occurs, erase any records in this table and try the save command again.
6. Close any other open tables.
You will enter data into the agents and trips table in a future lesson.
